



Contents: General information 🠛 Peculiarities 🠛 Pressure sensor 🠛 Programming the sensor in the UECBS 🠛 Programming pressure sensors in the…🠛 Manual programming of the sensor…🠛 Writing codes to memory 🠛 Season of use 🠛
General information
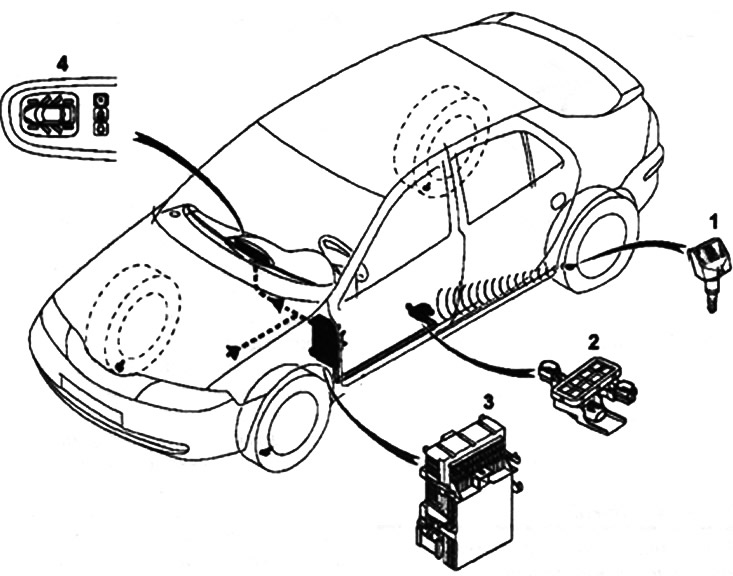
The system consists of:
- four pressure sensors 1 built into the valves (one per wheel) and transmitting radio signals:
- receiver 2, located under the car. It receives and decodes the signals from the sensors, transmits them to the central electronic unit in the cabin (CECBS);
- UEC 3, which receives and processes information from receiver 2 and also determines the message for indication;
- display 4 (special or built into the instrument panel).
This system allows you to constantly monitor the pressure in your car's tires (except for the spare tire).
During operation the system uses:
- four pressure sensors (with built-in valves) in each wheel of the car (except for the spare);
- receiver located under the car;
- electronic control unit integrated into the UEC;
- indicator lights showing the type of fault;
- display with a car icon, allowing you to identify a faulty wheel. On the instrument panel of the maximum configuration, the display shows the pressure values at each start of the car and when a fault is detected.
Peculiarities
Each sensor has a color coded mark around the valve:
- green - left front;
- yellow - right front;
- red - left rear;
- black - right rear.
Attention! It is necessary to install the wheels in strict accordance with the color marking in order to read reliable information about the location of the malfunction on the display or displays (depending on the configuration). Each sensor is recognised by the UCH by its code. If a sensor is replaced, its code must be entered into the UCH depending on its position on the vehicle and its colour mark (see "replacing a sensor").
The tire pressure monitoring system allows you to set the card in the reader to the 2nd fixed position and display the tire pressure with an accuracy of 0.1 bar.
In addition, the system will warn the driver if:
- pressure below 0.6 bar;
- the pressure is too high;
- there is a large air leak from the tire;
- the wheel is faulty;
- the tire pressure on the left and right sides of the vehicle is different.
Pressure sensor
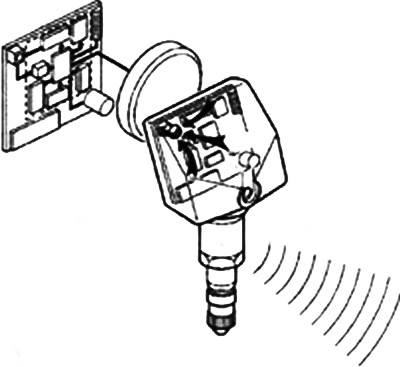
The pressure sensor consists of:
- conventional fan;
- the pressure sensor itself;
- special radio signal transmitter;
- non-removable power supply.
Note: The pressure sensor valve battery is not replaceable. Each sensor is marked with a color code. When replacing a valve, tire or removing a wheel, be sure to take the color of the sensor into account.
Sensors (powered by a built-in power source), continuously measure tire pressure and transmit the relevant information and their identification codes via radio waves.
Programming the sensor in the UECBS
The UCH can identify a second set of tyre pressure sensors. Ensure that the colour coding matches the location of the sensors.
Radio frequency receiver
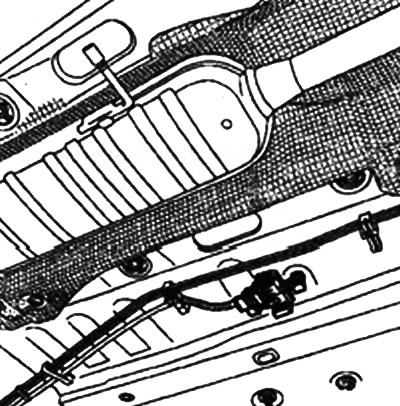
The receiver is located under the vehicle and receives signals from pressure sensors.
It transmits them via the UCHBS wire line. After processing the signals to detect air leaks from the tire (or a punctured tire) or if the tire is underinflated, the UCHBS issues a command to display information on the instrument panel.
Information is transmitted to the driver via:
- alarms showing the type of malfunction (the tire is punctured, the tire is flat, etc.);
- detection of vehicle pictograms, allowing localization of the faulty wheel;
- display built into the instrument panel of the maximum configuration and showing the tire pressure values when starting the engine, as well as displaying faults.
You can find the original at this link [RenaultBook]
Programming pressure sensors in the UCHBS
Note: The presence of tire pressure sensors requires that precautions be taken when removing and installing tires. Failure to do so may result in damage to the sensors and, consequently, to the failure of the pressure monitoring system.

Note: Replacing the sensor requires removing and installing the tires.
There are several ways to enter the sensor code into the UCH. These operations require the use of a diagnostic tool (except XR25):
- manual entry of the sensor code. The code is given on the label attached to the sensor;
- programming the code using the "Ms. 1607 Sensor Exciter" device;
- programming while the vehicle is moving.
Manual programming of the sensor code (code entry)
Set the card in the reader to the 2nd fixed position and use the diagnostic tool to establish a dialogue with the tire pressure monitoring system.
Select the command mode menu then the special command,
Select line SC 001: programming the valve code.
Enter a code of no more than six digits, indicated on the label attached to the sensor.
Confirm the position of the wheel on which this sensor is installed.
Confirm the season of use of the wheel (selected by default if the vehicle has only one set of wheels).
Note: The procedure is identical for programming the codes of four sensors with command SC 002: programming the codes of four sensors Automatic programming of the valve code using the initiator (Ms. 1706).
Set the card in the reader to the 2nd fixed position and use the diagnostic tool to establish a dialogue with the tire pressure monitoring system.
Select the command mode menu then special command.
Select line SC 001: programming the valve code.
Select the position of the sensor to be remembered on the vehicle on the device.
Place the Ms. 1607 device on the tire under the appropriate valve.
Press the switch on the Ms. 1607 device.
Wait until the programming process is complete (the signal lamp will light up).
The diagnostic tool will confirm that the valve code has been received correctly.
Confirm the position of the wheel on which this sensor is installed.
Confirm the season of use of the wheel (selected by default if the vehicle has only one set of wheels).
Note: The procedure is identical for programming the codes of the four valves with the command SC 002: programming the codes of the four sensors. Programming is performed in the following order: left front wheel, right front wheel, right rear wheel, left rear wheel. Automatic programming of the valve code by deflating the wheel.
Note: The valve transmits a message to the receiver including: its code, its pressure and its status. The receiver decodes this information and transmits it to the UCH.
When the car is moving, the valve transmits a message once per minute (if everything is ok) and once every 10 s if it is in state 2 (air leak).
When the vehicle is stationary, the valve transmits a message once per hour (if everything is ok) and once every 15 minutes if there is an air leak.
The valve state can be changed by leakage:
- the car is standing: in this case, wait fifteen minutes for each wheel;
- the car is moving at a speed higher than 20 km/h. This operation can only be carried out sequentially, wheel by wheel.
Set the card in the reader to the 2nd fixed position and use the diagnostic tool to establish a dialogue with the tire pressure monitoring system.
Reduce the tire pressure by about 1 bar.
Select the command mode menu then special command.
Select line SC 001: programming the sensor code.
Conduct a road test.
Confirm the position of the wheel on which this sensor is installed.
Confirm the season of use of the wheel (selected by default if the vehicle has only one set of wheels).
Re-inflate the tire.
Repeat the operation for each valve whose code you want to remember.
Attention! After the programming procedure, one or more valve sensors should be checked.
Writing codes to memory
The codes are presented in the "Parameters" menu, all sensor codes must be different.
Season of use
Allows you to display information on the instrument panel in the menu: "Status". ET 007: "Selected set of wheels: summer or winter".
If the car has only one set of wheels, select the summer season.
If the UCH has stored two codes, the season selection occurs automatically during the first trip, to change the season of use using the diagnostic tool:
Select: "Command mode, set parameters" and point to: VP 002 "Select a set of wheels".
Move the cursor to the winter button Press enter, use the arrows above and below to select the climate type, then confirm,
Press the blue button again, the save window will open. Select: "Yes" to confirm.
Recommended pressure values Recommended maximum and minimum pressure values can be viewed in menu 8: "Parameters". To change these values, select: "Command mode, setting parameters", VP 009: "Entering the recommended pressure".