
English Русский
Български
Беларускі
Український
Српски
Hrvatski
Română
Polski
Slovenský
Magyar
Bookmark Contacts Articles Sitemap
Company vehicles Peugeot Company vehicles Opel Company vehicles Skoda Company vehicles Land Rover Company vehicles Mitsubishi Company vehicles Volkswagen Company vehicles Honda
RenaultBook.ru


Duster   Fluence   Kangoo   Laguna   Logan   Megane   Sandero   Scenic   Symbol   Clio   Other
Renault 19 (1988-1996) Espace I and II (1984-1996) Espace III (1996-2002)

Lifting a car (Renault Espace I)

  • Main
  • Renault
  • Espace I and II (1984-1996)
  • General information
  • Introduction to the guide
  • Lifting a car
0
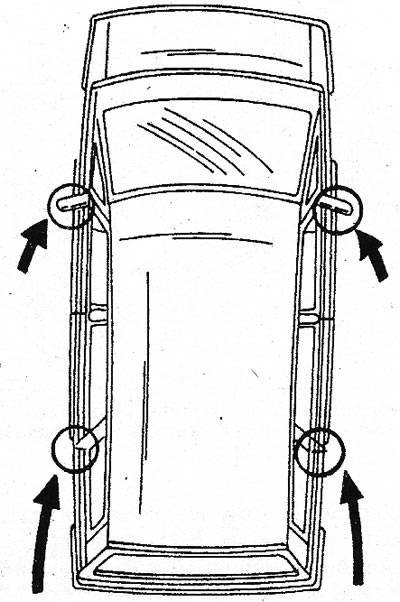
5.1 The car jack is installed only at certain points. The same applies to the car lift.
5.1 The car jack is installed only at certain points. The same applies to the car lift.


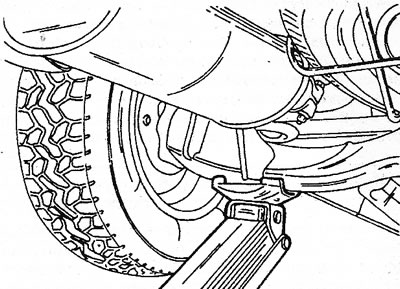
5.2 The rear of the vehicle may be jacked up as shown in the figure, but under no circumstances in…

5.2 The rear of the vehicle may be jacked up as shown in the figure, but under no circumstances in the middle of the rear axle.


To avoid damage to the underside of the vehicle, both the jack and various lifts must be installed only under the areas of the body specifically designed for them. Under no circumstances should the jack be installed under the front wheel suspension bracket or under the middle of the rear axle. When lifting the front of the vehicle, a wooden block must be placed between the jack head and the body and the jack must be installed under the front auxiliary frame, located directly behind the front crossmember.


The rear of the vehicle is jacked up as shown in Illustration 5.1. It can also be raised as shown in Illustration 5.2. The head of the vehicle jack is then positioned under the suspension.

When lifting the vehicle, be careful not to damage any body parts. Before attempting to lift the rear of the vehicle, place the gearshift lever in reverse or 1st gear on manual transmission models, or in park on automatic transmission models, to prevent the vehicle from rolling off the lift. When lifting the front of the vehicle, apply the parking brake. The rear wheels should be blocked on both sides just in case. Be sure to ensure that the surface on which the lift is installed is solid, so that the lift does not sink while the vehicle is being jacked up. This process can be prevented by placing wide boards under the lift.

The lift can only be installed on the sides of the body or under the rear cross member. Illustration 5.1 shows where the lift should be installed when lifting the front or rear of the car. When installing the lift, try not to damage the paintwork. It is best to drive the car onto a ramp for repair work.
This article is available on: russian, bulgarian, belarusian, ukrainian, serbian, croatian, romanian, polish, slovak, hungarian
Article has been reviewed by editor: Fedoseev Denis
Share with friends:
Previous
Espace I and II: Introduction to the guide
Next

Working conditions and tools
General instructions for carrying out repair work
Vehicle marking and identification
Introduction to the manual
Vehicle specifications
Maintenance and care
Lubricants, sealant
Other articles on other Renault models

➽ Lifting and towing a car Renault Fluence 1 (2009-2020, petrol)
➽ Lifting equipment Renault Laguna 2 (2001-2007)
➽ Safe car lifting Renault Logan 1 (2004-2012, petrol)
➽ Lifting the car and changing the wheel Renault Symbol 1 (1999-2008, petrol)
Link to this article in different formats
Reviews and comments of visitors
No comments yet


Add two numbers 35 + 25


Renault 19 (1988-1996) 
  • General information
  • Maintenance
  • Power unit
  • Engine repair
  • Exhaust system
  • Cooling system
  • Supply system
  • Single-point injection
  • Multi-point injection
  • Diesel injection system
  • Transmission
  • Clutch
  • Car gearbox
  • Chassis, running gear
  • Car suspension
  • Steering
  • Brake system
  • Wheels and tires
  • Body and interior
  • Exterior (external elements)
  • Interior (internal elements)
  • Heating and ventilation
  • Electrical equipment
  • Equipment and devices
  • Headlights and lighting
  • Ignition system
  • Power devices
  • Electrical circuits
Espace I and II (1984-1996) 
  • General information
  • Introduction to the guide
  • Troubleshooting
  • Power unit
  • Engine repair
  • Cooling system
  • Carburetor fuel system
  • Injection fuel system
  • Diesel fuel system
  • Ignition system
  • Transmission
  • Clutch
  • Car gearbox
  • Drive shafts
  • Chassis, running gear
  • Brake system
  • Steering
  • Front suspension
  • Rear suspension
  • Body and interior
  • Exterior (external elements)
  • Interior (internal elements)
  • Doors, locks and windows
  • Electrical equipment
  • Equipment and devices
  • Electrical circuits
Espace III (1996-2002) 
  • General information
  • Introduction to the manual
  • User manual
  • Power unit
  • Petrol engines F3R
  • Petrol engines Z7X
  • Diesel engines G8T
  • Diesel engines G9T
  • Transmission
  • Clutch
  • Mechanical gearbox
  • Automatic gearbox
  • Drive shafts
  • Chassis, running gear
  • Steering
  • Front suspension
  • Rear suspension
  • Brake system
  • Body and interior
  • Exterior (external elements)
  • Interior (internal elements)
  • Doors, locks and windows
  • Heating and ventilation
  • Electrical equipment
  • Equipment and instruments
  • Power devices
  • Electrical circuits
RenaultBook.ru © 2018–2026 | Mobile version | News and articles | Sitemap: EN BG BY UA RS HR RO PL SK HU | Administration | Site search | Bookmark
Duster 1 (2009-2017) | Fluence 1 (2009-2020, petrol) | Kangoo 1 (1997-2007) | Laguna 2 (2001-2007) | Logan 1 (2004-2012, petrol) | Logan 2 (2012-2020) | Megane 1 (1995-2002) | Megan 2 (2002-2009, petrol) | Sandero 1 (2007-2012, petrol) | Scenic 1 (1996-2003) | Symbol 1 (1999-2008, petrol) | Symbol 2 (2008-2013, petrol) | Renault 19 (1988-1996) | Espace I and II (1984-1996) | Espace III (1996-2002) | Clio 1 (1990-1998) |
We want your visit to be comfortable 😌 and use cookies 🍪 to do so.