
English Русский
Български
Беларускі
Український
Српски
Hrvatski
Română
Polski
Slovenský
Magyar
Bookmark Contacts Articles Sitemap
Company vehicles Peugeot Company vehicles Opel Company vehicles Skoda Company vehicles Land Rover Company vehicles Mitsubishi Company vehicles Volkswagen Company vehicles Honda
RenaultBook.ru


Duster   Fluence   Kangoo   Laguna   Logan   Megane   Sandero   Scenic   Symbol   Clio   Other
Clio 1 (1990-1998)

Temperature indicator and warning light sensor — checking serviceability, removal and installation (Renault Clio 1)

  • Main
  • Clio
  • Clio 1 (1990-1998)
  • Power unit
  • Cooling and heating
  • Temperature indicator and warning light sensor — checking serviceability, removal and installation
0
Contents: Checking the serviceability 🠛 Removal 🠛 Installation 🠛
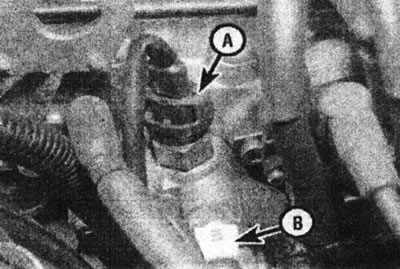
1. The location of the indicator lamp sensor and temperature gauge varies depending on the model. On C series engines it is located on the water pump. On D-series engines, the sensor is located at the rear of the thermostat housing. On F3P engines it is located in the left front corner of the cylinder head. On the F7P engine (with 16 valves) the sensor is screwed into the thermostat housing (see illustration).

8.1. Temperature sensor (A) - engine F7P (with 16 valves); the fuel injection system temperature…

8.1. Temperature sensor (A) - engine F7P (with 16 valves); the fuel injection system temperature sensor (B) is also visible.


In all cases, the procedures described are the same.

Checking the serviceability


2. Disconnect the multi-pin connector from the sensor (see illustration).

[Information is located on the website: www.renaultbook.ru]
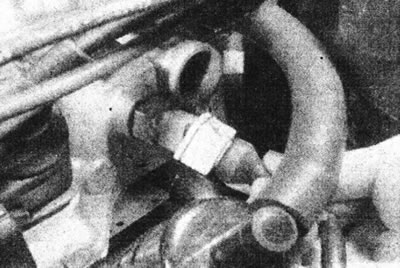
8.2. Disconnect the connector from the coolant temperature gauge sensor - F3P engine.

8.2. Disconnect the connector from the coolant temperature gauge sensor - F3P engine.


Measure the resistance of the sensor and compare the result with the data given in Specifications. If the obtained value differs significantly from the norm, the sensor is probably faulty.

3. For accurate testing of serviceability over the entire temperature range, the sensor must be removed. Place the sensor in a container of water as described for the thermostat in Chapter 5 and measure the resistance of the sensor at different temperatures.

Removal


Note: A suitable sealant will be required during installation.


4. Drain the cooling system (see Section 1). Alternatively, remove the expansion tank cap (to relieve pressure in the system) and prepare a new sensor or a suitable plug.

5. Disconnect the multi-pin connector and unscrew the sensor.

Installation


6. Apply a small amount of sealant to the sensor threads and screw it into place. Connect the multi-pin connector.

7. Bring the coolant level in the cooling system to normal (Section 1).
This article is available on: russian, bulgarian, belarusian, ukrainian, serbian, croatian, romanian, polish, slovak, hungarian
Article has been reviewed by editor: Fedoseev Denis
Share with friends:
Previous
Clio 1: Cooling and heating
Next

Fan Thermal Switch — checking functionality, removal and installation
Electric fan assembly — removal and installation
Thermostat — removal, checking for serviceability and installation
Expansion tank — removal, inspection and installation
Radiator — removal, inspection, cleaning and installation
Water pump — removal and installation
Auxiliary water pump (models with F7P 16-valve engine) — removal and…
Heating system — general description and operation check
Heater Components — removal and installation
Heating system air ducts and deflectors — removal and installation
Other articles on other Renault models

➽ Replacing the oil pressure warning light sensor Renault Logan 1 (2004-2012, petrol)
➽ Checking, removing and installing the coolant temperature sensor Renault Megane 1 (1995-2002)
➽ Replacing the oil pressure warning light sensor Renault Sandero 1 (2007-2012, petrol)
➽ Checking, removing and installing the coolant temperature sensor Renault Symbol 1 (1999-2008, petrol)
➽ Fuel temperature sensor Renault Duster 1 (2009-2017)
Link to this article in different formats
Reviews and comments of visitors
No comments yet


Add two numbers 46 + 16


Clio 1 (1990-1998) 
  • General information
  • Maintenance
  • Troubleshooting
  • Power unit
  • Petrol engines 1.1 l (C)
  • Petrol engines 1.2 l (D)
  • Petrol engines 1.2/1.4 l (E)
  • Petrol engines 1.8 l (F)
  • Diesel engines
  • Overhaul of engines
  • Cooling and heating
  • Fuel system (carburetor)
  • Central fuel injection
  • Distributed fuel injection
  • Fuel system (diesel)
  • Starting and charging system
  • Ignition system (transistor)
  • Ignition system (electronic)
  • Pre-heating of diesel engines
  • Transmission
  • Clutch
  • Manual gearbox
  • Automatic gearbox
  • Drive shafts
  • Chassis, running gear
  • Brake system
  • Car suspension
  • Steering system
  • Body and interior
  • Exterior (external elements)
  • Doors, locks and windows
  • Electrical equipment
  • Equipment and devices
  • Electrical circuits
RenaultBook.ru © 2018–2026 | Mobile version | News and articles | Sitemap: EN BG BY UA RS HR RO PL SK HU | Administration | Site search | Bookmark
Duster 1 (2009-2017) | Fluence 1 (2009-2020, petrol) | Kangoo 1 (1997-2007) | Laguna 2 (2001-2007) | Logan 1 (2004-2012, petrol) | Logan 2 (2012-2020) | Megane 1 (1995-2002) | Megan 2 (2002-2009, petrol) | Sandero 1 (2007-2012, petrol) | Scenic 1 (1996-2003) | Symbol 1 (1999-2008, petrol) | Symbol 2 (2008-2013, petrol) | Renault 19 (1988-1996) | Espace I and II (1984-1996) | Espace III (1996-2002) | Clio 1 (1990-1998) |
We want your visit to be comfortable 😌 and use cookies 🍪 to do so.