
Note. The headlight and direction indicator are mounted in one unit.
Removing
- disconnect the wire from the negative terminal of the battery;
- remove the front bumper and grille (see section «Body»);
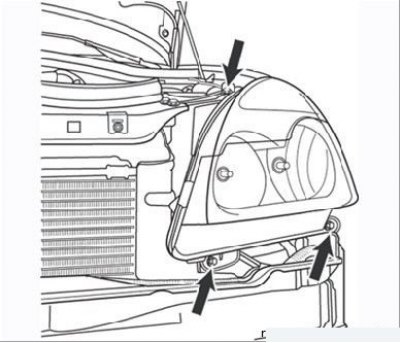
Figure 8.19. headlight mounting bolts
- remove the headlight bolts (Figure 8.19);
- Disconnect the connectors and remove the headlamp.
Installation
Installation is carried out in the reverse order of removal.
After installation, it is necessary to adjust the beam of headlights. To do this, do the following:
- park the car on level ground (do not apply the parking brake);
- make sure that the car is not loaded, the fuel tank must be full (if possible);
- set the headlight range control knob to position «0»;
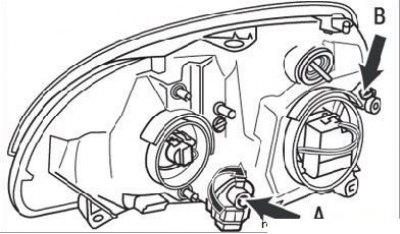
Figure 8.20. Headlight Beam Adjustment Screws: A - in the vertical plane; B - in the horizontal plane
- adjust the headlight beam as shown below. The headlight beam adjustment screws are shown in Figure 8.20.
Headlight Bulb Replacement
Replacement order:
- disconnect the wire from the negative terminal of the battery;
- disconnect the connector from the headlight in the engine compartment;
- remove the rubber seal from the back of the headlight;
- remove the spring clip of the lamp;
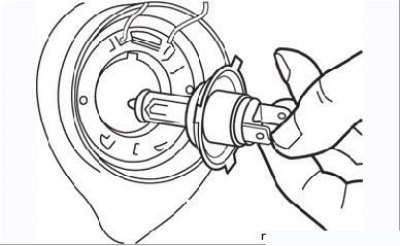
Figure 8.21. Removing the headlight bulb
- carefully remove the lamp from the socket, holding it by the contact leads (Figure 8.21).
When installing, do not touch the glass part of the halogen lamp with your fingers. Before installation, wipe the lamp bulb with a clean cloth dampened with alcohol. Traces of dirt and grease cause excessive heating of the lamp bulb and its rapid burnout.
Installing the lamp is carried out in the reverse order of removal. Check headlight operation.
Xenon headlights
Xenon headlight bulbs do not have a filament. Light radiation in such lamps is generated by two electrodes enclosed in a quartz flask containing a gas compressed under high pressure (xenon).
The electronic unit built into the headlight is powered by a car battery (12 V), creates a voltage pulse of 20,000 V, necessary for the ionization of an inert gas, and then generates an alternating voltage of 85 V to maintain the discharge.
All work related to the maintenance of xenon headlights is recommended to be carried out at a Renault station.
Beam Positioner
Removing
1. Remove the headlight.
2. Turn the knob (A) 1/8 turn and remove it from the headlight housing.
3. Disconnect the governor actuator ball joint by tilting the governor slightly.

Installation
Installation is carried out in the reverse order. After installing the headlight, adjust the position of the beam with the screws (IN) And (WITH).
Regulator connector
Terminal 1 - "Earth", Terminal 2 - Control, Terminal 3 - Power.