
English Русский
Български
Беларускі
Український
Српски
Hrvatski
Română
Polski
Slovenský
Magyar
Bookmark Contacts Articles Sitemap
Company vehicles Peugeot Company vehicles Opel Company vehicles Skoda Company vehicles Land Rover Company vehicles Mitsubishi Company vehicles Volkswagen Company vehicles Honda
RenaultBook.ru


Duster   Fluence   Kangoo   Laguna   Logan   Megane   Sandero   Scenic   Symbol   Clio   Other
Symbol 1 (1999-2008, petrol) Symbol 2 (2008-2013, petrol)

Disassembly, inspection and assembly of the oil pump (Renault Symbol 1)

  • Main
  • Symbol
  • Symbol 1 (1999-2008, petrol)
  • Power unit
  • Cooling and lubrication system
  • Disassembly, inspection and assembly of the oil pump
0
Work order:
  • remove the oil pump as described earlier;
  • unscrew the mounting bolts, remove the cover and oil receiver;
  • remove the pin, adjusting screw, spring and plunger of the pressure reducing valve;
  • carefully inspect the pump gears and the pressure reducing valve parts. No external damage or increased wear is allowed;
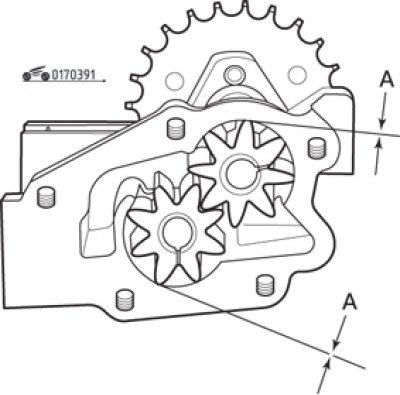
Fig. 3.91. Measuring the clearance (A) between the gears and the oil pump housing

Fig. 3.91. Measuring the clearance (A) between the gears and the oil pump housing

  • measure the gap between the pump body and the gears (Fig. 3.91), it should be within 0.110–0.249 mm;
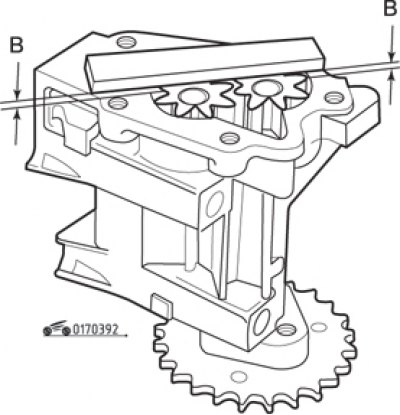
Fig. 3.92. Measuring the axial clearance (B) of the oil pump gears

Fig. 3.92. Measuring the axial clearance (B) of the oil pump gears

  • measure the axial clearance of the gears (Fig. 3.92). The clearance should not be more than 0.020–0.086 mm. If the clearances exceed the permissible limits, replace the oil pump;
  • check the flatness of the cover adjacent to the pump body.

If the condition of the pump parts is satisfactory, assemble the pump in the reverse order of removal, fill the housing with clean engine oil and install, tightening the bolts to the required torque.


Checking the oil pressure in the lubrication system


Disconnect the wires from the oil pressure warning light sensor, unscrew the sensor and screw in the pressure gauge hose fitting in its place.

Start the engine and warm it up to an oil temperature of 80°C. Measure the oil pressure at idle and at a crankshaft speed of 3000 мин⁻¹, which should be 1 and 3 bar, respectively.

Disconnect the control pressure gauge, install the sensor and connect the wires to it.

(View the original source on this resource: RenaultBook)
This article is available on: russian, bulgarian, belarusian, ukrainian, serbian, croatian, romanian, polish, slovak, hungarian
Article has been reviewed by editor: Podkrepilov Maxim
Share with friends:
Previous
Symbol 1: Cooling and lubrication system
 

General information about the engine lubrication system
Removal, checking and installation the thermostat
Checking, removing and installing the coolant temperature sensor
Removal and installation the radiator
Removal and installation an electric fan
 
Other articles on other Renault models

➽ Oil pump — removal and installation Renault Duster 1 (2009-2017)
➽ Removal the water pump inlet pipe Renault Fluence 1 (2009-2020, petrol)
➽ Oil pump Renault Kangoo 1 (1997-2007)
➽ Checking fuel pump performance (all engines) Renault Laguna 2 (2001-2007)
➽ Replacing the chain and gear of the oil pump drive Renault Logan 1 (2004-2012, petrol)
Link to this article in different formats
Reviews and comments of visitors
No comments yet


Add two numbers 32 + 30


Symbol 2 (2008-2013, petrol) 
  • General information
  • User manual
  • Maintenance
  • Power unit
  • Engine repair
  • Cooling system
  • Fuel system
  • Exhaust system
  • Ignition system
  • Transmission
  • Clutch
  • Mechanical gearbox
  • Automatic gearbox
  • Drive shafts
  • Chassis, running gear
  • Front suspension
  • Rear suspension
  • Steering
  • Brake system
  • Body and interior
  • Exterior (external elements)
  • Interior (internal elements)
  • Doors, locks and windows
  • Heating and ventilation
  • Electrical equipment
  • Equipment and devices
  • Headlights and lighting
  • Power devices
  • Electrical circuits
Symbol 1 (1999-2008, petrol) 
  • General information
  • User manual
  • Car care
  • Maintenance
  • Power unit
  • Engine repair
  • Cooling and lubrication system
  • Supply system
  • Exhaust system
  • Ignition system
  • Transmission
  • Clutch
  • Mechanical gearbox
  • Automatic gearbox
  • Drive shafts
  • Chassis, running gear
  • Car suspension
  • Steering
  • Brake system
  • Body and interior
  • Exterior (external elements)
  • Interior (internal elements)
  • Doors, locks and windows
  • Restoration and repair
  • Electrical equipment
  • Equipment and devices
  • Headlights and lighting
  • Power devices
  • Heating and ventilation
  • Electrical circuits
RenaultBook.ru © 2018–2026 | Mobile version | News and articles | Sitemap: EN BG BY UA RS HR RO PL SK HU | Administration | Site search | Bookmark
Duster 1 (2009-2017) | Fluence 1 (2009-2020, petrol) | Kangoo 1 (1997-2007) | Laguna 2 (2001-2007) | Logan 1 (2004-2012, petrol) | Logan 2 (2012-2020) | Megane 1 (1995-2002) | Megan 2 (2002-2009, petrol) | Sandero 1 (2007-2012, petrol) | Scenic 1 (1996-2003) | Symbol 1 (1999-2008, petrol) | Symbol 2 (2008-2013, petrol) | Renault 19 (1988-1996) | Espace I and II (1984-1996) | Espace III (1996-2002) | Clio 1 (1990-1998) |
We want your visit to be comfortable 😌 and use cookies 🍪 to do so.