
- Type: Valeo A 11 VI 87.
- Rated output current: 75 A.
Diagnostics
After 15 minutes warm up (in steady state) at a voltage of 13.5 V at the terminals.
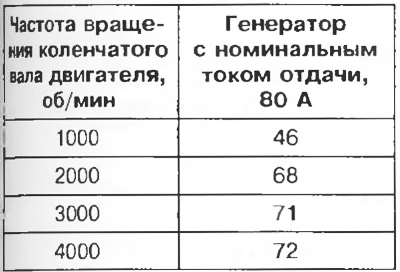
Table 3.9
These vehicles are equipped with alternators with internal ventilation, built-in voltage regulator and warning light in the instrument panel, the second works as follows:
- when the ignition is turned on, the lamp lights up;
- after starting the engine, the lamp goes out;
- If the lamp comes on again while the engine is running, this indicates a malfunction in the battery charging circuit.
Troubleshooting
The signal lamp does not light up when the ignition is switched on.
Check:
- reliability of electrical connections;
- is the lamp burnt out (to do this, connect the circuit to ground, the lamp should turn on).
The warning light comes on while the engine is running.
This indicates a malfunction of the charging target, which is caused by:
- breakage of the generator drive belt, breakage of the wire between the generator and the battery;
- damage to the internal parts of the generator (rotor, stator, diodes or brushes);
- voltage regulator malfunction;
- too high output voltage.
The customer complains about the lack of charging, and the signal light works fine.
If the regulated voltage is below 13.5V, check the alternator
The cause of the malfunction may be:
- destruction of the diode;
- phase break;
- the formation of soot on the slip rings or their wear.
Voltage test
Connect a voltmeter to the battery terminals, measure its voltage.
Start the engine and increase its speed until the voltmeter needle stabilizes at the regulated voltage.
This voltage must be between 13.5V and 14.8V.
Attention! When performing work on the car, connected with electric welding, be sure to disconnect the battery and the voltage regulator.
Removal and installation
Required special tool
- Mot. 1273 Belt Tension Tester
1. Place the vehicle on a two post lift.
2. Disconnect the storage battery, and also electric sockets of the generator.
3. Remove the alternator and booster pump drive belts.
4. Remove the generator.
5. Installation is made in an order, the return to removal.
6. Tension the belt with the bolt 1 and tighten the nut 2 after measuring the belt tension.
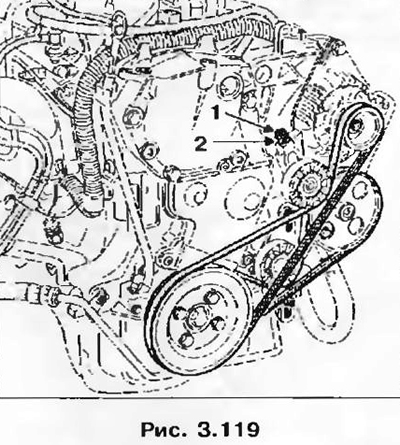
Belt tension adjustment values are given in chapter «Maintenance».