English Русский
Български
Беларускі
Український
Српски
Hrvatski
Română
Polski
Slovenský
Magyar
Bookmark Contacts Articles Sitemap
Company vehicles Peugeot Company vehicles Opel Company vehicles Skoda Company vehicles Land Rover Company vehicles Mitsubishi Company vehicles Volkswagen Company vehicles Honda
RenaultBook.ru


Duster   Fluence   Kangoo   Laguna   Logan   Megane   Sandero   Scenic   Symbol   Clio   Other
Fluence 1 (2009-2020, petrol)

Assembly of the K4M engine main cylinder (Renault Fluence 1)

  • Main
  • Fluence
  • Fluence 1 (2009-2020, petrol)
  • Power unit
  • Engine repair
  • Assembly of the K4M engine main cylinder
0
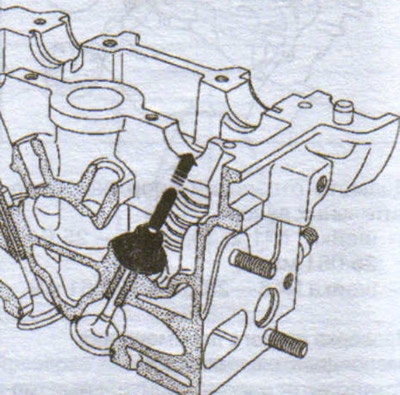
Insert the valve into the cylinder head.

Place the tip of the tool (Mot. 1511) on the valve stem (the inner diameter of the tip must be equal to the diameter of the rod).

Keep the valve pressed against the seat.
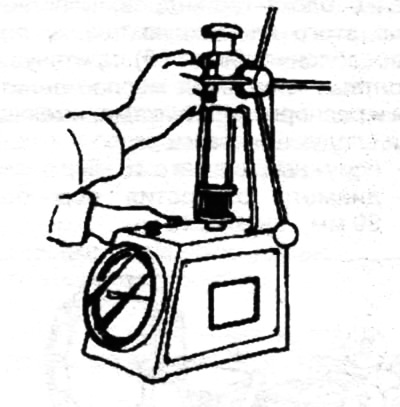
Checking the spring calibration
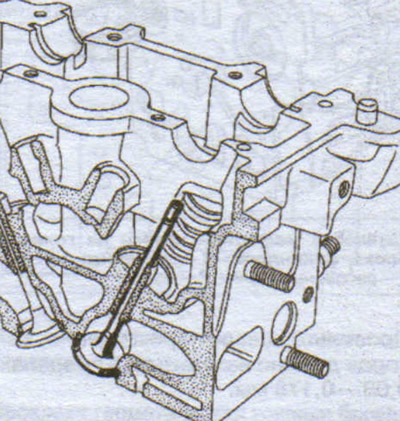
Checking the spring calibration


Assembly of the K4M engine main cylinder


Install the oil seal (not oiled) on the tip.

Slide the oil seal until it passes over the tip.


Remove the tip.

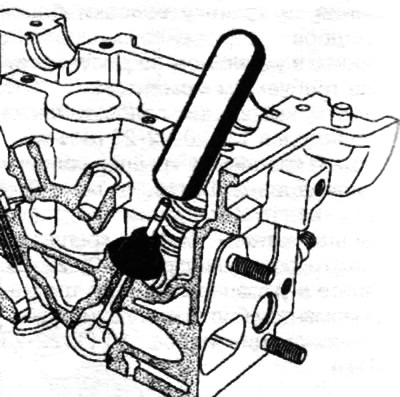
Install the mandrel onto the oil seal.
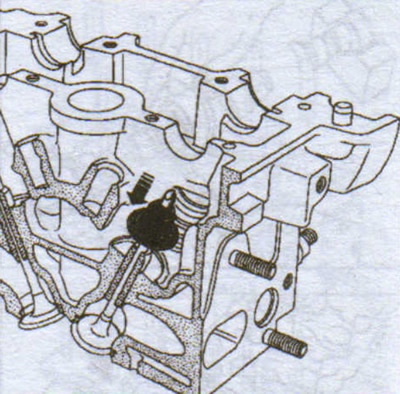
Install the mandrel onto the oil seal.

Install the mandrel onto the oil seal.


Note: The inside diameter of the mandrel should match the diameter of the valve stem. In addition, the bottom of the mandrel should partially rest against the valve stem seal, which serves as a support washer for the valve spring.


Press on the valve stem seal by tapping the top of the mandrel with your palm until the valve stem seal contacts the cylinder head.
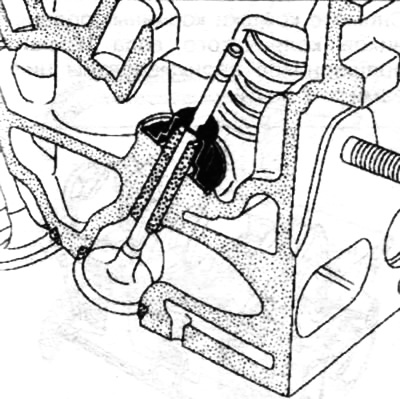


Press on the valve stem seal by tapping the top of the mandrel with your palm until the valve stem…


Repeat the above operations for all valves.
Install the springs and plates.
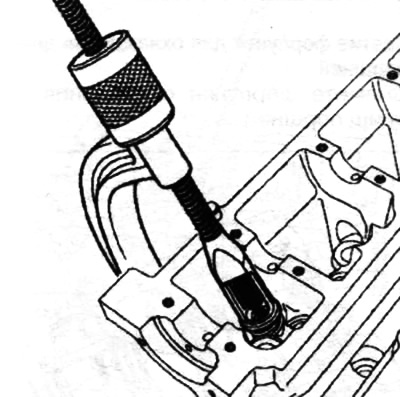
Install the springs and plates.


Insert the croutons using curved tongs.
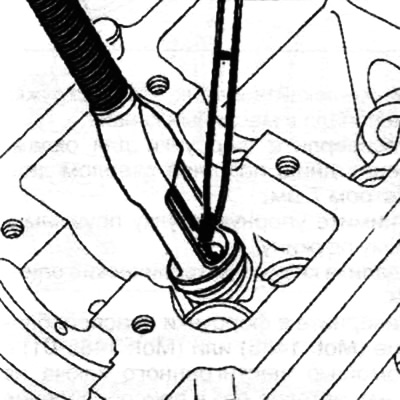
Insert the croutons using curved tongs.


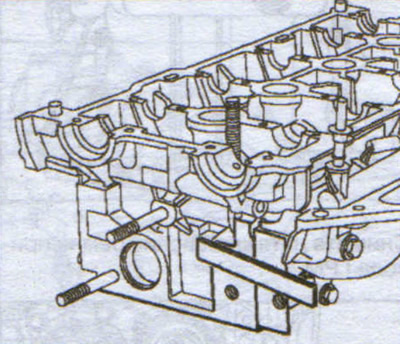
Install the thermostat assembly with a new gasket onto the cylinder head.

Tighten the thermostat assembly mounting bolts on the cylinder head in the order shown in the figure to the required torque (10 Nm).
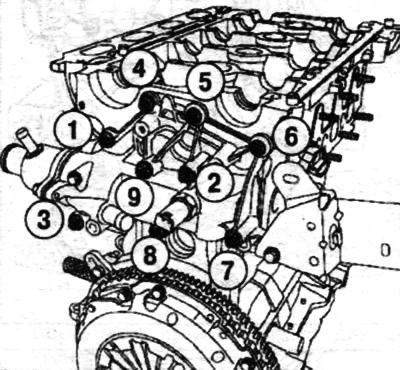


Tighten the thermostat assembly mounting bolts on the cylinder head in the order shown in the…


Install the exhaust manifold with a new gasket.

Tighten the exhaust manifold mounting stud nuts in the order shown in the figure to the required torque (23 Nm).

Install the exhaust manifold heat shield.

Tighten the exhaust manifold heat shield mounting bolts to the specified torque (1 Nm).

Caution: Make sure the exhaust manifold heat shield is securely fastened between the oxygen sensor and the manifold (to avoid overheating, which could result in damage to the upstream oxygen sensor wiring).


Tighten the oxygen sensor to the specified torque (4.5 Nm) using the tool (Mot. 1495). Install the inner timing case spacer.

Install the injector housing linings with a new gasket.

Install the oxygen sensor. Align the injector housing lining with the cylinder head (from the timing drive side).

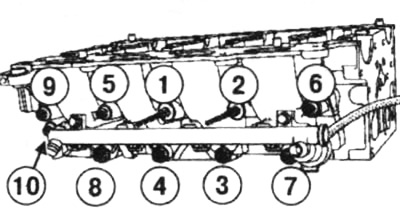
Align the mating planes of the injector housing linings with the cylinder head. Tighten the injector housing lining bolts in the specified order to the required torque (21 Nm).
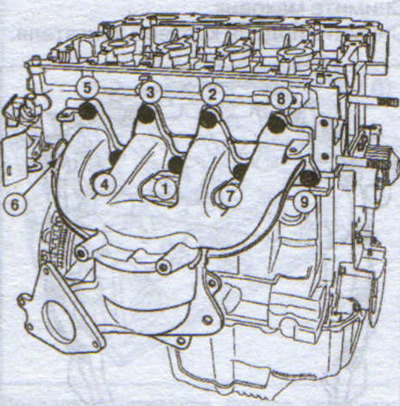
Align the mating planes of the injector housing linings with the cylinder head. Tighten the…

Align the mating planes of the injector housing linings with the cylinder head. Tighten the…
This article is available on: russian, bulgarian, belarusian, ukrainian, serbian, croatian, romanian, polish, slovak, hungarian
Article has been reviewed by editor: Podkrepilov Maxim
Share with friends:
Previous
Fluence 1: Engine repair
Next

Checking the valve springs of the K4M engine
Checking the clearance between the rods and the valve guides of the…
Checking the valves of the K4M engine
Checking the axial displacement of the camshafts of the K4M engine
Checking the diameters of the bearing journals and bearing holes of…
Cylinder block and crankshaft of the K4M engine
Cleaning the lower part of the K4M engine
Checking the mating surface of the K4M engine cylinder block
Checking the diameter of the main bearing supports of the K4M engine…
Checking the diameters of the main and connecting rod journals of the…
Other articles on other Renault models

➽ Disassembly, inspection and assembly of the cylinder block… Renault Laguna 2 (2001-2007)
➽ Disassembly and assembly of the cylinder head, K7M engine (8… Renault Logan 2 (2012-2020)
➽ Installing main bearing shells in the cylinder block bed Renault Megan 2 (2002-2009, petrol)
➽ Cylinder Liner Protrusion (1.4L/E7J Petrol Engine) — Check Renault Scenic 1 (1996-2003)
➽ Engine cylinder head repair Renault Symbol 2 (2008-2013, petrol)
Link to this article in different formats
Reviews and comments of visitors
No comments yet


Add two numbers 11 + 40


Fluence 1 (2009-2020, petrol) 
  • General information
  • Maintenance
  • Governing bodies
  • Car driving
  • Power unit
  • Engine repair
  • Cooling and lubrication system
  • Fuel system
  • Fuel injection
  • Transmission
  • Clutch and drive shafts
  • Mechanical gearbox
  • Automatic gearbox
  • Chassis, running gear
  • Front suspension
  • Rear suspension
  • Steering
  • Brake system
  • Body and interior
  • Exterior (external elements)
  • Interior (internal elements)
  • Doors, locks and windows
  • Air conditioning
  • Electrical equipment
  • Power devices
  • Fuses and relays
  • Headlights and lighting
  • Equipment and devices
  • Safety system
  • Electrical circuits
RenaultBook.ru © 2018–2026 | Mobile version | News and articles | Sitemap: EN BG BY UA RS HR RO PL SK HU | Administration | Site search | Bookmark
Duster 1 (2009-2017) | Fluence 1 (2009-2020, petrol) | Kangoo 1 (1997-2007) | Laguna 2 (2001-2007) | Logan 1 (2004-2012, petrol) | Logan 2 (2012-2020) | Megane 1 (1995-2002) | Megan 2 (2002-2009, petrol) | Sandero 1 (2007-2012, petrol) | Scenic 1 (1996-2003) | Symbol 1 (1999-2008, petrol) | Symbol 2 (2008-2013, petrol) | Renault 19 (1988-1996) | Espace I and II (1984-1996) | Espace III (1996-2002) | Clio 1 (1990-1998) |
We want your visit to be comfortable 😌 and use cookies 🍪 to do so.