
English Русский
Български
Беларускі
Український
Српски
Hrvatski
Română
Polski
Slovenský
Magyar
Bookmark Contacts Articles Sitemap
Company vehicles Peugeot Company vehicles Opel Company vehicles Skoda Company vehicles Land Rover Company vehicles Mitsubishi Company vehicles Volkswagen Company vehicles Honda
RenaultBook.ru


Duster   Fluence   Kangoo   Laguna   Logan   Megane   Sandero   Scenic   Symbol   Clio   Other
Duster 1 (2009-2017)

Bypass valve (Renault Duster 1)

  • Main
  • Duster
  • Duster 1 (2009-2017)
  • Power unit
  • Diesel injection system (K9K)
  • Bypass valve
0
Contents: Removal 🠛 Installation 🠛
Tightening torques: Bypass valve mounting bolt - 6 Nm.

Important note.
  • Before carrying out work on the injection system, make sure using a diagnostic tool: that the pressure in the fuel rail is relieved, that the fuel temperature is not high.
  • When performing any work, the instructions for cleanliness and safety given in this document must be observed. It is strictly forbidden to perform any work on the injection system with the engine running.


Note: Before opening the fuel supply system, make sure that a new bypass valve is present.


Removal


Disconnect the battery.

Remove the top engine cover.

Remove the dipstick tube and filler neck mounting nuts (1).
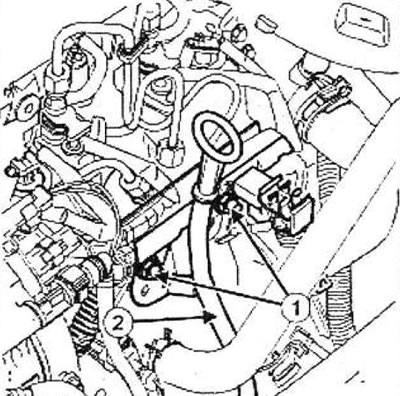
Remove the dipstick tube and filler neck mounting nuts (1).


Move the dipstick tube (2) to the side.

Disconnect the fuel supply and return lines (3).
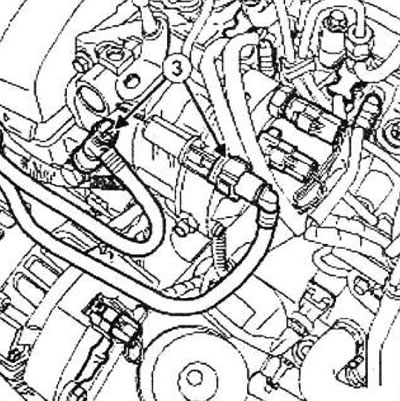
Disconnect the fuel supply and return lines (3).


Disconnect the fuel drain line (4) connecting the injector to the high-pressure fuel pump.
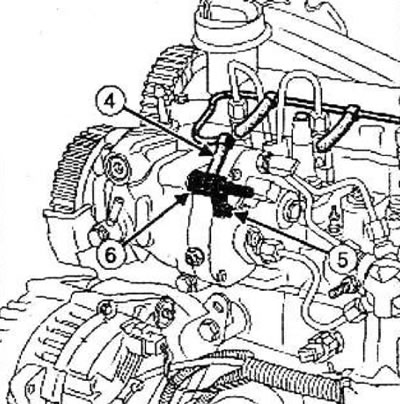


Disconnect the fuel drain line (4) connecting the injector to the high-pressure fuel pump.


Remove:
  • bolt (5) of the bypass valve (6),
  • bypass valve.

Install plugs on the holes.

Installation


Attention! Remove the plugs immediately before installing the part in place.


Lubricate the sealing ring with the grease from the tube included with the new part.

Parts that must be replaced: bypass valve.

Note: Do not damage the gasket during installation.


Replace the relief valve.

Tighten the bypass valve mounting bolt to the required torque (6 Nm).

Connect the fuel drain line connecting the injector to the high-pressure fuel pump.

Connect the battery.

Start the engine.

Check for fuel leaks.

Install the top engine cover.
This article is available on: russian, bulgarian, belarusian, ukrainian, serbian, croatian, romanian, polish, slovak, hungarian
Article has been reviewed by editor: Fedoseev Denis
Share with friends:
Previous
Duster 1: Diesel injection system (K9K)
Next

Fuel supply regulator
High pressure fuel pump (HPFP)
Crankshaft position sensor
Camshaft Position Sensor
Diesel injection system control unit
High pressure pipeline — inspection
High pressure pipeline between the fuel injection pump and the rail
High pressure pipe between the rail and the injector
Fuel distribution rail
Fuel temperature sensor
Other articles on other Renault models

➽ Removal valve springs of the K4M engine Renault Fluence 1 (2009-2020, petrol)
➽ Adjusting clearances in the valve drive mechanism Renault Kangoo 1 (1997-2007)
➽ Checking the valve opening pressure Renault Laguna 2 (2001-2007)
➽ Adjusting valve clearances Renault Logan 1 (2004-2012, petrol)
➽ Cleaning the exhaust gas recirculation valve (engines K7M and… Renault Megane 1 (1995-2002)
Link to this article in different formats
Reviews and comments of visitors
No comments yet


Add two numbers 26 + 15


Duster 1 (2009-2017) 
  • User manual
  • Governing bodies
  • Car driving
  • Devices for comfort
  • Car care
  • Practical Tips
  • Power unit
  • Petrol engine (K4M)
  • Diesel engine (K9K)
  • Power system (K4M)
  • Power system (K9K)
  • Fuel system
  • Petrol injection system (K4M)
  • Diesel injection system (K9K)
  • Starting and ignition system
  • Cooling system
  • Exhaust system
  • Transmission
  • Clutch
  • Manual gearbox
  • Drive shafts
  • Chassis, running gear
  • Front bearing elements
  • Rear load-bearing elements
  • Steering
  • Control devices
  • Body and interior
  • Exterior (external elements)
  • Interior (internal elements)
  • Interior trim
  • Interior heating
  • Air conditioning
  • Electrical equipment
  • Equipment and devices
  • Headlights and lighting
  • Governing bodies
  • Wipers/washers
  • Audio system
  • Electrical circuits
RenaultBook.ru © 2018–2026 | Mobile version | News and articles | Sitemap: EN BG BY UA RS HR RO PL SK HU | Administration | Site search | Bookmark
Duster 1 (2009-2017) | Fluence 1 (2009-2020, petrol) | Kangoo 1 (1997-2007) | Laguna 2 (2001-2007) | Logan 1 (2004-2012, petrol) | Logan 2 (2012-2020) | Megane 1 (1995-2002) | Megan 2 (2002-2009, petrol) | Sandero 1 (2007-2012, petrol) | Scenic 1 (1996-2003) | Symbol 1 (1999-2008, petrol) | Symbol 2 (2008-2013, petrol) | Renault 19 (1988-1996) | Espace I and II (1984-1996) | Espace III (1996-2002) | Clio 1 (1990-1998) |
We want your visit to be comfortable 😌 and use cookies 🍪 to do so.