
English Русский
Български
Беларускі
Український
Српски
Hrvatski
Română
Polski
Slovenský
Magyar
Bookmark Contacts Articles Sitemap
Company vehicles Peugeot Company vehicles Opel Company vehicles Skoda Company vehicles Land Rover Company vehicles Mitsubishi Company vehicles Volkswagen Company vehicles Honda
RenaultBook.ru


Duster   Fluence   Kangoo   Laguna   Logan   Megane   Sandero   Scenic   Symbol   Clio   Other
Clio 1 (1990-1998)

Shift Rod/Mechanism — removal and installation (Renault Clio 1)

  • Main
  • Clio
  • Clio 1 (1990-1998)
  • Transmission
  • Manual gearbox
  • Shift Rod/Mechanism — removal and installation
0
Contents: Removal 🠛 Installation 🠛

Removal


1. While working inside the vehicle, push the gearshift lever cover away from the center console.

2. Apply the handbrake, then jack up the front of the car and place it on axle stands.

3. Working under the vehicle, disconnect the flexible exhaust system hangers. Unfasten and remove the mudguard from under the gearbox.

4. Disconnect the return spring from the shift rod.

5. Slide the rubber boot off the front end of the rod. Remove the bolt and disconnect the rod from the transmission operating lever. Remove the bushing and coupling. Please note that the forked rod tip is not symmetrical. Remember its orientation to make installation easier.

6. Remove the nuts securing the gear shift lever pivot housing assembly to the underbody. Lower the assembly while simultaneously moving the exhaust system to the side.

7. Apply alignment marks to the shift rod and the forked end of the gear shift lever. Loosen the clamp bolt and separate the rod from the forked end.

8. Clamp the gear shift lever in a vice, then remove the gear shift lever boot and handle. The handle is glued to the lever and may be difficult to remove.

9. Remove the retaining ring from the base of the gear shift lever and remove the lever and latch from the pivot housing.

Installation


10. Perform installation in reverse order, paying attention to the points noted in the following paragraphs.

11. Lubricate the hinge joints and install the handle on the lever, securing it with suitable glue.


12. Make sure that the forked end on the front end of the rod is oriented with the larger part protruding towards the gearbox (see illustration).
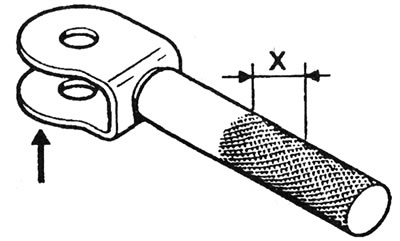
3.12. The section X of the area with knurling must remain outside when connecting the rod. X = 10 -…

3.12. The section X of the area with knurling must remain outside when connecting the rod. X = 10 - 12 mm


If the tip has been removed or a new component is being installed, connect the rod to the tip so that 10-12 mm of the knurled area protrudes from it.

13. Adjust the gear shift mechanism as described in Chapter 2.
This article is available on: russian, bulgarian, belarusian, ukrainian, serbian, croatian, romanian, polish, slovak, hungarian
Article has been reviewed by editor: Fedoseev Denis
Share with friends:
Previous
Clio 1: Manual gearbox
Next

Gearshift linkage/mechanism adjustment
General description of a mechanical transmission
Manual transmission specifications
Speedometer Drive — removal and installation
Differential Drive Shaft Seal (Right Side) — replacement
Reverse Light Switch — removal and installation
Manual transmission (C, D and E series engines) — removal and…
Manual Transmission (F Series Engine) — removal and installation
Other articles on other Renault models

➽ Removal and installation the gear shift mechanism Renault Logan 2 (2012-2020)
➽ Adjusting the gear shift mechanism Renault Megane 1 (1995-2002)
➽ Gear shift mechanism Renault Scenic 1 (1996-2003)
➽ Removal and installation the gear shift mechanism Renault Symbol 1 (1999-2008, petrol)
➽ Gear shift lever Renault Duster 1 (2009-2017)
Link to this article in different formats
Reviews and comments of visitors
No comments yet


Add two numbers 31 + 38


Clio 1 (1990-1998) 
  • General information
  • Maintenance
  • Troubleshooting
  • Power unit
  • Petrol engines 1.1 l (C)
  • Petrol engines 1.2 l (D)
  • Petrol engines 1.2/1.4 l (E)
  • Petrol engines 1.8 l (F)
  • Diesel engines
  • Overhaul of engines
  • Cooling and heating
  • Fuel system (carburetor)
  • Central fuel injection
  • Distributed fuel injection
  • Fuel system (diesel)
  • Starting and charging system
  • Ignition system (transistor)
  • Ignition system (electronic)
  • Pre-heating of diesel engines
  • Transmission
  • Clutch
  • Manual gearbox
  • Automatic gearbox
  • Drive shafts
  • Chassis, running gear
  • Brake system
  • Car suspension
  • Steering system
  • Body and interior
  • Exterior (external elements)
  • Doors, locks and windows
  • Electrical equipment
  • Equipment and devices
  • Electrical circuits
RenaultBook.ru © 2018–2026 | Mobile version | News and articles | Sitemap: EN BG BY UA RS HR RO PL SK HU | Administration | Site search | Bookmark
Duster 1 (2009-2017) | Fluence 1 (2009-2020, petrol) | Kangoo 1 (1997-2007) | Laguna 2 (2001-2007) | Logan 1 (2004-2012, petrol) | Logan 2 (2012-2020) | Megane 1 (1995-2002) | Megan 2 (2002-2009, petrol) | Sandero 1 (2007-2012, petrol) | Scenic 1 (1996-2003) | Symbol 1 (1999-2008, petrol) | Symbol 2 (2008-2013, petrol) | Renault 19 (1988-1996) | Espace I and II (1984-1996) | Espace III (1996-2002) | Clio 1 (1990-1998) |
We want your visit to be comfortable 😌 and use cookies 🍪 to do so.