



Contents: Inspection 🠛 Replacement 🠛
Inspection
1. Apply the handbrake, then jack up the front of the car and support it on axle stands where available, and remove the lower engine shield.
2. Visually inspect the rubber mounts on the two front and one rear engine/transmission mount brackets for cracks and dirt. Check that all bracket fasteners are securely tightened; when doing this, use a torque wrench. If there is excessive movement of the suspension, or the condition of the rubber cushions has deteriorated, the suspension should be replaced.
Replacement
Right front suspension
3. Attach a winch to the engine mounting eyes to support the engine/transmission assembly while the hanger is removed. To support the assembly, you can use a jack and a suitable wooden block to increase the support area under the pallet.
4. On F8Q engines, remove the mounting bolts and the upper plastic drive belt/right engine mount cover. On F9Q engines, remove the mounting nuts and soundproof cover.
5. Ensure the engine/transmission assembly is securely supported, then remove the nut securing the upper suspension bracket to the ride limiter/rubber mount assembly on the body.
6. Remove the three bolts securing the upper hanger bracket to the main bracket on the engine, then remove the bracket (see illustration).
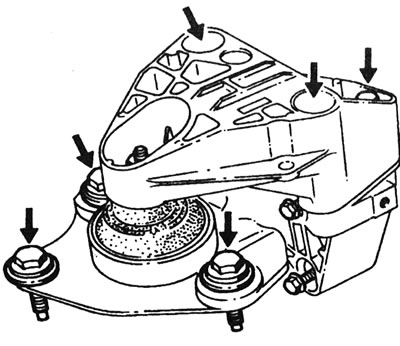
13.6. Location of right engine mount/motion limiter assembly mounting bolts.
7. Remove the bolts securing the travel limiter/rubber engine mount assembly to the body and remove the assembly.
8. Remove the outer timing belt covers to gain access to the main bracket mounting bolts on the engine. Remove the bolts and remove the main bracket.
9. Install the travel limiter/rubber cushion assembly. On F8Q engines, do not fully tighten the mounting bolts yet.
10. Install the upper bracket and tighten its bolts to the torque specified in the Specifications. On F8Q engines, do not fully tighten the nut securing the bracket to the travel limiter/rubber pad assembly yet.
11. Remove the winch or jack.
12. On F8Q engines, the travel limiter/rubber mount assembly now needs to be centered before tightening the mounting bolts (on engines - self-centering assembly). Renault technicians use a special split clamp, Mot. 1289-03, which is inserted through slots in the bracket. If this tool is not available, it can be made from metal strips.
13. Having centered the hanger, tighten its fastening nut with the tightening force specified Specifications (see illustration).
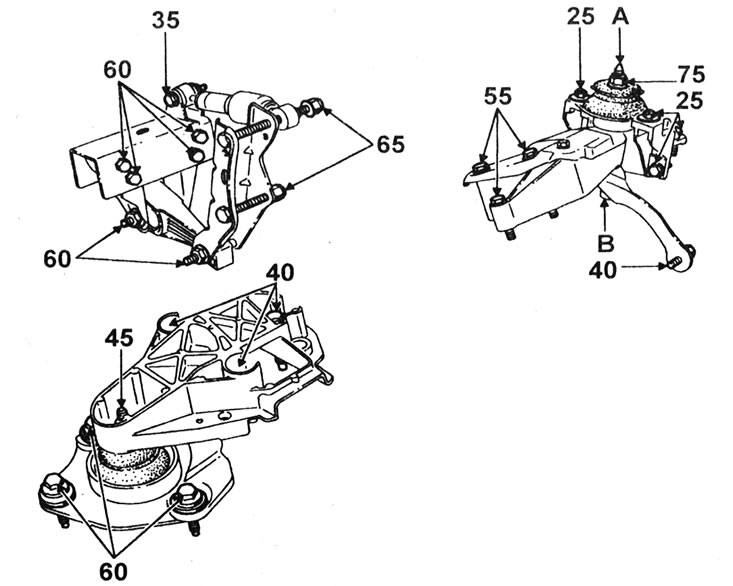
13.13. Tightening torques (in Nm) for engine/transmission mounts: A - Tighten the rack to a torque of 60 Nm; B - Tighten the nut to a torque of 40 Nm.
Remove the tool and install the plastic cover or engine cover where applicable.
(Text provided by an online resource: www.RenaultBook.ru)
Front left suspension
14. Remove the left wheel.
15. Using a jack and a block of wood, support the weight of the transmission.
16. Unscrew the nut securing the lower mount post to the upper bracket. Tap the post with a mallet to loosen it from the top bracket.
17. Unscrew the rubber part of the upper mount and the bracket (see illustration).
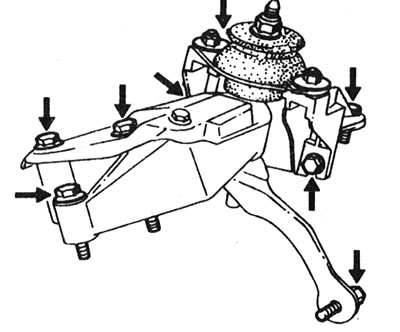
13.17. Location of front left suspension mounting bolts.
18. Unscrew the lower mounting bracket.
19. Install the new fasteners in the reverse order of removal and tighten the strut, nuts and bolts to the torque shown in Illustration 13.13.
Rear suspension
20. Remove the air cleaner assembly as described in Section 4D.
21. Working in the engine compartment, on the lower left side of the engine, unscrew the nuts from the bolts securing the rear suspension bracket to the transmission. At the same time, unscrew the shock absorber from the top of the suspension.
22. Using a winch or jack with a wooden block, slightly raise the engine to remove the load from the rear suspension.
23. Remove the bolts from the bracket and separate the bracket from the transmission and subframe (see illustration).
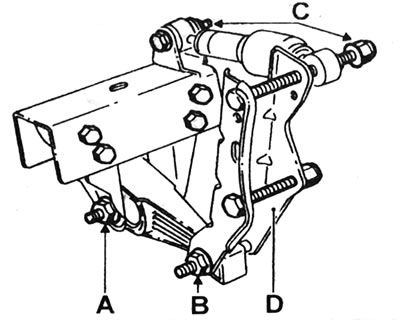
13.23. Sequence of disassembling the rear suspension (from A to D).
24. Install the new hanger in the reverse order of removal and tighten the bolts to the tightening torque shown in Illustration 13.13.