
Switching on side lights
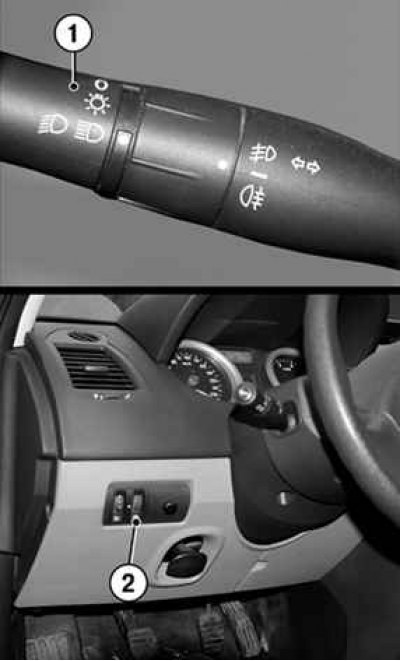
Pic. 1.40. Turning on side lights: 1 – lever ring; 2 - regulator
Turn the extreme ring of the lever 1 of the steering column switch to the position in which the mark on the ring is aligned with the corresponding symbol (pic. 1.40).
At the same time, the illumination of the instrument panel is switched on. The backlight brightness can be adjusted by turning knob 2.
Switching on low beam
Manual mode

Pic. 1.41. Switching on low beam: 1 – lever ring; 2 - label; 3 - button
Turn the extreme ring of the lever 1 of the steering column switch to the position in which mark 2 is aligned with the corresponding symbol (pic. 1.41).
In all cases, the corresponding control lamp lights up on the instrument panel.
Automatic mode of operation (depending on vehicle configuration)
When the engine is running, the dipped beam headlights turn on and off automatically depending on the level of light outside the vehicle, without operating the stalk lever 1 (position 0).
Automatic mode can be turned on or off.
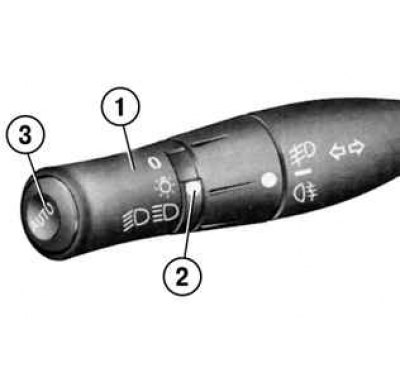
Pic. 1.41. Switching on low beam: 1 – lever ring; 2 - label; 3 - button
- To turn on the mode, hold down button 3 for at least four seconds. This action will be confirmed by a double beep and a corresponding message will appear on the instrument panel (see fig. 1.41).
- To disable the mode when the engine is stopped, hold down the Z button for at least four seconds. An audible signal will confirm this action and a message will appear on the instrument panel «Auto light off».
Any action on the stalk lever 1 has priority and cancels the automatic control mode.
Attention! Before driving at night, check the electrical equipment and adjust the direction of the headlights (if the car loading is different from the usual). Make sure that the car's exterior lights are not hidden (e.g. mud, snow or transported goods).
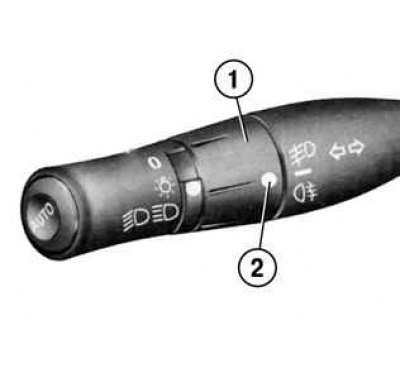
Switching on high beam headlights
With the headlights on, move the stalk lever towards you.
At the same time, the high beam indicator lamp on the instrument panel comes on.
To turn on the dipped beam headlights again, move the switch lever towards you again.
Function «Accompanying light to the door»
This function allows you to switch on the dipped beam headlights for a short time to illuminate, for example, when opening an entrance gate, garage door, etc.

Pic. 1.42. Switching on high beam headlights: 1 – lever ring
After stopping the engine and turning off the headlights, turn the end ring of the selector lever 1 to position 0 and pull the steering selector lever 1 towards you: the dipped beam will turn on for approximately thirty seconds (see fig. 1.42).
Each successive press of the switch extends the lighting duration by 30 seconds. The maximum lighting duration is two minutes (four clicks on the switch).
To turn off the lights before they turn off automatically, turn the end ring of the stalk lever 1 and set to position 0 (pic. 1.42).
Switching off the headlights
Manual mode
There are two ways to turn off the headlights manually:
- set the steering column switch lever 1 to its original position;
- the headlights turn off after the engine is stopped, when the driver's door is opened. In this case, the next time the engine is started, the headlights will turn on in the mode corresponding to the position of the switch lever 1 (see fig. 1.42).

Pic. 1.42. Switching on high beam headlights: 1 – lever ring
Auto mode (depending on vehicle configuration)
The headlights turn off when the engine is stopped, when the driver's door is opened, or when the vehicle is locked.
If the headlights were turned on after the engine was stopped, a chime will sound when the driver's door is opened to remind you that the lights are still on.
Fog lights

Pic. 1.43. Turning on the fog lights: 1 – an average ring of the lever; 2 - label
Turn the middle ring of the stalk lever 1 to the position where mark 2 is aligned with the corresponding symbol, then release the ring (pic. 1.43).
The fog lamps are switched on only if the ring on the end of the switch is set to a certain position, at the same time the corresponding control lamp on the instrument panel lights up.
Rear fog lamp

Pic. 1.43. Turning on the fog lights: 1 – an average ring of the lever; 2 - label
Turn the middle ring of the stalk lever 1 to the position where mark 2 is aligned with the corresponding symbol, then release the ring (see fig. 1.43).
The lamp turns on if the external lighting devices are on, at the same time the corresponding control lamp on the instrument panel lights up.
Remember to turn off the rear fog light when it is not needed so as not to disturb other road users.
Note. The fog lamp is located on the driver's side.
Switching off outdoor lighting
Pic. 1.43. Turning on the fog lights: 1 – an average ring of the lever; 2 - label
Turn ring 1 again to mark 6 opposite the symbol for the fog lights you want to turn off (see fig. 1.43).
When you turn off the exterior lights, the fog lights and lights turn off at the same time.
Note. When driving in fog, the automatic switching on of the headlights occurs irregularly, and the operation of the fog lamps can be monitored: the indicator lamps on the instrument panel indicate their inclusion (control lamp on) or off (control lamp does not light up).
Electric adjustment of the direction of headlights in the vertical plane
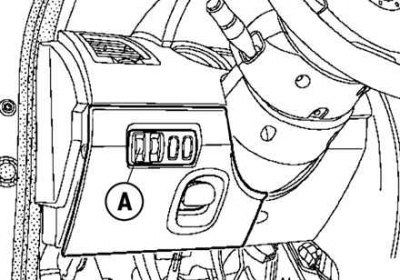
Pic. 1.44. Headlight dimmer
In vehicles with this function, knob A allows you to change the direction of the headlights in height depending on the degree of loading of the car (pic. 1.44).
Turn knob A down to lower the headlight beams or up to raise them.
On other modifications, the adjustment is carried out automatically.