
English Русский
Български
Беларускі
Український
Српски
Hrvatski
Română
Polski
Slovenský
Magyar
Bookmark Contacts Articles Sitemap
Company vehicles Peugeot Company vehicles Opel Company vehicles Skoda Company vehicles Land Rover Company vehicles Mitsubishi Company vehicles Volkswagen Company vehicles Honda
RenaultBook.ru


Duster   Fluence   Kangoo   Laguna   Logan   Megane   Sandero   Scenic   Symbol   Clio   Other
Clio 1 (1990-1998)

Fuel pump — inspection, removal and installation (Renault Clio 1)

  • Main
  • Clio
  • Clio 1 (1990-1998)
  • Power unit
  • Fuel system (carburetor)
  • Fuel pump — inspection, removal and installation
0
Contents: Checking the serviceability 🠛 Removal 🠛 Installation 🠛
Note: Before you begin, please see the warning in Chapter 1.


Checking the serviceability


1. To check the fuel pump on the engine, temporarily disconnect the outlet pipe that leads to the carburetor, plug the pump outlet with a ball of rags and have an assistant quickly crank the engine with the starter.

Warning. Keep your hands away from the electric fan.


2. The pump can also be checked by removing it. Disconnect the outlet tube from the pump. Prime the pump by manually moving the lever up and down; if the pump is working properly, a strong stream of fuel will spray out of the outlet pipe.

3. If a suitable pressure gauge is available, the test can be performed more accurately. Before connecting the pressure gauge to the fuel system, start the engine and let it idle for a few minutes to completely fill the carburetor float chamber. Stop the engine, disconnect the fuel supply line from the carburetor, and then connect the pressure gauge to it. Use a short transparent tube to make the connection. Using a clamp, clamp the return line to the fuel tank. Holding the pressure gauge as high as possible with the vertical tube, start the engine and let it idle. Slowly lower the gauge until the fuel level in the transparent tube matches the level of the diaphragm of the fuel pump, then check that the static pressure of the pump matches the data given in Specifications (please note that the engine should be idling, but there should be no fuel movement). Check the return tube for blockage. To do this, remove the clamp, the pressure should drop to 0.01-0.02 bar, if the pressure is higher than this, blow out the return hose.


Removal


Note: A new gasket will be required during installation.


4. Disconnect the negative cable from the battery.

5. Mark the fuel pump inlet and outlet hoses, then disconnect and plug them (see illustration).
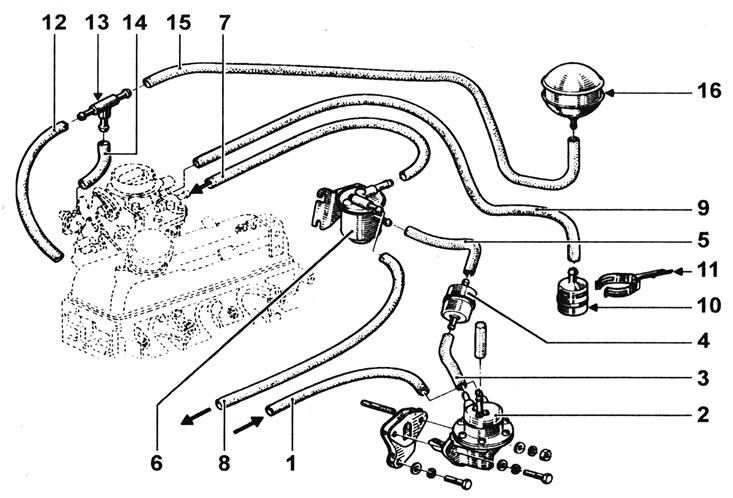
7.5. Fuel pump and related components:1 - Fuel inlet hose; 2 - Fuel pump; 3 - Fuel outlet hose; 4 -…

7.5. Fuel pump and related components:1 - Fuel inlet hose; 2 - Fuel pump; 3 - Fuel outlet hose; 4 - Fuel filter; 5 - Connecting hose; 6 - Steam separator; 7 - Carburetor inlet hose; 8 - Return fuel hose; 9 - Ventilation hose; 10 - Steam accumulation tank; 11 - Clamp; 12 - Vacuum hose (from the collector); 13 - T-shaped connector; 14 - Vacuum hose (to the vacuum capsule of the valve); 15 - Vacuum hose (to the tank); 16 - Vacuum tank.


6. Loosen the nuts or bolts securing the pump to the cylinder block and remove the washers.

7. Remove the fuel pump and remove the gasket.

Installation


8. Install in reverse order, clean the contact surfaces, and install a new gasket. Finally, tighten the nuts/bolts securely.
This article is available on: russian, bulgarian, belarusian, ukrainian, serbian, croatian, romanian, polish, slovak, hungarian
Article has been reviewed by editor: Fedoseev Denis
Share with friends:
Previous
Clio 1: Fuel system (carburetor)
Next

Unleaded gasoline — general description
Choke Cable — removal, installation and adjustment
Gas pedal — removal and installation
Throttle Pedal Cable — removal, installation, and adjustment
Air filter housing — removal and installation
Fuel level sensor — removal, inspection and installation
Fuel tank — removal and installation
Fuel tank filler pipe — removal and installation
Carburetor — removal and installation
Carburetor — troubleshooting, overhaul and adjustment
Other articles on other Renault models

➽ Manual fuel priming pump (K9K engine) Renault Duster 1 (2009-2017)
➽ Checking the electric fuel pump (all engines) Renault Fluence 1 (2009-2020, petrol)
➽ Fuel pump assembly with fuel level sensor Renault Kangoo 1 (1997-2007)
➽ Checking fuel pump performance (all engines) Renault Laguna 2 (2001-2007)
➽ Scheme 2. Fuel pump and fuel level sensor Renault Logan 1 (2004-2012, petrol)
Link to this article in different formats
Reviews and comments of visitors
No comments yet


Add two numbers 48 + 14


Clio 1 (1990-1998) 
  • General information
  • Maintenance
  • Troubleshooting
  • Power unit
  • Petrol engines 1.1 l (C)
  • Petrol engines 1.2 l (D)
  • Petrol engines 1.2/1.4 l (E)
  • Petrol engines 1.8 l (F)
  • Diesel engines
  • Overhaul of engines
  • Cooling and heating
  • Fuel system (carburetor)
  • Central fuel injection
  • Distributed fuel injection
  • Fuel system (diesel)
  • Starting and charging system
  • Ignition system (transistor)
  • Ignition system (electronic)
  • Pre-heating of diesel engines
  • Transmission
  • Clutch
  • Manual gearbox
  • Automatic gearbox
  • Drive shafts
  • Chassis, running gear
  • Brake system
  • Car suspension
  • Steering system
  • Body and interior
  • Exterior (external elements)
  • Doors, locks and windows
  • Electrical equipment
  • Equipment and devices
  • Electrical circuits
RenaultBook.ru © 2018–2026 | Mobile version | News and articles | Sitemap: EN BG BY UA RS HR RO PL SK HU | Administration | Site search | Bookmark
Duster 1 (2009-2017) | Fluence 1 (2009-2020, petrol) | Kangoo 1 (1997-2007) | Laguna 2 (2001-2007) | Logan 1 (2004-2012, petrol) | Logan 2 (2012-2020) | Megane 1 (1995-2002) | Megan 2 (2002-2009, petrol) | Sandero 1 (2007-2012, petrol) | Scenic 1 (1996-2003) | Symbol 1 (1999-2008, petrol) | Symbol 2 (2008-2013, petrol) | Renault 19 (1988-1996) | Espace I and II (1984-1996) | Espace III (1996-2002) | Clio 1 (1990-1998) |
We want your visit to be comfortable 😌 and use cookies 🍪 to do so.