
Checking the temperature sensor
1. Disconnect the multi-pin connector from sensor 3 of the coolant temperature indicator (see illustration).
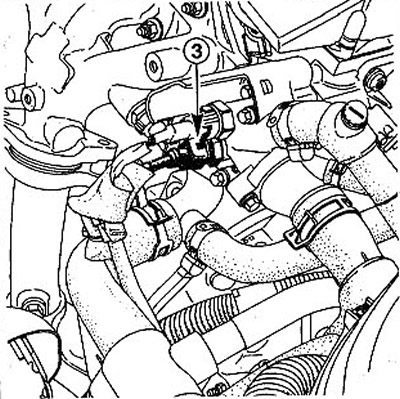
5.1 Disconnect the multi-pin connector from sensor 3 for the coolant temperature gauge. The illustration shows a 1.4-/1.6-liter petrol engine (K7J/K7M),
Attention! The plug should be disconnected by holding it by the body, and not by pulling on the wire.
2. Connect a voltmeter to the sensor plug and to «mass» (-).
3. Turn on the ignition and check if there is power. If there is no voltage, then check the condition of the wires.
4. Connect an ohmmeter to both contacts of the sensor and check up its resistance. The value obtained should correspond to the resistance when the engine is cold (see table). If the ohmmeter shows 0 ohms or ∞ ohms, then the sensor should be replaced. If the resistance of the sensor does not correspond to the nominal values, then it should be unscrewed for verification.
Attention! To avoid leakage of coolant through the sensor hole, drain and collect some of it in a container.
5. Dip sensor 2 in a container of water (see illustration), holding it on the wire so that it does not touch the walls of the water container.
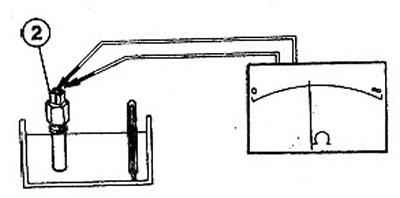
5.5 Lower sensor 2 into the water container, holding it on the wire so that it does not touch the walls of the water container
6. Connect an ohmmeter to the sensor (see illustration 5.5).
7. Heat the water in the tank and compare the sensor resistance data with the nominal (see table.).
| Temperature | Sensor resistance |
| + 4°C | 7.5±0.5 kΩ |
| + 20°C | 3.5±0.5 kΩ |
| + 80°C | 335±35 ohm |
| + 90°C | 240±30 ohm |
If the data obtained during the test of the sensor does not correspond to the nominal, then the sensor should be replaced.
8. Screw the sensor back in place and connect the power plug. Tighten the sensor with a small amount of force.
9. Add coolant and bleed air from the cooling system.
10. Carry out a test drive and check the tightness of the temperature sensor.