



Contents: Removal 🠛 Installation 🠛
During vehicle operation, the narrow radiator channels may become clogged with limescale deposits and coolant sediment. This reduces the cooling effect and the engine may overheat. In this case, the radiator should be removed and flushed with a regular scale remover, following the manufacturer's instructions. In most cases, however, the radiator will have to be replaced.
Removal
1. Disconnect the negative (-) battery terminal.
Warning! This will delete data from memory devices, such as the radio's security code. Before disconnecting the battery, read the recommendations in Chapter "Battery - removal and installation".
2. Place the vehicle on jack stands.
3. Remove the engine splash guard if present.
4. Drain the coolant into a suitable container.
5. Disconnect the radiator fan power plug.
6. SCENIC vehicles with air conditioning: Remove both front direction indicators.
7. Loosen the clamp securing the upper coolant circulation hose to the radiator with pliers and remove the hose. If necessary, cut the pressed clamp with side cutters and install a clamp clamp in its place when connecting the hose.
8. Disconnect the wire from the thermal switch on the radiator.
9. Disconnect the radiator fan wire. If necessary, disconnect the plugs of the corresponding relays.
10. Unscrew the two upper radiator mounting bolts A (see illustration).
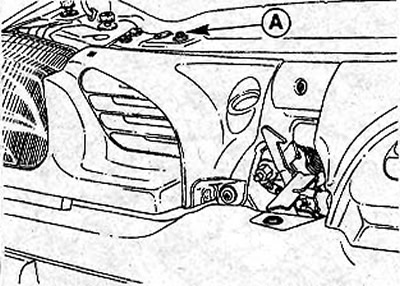
7.10 Unscrew the two upper radiator mounting bolts A
11. Cars with air conditioning. Unscrew the air dryer mounting bolts (see arrows in the illustration) and hang the dryer on the engine without disconnecting the hoses from it.
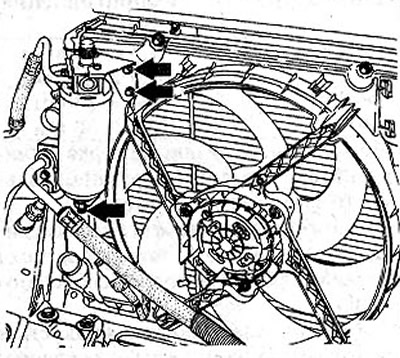
7.11 Unscrew the air dryer mounting bolts (see arrows). Cars with air conditioning
Caution! If air conditioner refrigerant comes into contact with your skin, it may cause frostbite.
12. Remove the radiator grille, see the relevant chapter.
13. Unscrew the 6 radiator cross member mounting bolts (see arrows in the illustration).
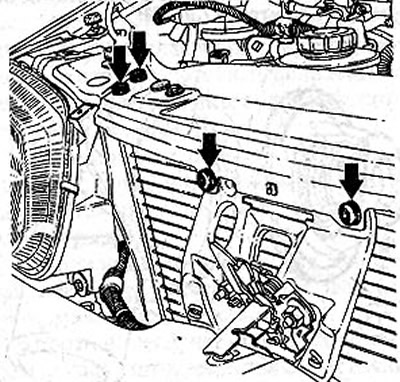
7.13 Unscrew the 6 radiator cross member mounting bolts(see arrows)
14. Disconnect the air intake hose, see the relevant chapter.
15. Unscrew the power steering reservoir mounting bolts and secure the reservoir to the engine without disconnecting the hoses from it.
16. Unscrew the four radiator mounting bolts and remove it.
17. Cars with air conditioning. Unscrew the four bolts that secure the air conditioning radiator to the radiator and remove the radiator (see illustration).
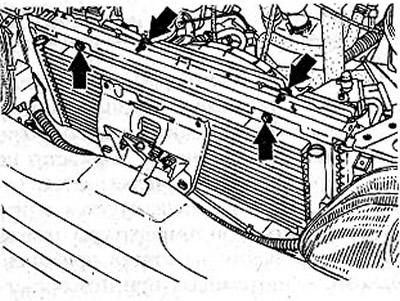
7.17 Unscrew the four bolts that secure the air conditioner radiator to the radiator and remove the radiator. Cars with air conditioning
Warning! The radiator cooling fins have quite sharp edges. It is recommended to use work gloves when removing the radiator.
Attention! If the radiator is to be removed for more than 48 hours, rinse it with clean water, blow it with compressed air and close the radiator openings with plugs. The radiator can also be filled with coolant, closing the openings with plugs. Otherwise, corrosion will form on the internal surfaces of the radiator, which may subsequently cause it to become leaky.
Installation
18. Install, if necessary, the old thermal switch and electric fan on the new radiator.
19. Check the condition of all coolant circulation hoses and make sure there are no cuts, cracks or other damage. Replace the hoses if necessary. Also check the condition of the rubber radiator mounting cushions.
20. Place the radiator into the engine compartment so that the radiator mounting supports fit into the cushions on the bracket.
21. Screw on the radiator fan.
22. Cars with air conditioning. Screw the air conditioning radiator to the radiator.
[View the original source on this resource: RENAULTBOOK]
23. Reinstall the radiator upper cross member.
24. Connect the upper and lower hoses to the radiator and secure them with clamps.
25. Replace the power steering fluid reservoir.
26. Connect the air intake hose.
27. Replace the radiator grille, see the relevant chapter.
28. Vehicles with air conditioning: Connect the air conditioning dryer.
29. Secure the radiator to the upper cross member.
30. Install the engine splash guard, if equipped.
31. Lower the vehicle.
32. Scenic vehicles with air conditioning: Replace the front direction indicators.
33. Connect the wires to the thermal switch, the radiator fan and, if disconnected, the relay plugs.
34. Fill with coolant.
35. Connect the negative (-) terminal of the battery wire to the negative terminal.
36. Set the clock.
37. Enter the code into the radio receiver if necessary.
38. Warm up the engine and check the tightness of the cooling hoses.
39. Check the coolant level and top up if necessary.