
English Русский
Български
Беларускі
Український
Српски
Hrvatski
Română
Polski
Slovenský
Magyar
Bookmark Contacts Articles Sitemap
Company vehicles Peugeot Company vehicles Opel Company vehicles Skoda Company vehicles Land Rover Company vehicles Mitsubishi Company vehicles Volkswagen Company vehicles Honda
RenaultBook.ru


Duster   Fluence   Kangoo   Laguna   Logan   Megane   Sandero   Scenic   Symbol   Clio   Other
Scenic 1 (1996-2003)

Heater flap rods — removal and installation (Renault Scenic 1)

  • Main
  • Scenic
  • Scenic 1 (1996-2003)
  • Power unit
  • Cooling and ventilation
  • Heater flap rods — removal and installation
0
Contents: Removal 🠛 Installation 🠛
In cars without air conditioning, the damper drive cables can be removed without dismantling the instrument panel. If air conditioning is installed, then to remove the air distribution damper rods, you will need to disconnect the instrument panel.

Removal


1. Remove the heater switch panel.

Attention! Adjustment of the damper rods from the switch panel side is not possible.


2. Reach under the panel and push the rear window defroster switch out of its seat.

3. Using a marker, mark the position of the E clamps on the rods, from the passenger side (see illustration). This will allow the rods to be secured in their original locations when installed.
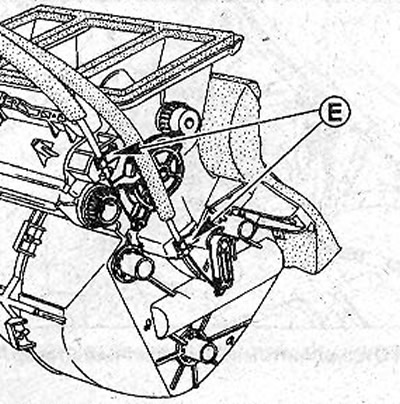
11.3 Using a marker, mark the position of the E clamps on the rods, from the passenger side

11.3 Using a marker, mark the position of the E clamps on the rods, from the passenger side


4. Unscrew the clamps E. The warm/cold air flap rod is painted red, and the distribution flap rod is painted blue.

Installation


5. Secure the rods to the heater casing. First, secure the blue distribution flaps rod, then the red rod. Then pull the flap levers back so that the rods do not slip.

6. Secure the rod casings with F clamps (see illustration).
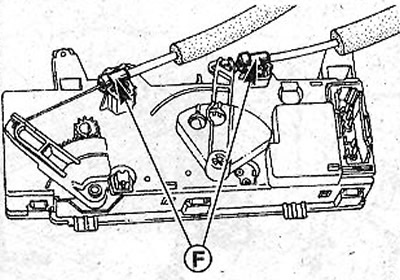


11.6 Secure the rod casings with F clamps

11.6 Secure the rod casings with F clamps


7. Replace the heater switch panel, but do not tighten the mounting bolts.

8. Fasten the opposite ends of the rods to the switches, working from the passenger side. Place the clamps according to the marks made before removal.

When installing new rods, set the interior air flow control to the "Upper interior air flow" position and the heater switch to the "Heater off" position. Keeping the switches in this position, connect the rods to them.

9. Secure the heater switch panel with two bolts.

10. Place the ashtray holder back in place and secure.

This article is taken from the website: RENAULTBOOK.ru

11. Put the ashtray back in place.

12. Replace the rear window defroster switch.
This article is available on: russian, bulgarian, belarusian, ukrainian, serbian, croatian, romanian, polish, slovak, hungarian
Article has been reviewed by editor: Fedoseev Denis
Share with friends:
Previous
Scenic 1: Cooling and ventilation
Next

Heater Switches — Removal and Installation
Heating system — design description
Water pump — removal and installation
Radiator — removal and installation
Thermostat — Removal, Installation and Checking
Heater Fan Electric Motor — Removal and Installation
Additional fan motor resistors — removal and installation
Cabin filter — removal and installation
Air conditioner — design description
Other articles on other Renault models

➽ Multifunctional bracket (engine with heater) Renault Duster 1 (2009-2017)
➽ Checking the clearance between the rods and the valve guides of… Renault Fluence 1 (2009-2020, petrol)
➽ Beam rods Renault Kangoo 1 (1997-2007)
➽ Immersion heater Renault Laguna 2 (2001-2007)
➽ Features of the heater and air conditioner Renault Logan 1 (2004-2012, petrol)
Link to this article in different formats
Reviews and comments of visitors
No comments yet


Add two numbers 23 + 50


Scenic 1 (1996-2003) 
  • General information
  • User manual
  • Maintenance
  • Troubleshooting
  • Power unit
  • Engine repair
  • Cooling and ventilation
  • Injection system (petrol)
  • Fuel system (diesel)
  • Fuel system
  • Exhaust system
  • Ignition system
  • Transmission
  • Clutch
  • Car gearbox
  • Chassis, running gear
  • Brake system
  • Car suspension
  • Steering
  • Body and interior
  • Exterior (external elements)
  • Interior (internal elements)
  • Doors, locks and windows
  • Electrical equipment
  • Equipment and devices
  • Headlights and lighting
  • Power devices
  • Electrical circuits
RenaultBook.ru © 2018–2026 | Mobile version | News and articles | Sitemap: EN BG BY UA RS HR RO PL SK HU | Administration | Site search | Bookmark
Duster 1 (2009-2017) | Fluence 1 (2009-2020, petrol) | Kangoo 1 (1997-2007) | Laguna 2 (2001-2007) | Logan 1 (2004-2012, petrol) | Logan 2 (2012-2020) | Megane 1 (1995-2002) | Megan 2 (2002-2009, petrol) | Sandero 1 (2007-2012, petrol) | Scenic 1 (1996-2003) | Symbol 1 (1999-2008, petrol) | Symbol 2 (2008-2013, petrol) | Renault 19 (1988-1996) | Espace I and II (1984-1996) | Espace III (1996-2002) | Clio 1 (1990-1998) |
We want your visit to be comfortable 😌 and use cookies 🍪 to do so.