
English Русский
Български
Беларускі
Український
Српски
Hrvatski
Română
Polski
Slovenský
Magyar
Bookmark Contacts Articles Sitemap
Company vehicles Peugeot Company vehicles Opel Company vehicles Skoda Company vehicles Land Rover Company vehicles Mitsubishi Company vehicles Volkswagen Company vehicles Honda
RenaultBook.ru


Duster   Fluence   Kangoo   Laguna   Logan   Megane   Sandero   Scenic   Symbol   Clio   Other
Scenic 1 (1996-2003)

Thermostat — Removal, Installation and Checking (Renault Scenic 1)

  • Main
  • Scenic
  • Scenic 1 (1996-2003)
  • Power unit
  • Cooling and ventilation
  • Thermostat — Removal, Installation and Checking
0
Contents: Removal 🠛 Examination 🠛 Installation 🠛
As the engine temperature increases, the thermostat opens a large circuit of coolant circulation. If, due to a malfunction, the thermostat does not work, the engine will overheat. This situation is signaled by the coolant temperature control lamp on the instrument panel. At the same time, the radiator remains cold. A faulty thermostat may remain open after the coolant has cooled. This thermostat defect can be determined by the fact that the engine does not warm up to operating temperature. If such a thermostat defect occurs in winter, the intensity of the interior heating decreases.

Attention! If the engine overheats after a short mileage, the cause may be limescale deposits clogging the radiator, or a broken V-belt of the water pump drive.


Removal


1. Disconnect the negative (-) battery terminal.

Warning! This will delete data from the memory devices, such as the radio receiver security code. Before disconnecting the battery, read the recommendations in the chapter "Battery - Removal and Installation".


2. Drain the coolant into a suitable container.

3. Remove cover 1 of the thermostat housing by unscrewing the mounting bolts (see illustrations 6.3 and 6.3a).
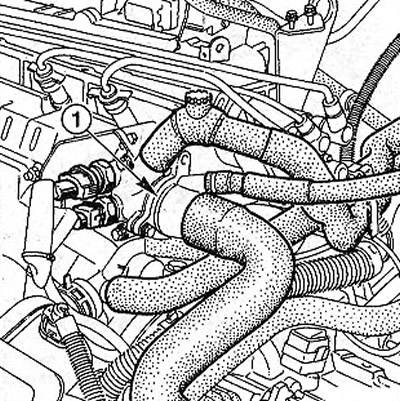
6.3 Remove the thermostat housing cover 1 by unscrewing the mounting bolts. The illustration shows…

6.3 Remove the thermostat housing cover 1 by unscrewing the mounting bolts. The illustration shows a 1.4-/1.6-liter petrol engine (K7J/K7M)
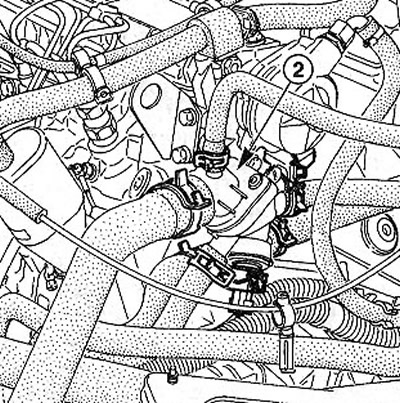


6.3a Remove the cover 2 of the thermostat housing by unscrewing the mounting bolts. Petrol engine…

6.3a Remove the cover 2 of the thermostat housing by unscrewing the mounting bolts. Petrol engine with a volume of 2.0 liters and diesel engine with a volume of 1.9 liters


4. Record the installation position of thermostat 11 in the coolant pipe and remove it (see illustration).
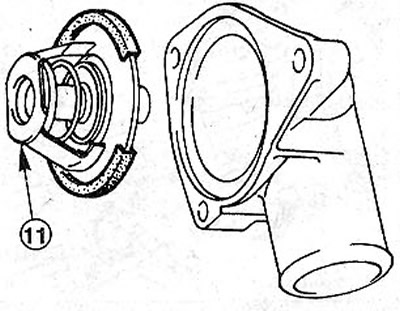
6.4 Note the installation position of thermostat 11 in the coolant pipe and remove it. The…

6.4 Note the installation position of thermostat 11 in the coolant pipe and remove it. The illustration shows a diesel engine


Examination


5. Measure the height of the thermostat and record it as value a (see illustration).
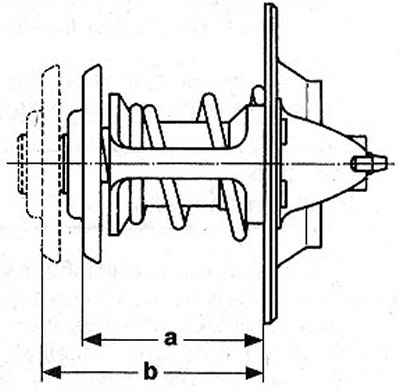
6.5 Measure the height of the thermostat and record it as value a

6.5 Measure the height of the thermostat and record it as value a


6. Heat the thermostat in a container with water. The thermostat should not touch the walls of the container and should be completely immersed in water. Check the water temperature with an appropriate thermometer (see illustration).
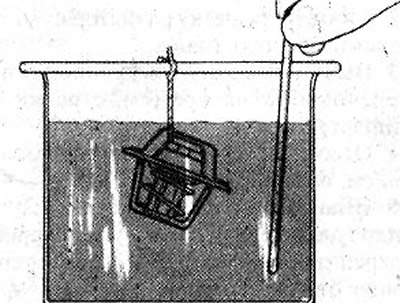
6.6 Heat the thermostat in a container of water

6.6 Heat the thermostat in a container of water


Once the water temperature reaches approximately +89°C, the thermostat valve will begin to open.

The greatest stroke of the thermostat valve occurs at a temperature of approximately +101°C. At this water temperature, the valve should open completely. This means that its stroke should be at least 7.5 mm. To determine the stroke of the thermostat valve, it is necessary to subtract the value a from the value b (see illustration 6.5).

Attention! Since the thermostat opens completely when the water temperature exceeds its boiling point, the data provided should be considered as approximate.


7. Make sure that the thermostat valve closes when cooling down. If not, replace the thermostat.

Installation


8. Install the thermostat into the outlet pipe.

9. Cars with a 1.4-/1.6-liter gasoline engine (K7J/K7M). Clean the sealing surfaces on the cylinder head and thermostat housing. Apply sealant to these surfaces "LOCTITE 518" the layer of sealant H should be between 0.6 and 1.0 mm and it should be applied as shown in the illustration.
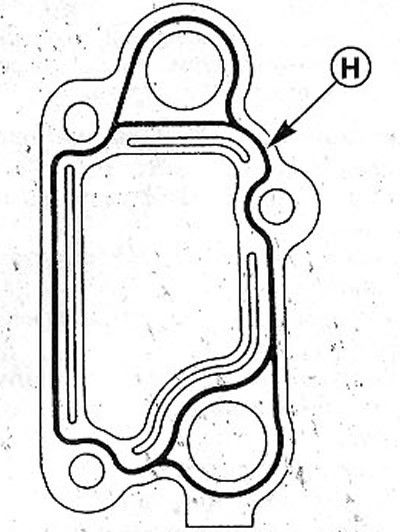


6.9 Apply sealant to these surfaces «LOCTITE 518». The layer of sealant H should be within the…

6.9 Apply sealant to these surfaces "LOCTITE 518". The layer of sealant H should be within the range of 0.6 to 1.0 mm 5


[Source link is located on: RENAULTBOOK.ru]

10. Cars with 2.0 litre petrol engine and 1.9 litre diesel engine: Secure the thermostat cover by replacing its old rubber gasket with a new one.

11. Connect the negative (-) terminal of the battery cable to the negative terminal.

12. Set the clock.

13. Enter the code into the radio receiver if necessary.

14. Fill the coolant and bleed air from the cooling system.
This article is available on: russian, bulgarian, belarusian, ukrainian, serbian, croatian, romanian, polish, slovak, hungarian
Article has been reviewed by editor: Fedoseev Denis
Share with friends:
Previous
Scenic 1: Cooling and ventilation
Next

Coolant Temperature Sensor — Removal, Installation and Testing
Thermal switch — check
Cooling system — leak test
Coolant — Replacement
Coolant circulation
Radiator — removal and installation
Water pump — removal and installation
Heating system — design description
Heater Switches — Removal and Installation
Heater flap rods — removal and installation
Other articles on other Renault models

➽ Removal, checking the serviceability and installing the… Renault Megane 1 (1995-2002)
➽ Removal, checking and installation the thermostat Renault Symbol 1 (1999-2008, petrol)
➽ Removal, checking and installation the thermostat Renault 19 (1988-1996)
➽ Thermostat — removal, checking for serviceability and… Renault Clio 1 (1990-1998)
➽ Checking oil pressure Renault Duster 1 (2009-2017)
Link to this article in different formats
Reviews and comments of visitors
No comments yet


Add two numbers 21 + 41


Scenic 1 (1996-2003) 
  • General information
  • User manual
  • Maintenance
  • Troubleshooting
  • Power unit
  • Engine repair
  • Cooling and ventilation
  • Injection system (petrol)
  • Fuel system (diesel)
  • Fuel system
  • Exhaust system
  • Ignition system
  • Transmission
  • Clutch
  • Car gearbox
  • Chassis, running gear
  • Brake system
  • Car suspension
  • Steering
  • Body and interior
  • Exterior (external elements)
  • Interior (internal elements)
  • Doors, locks and windows
  • Electrical equipment
  • Equipment and devices
  • Headlights and lighting
  • Power devices
  • Electrical circuits
RenaultBook.ru © 2018–2026 | Mobile version | News and articles | Sitemap: EN BG BY UA RS HR RO PL SK HU | Administration | Site search | Bookmark
Duster 1 (2009-2017) | Fluence 1 (2009-2020, petrol) | Kangoo 1 (1997-2007) | Laguna 2 (2001-2007) | Logan 1 (2004-2012, petrol) | Logan 2 (2012-2020) | Megane 1 (1995-2002) | Megan 2 (2002-2009, petrol) | Sandero 1 (2007-2012, petrol) | Scenic 1 (1996-2003) | Symbol 1 (1999-2008, petrol) | Symbol 2 (2008-2013, petrol) | Renault 19 (1988-1996) | Espace I and II (1984-1996) | Espace III (1996-2002) | Clio 1 (1990-1998) |
We want your visit to be comfortable 😌 and use cookies 🍪 to do so.