
Removing
1. Mark the position of the rear wheels on the hub with paint. This will allow the assembly to set the balanced wheel in its original position,
2. Loosen the wheel bolts. The vehicle must be on wheels during this operation.
3. Install the car on the goats and remove the rear wheels.
Attention! If the brake pads are to be reinstalled for later use, they should be marked before removal. Swapping pads from the right wheel to the left and vice versa is not allowed. Such a rearrangement can lead to uneven braking of the wheels. Be sure to change all rear brake pads, even if only one of them has reached the minimum wear limit.
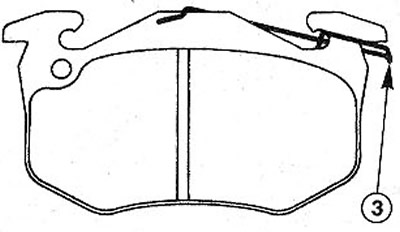
4. Remove clamp 1 with a screwdriver (see illustration).
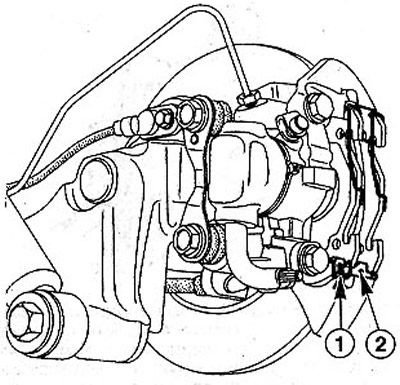
5.4 Remove clamp 1 with a screwdriver
5. Detach retaining clip 2 (see illustration 5.4).
6. Remove the brake pads.
Installation
Attention! With the brake pads removed, do not press the brake pedal. Otherwise, the piston will be squeezed out of the housing. If the piston was squeezed out due to any reason, then remove the caliper and contact the workshop to assemble the wheel cylinder.
7. Clean the seating and guide surfaces of the brake pads with a suitable soft metal brush or wipe with a rag soaked in alcohol. Do not use solvents containing mineral oils or sharp-edged tools.
8. Before installing the pads, check the brake disc for the absence of grooves by running your hand over it. Brake disks with a corrugated surface replace with new ones.
9. Measure the thickness of the brake discs.
10. Check up a condition of dustproof caps 6 and a cuff 5 of the piston of the brake cylinder. Replace a damaged and cracked cap or cuff immediately, because penetrating dirt quickly leads to depressurization of the brake caliper. To do this, the brake caliper must be removed and disassembled (work is done in the workshop) (see illustration).
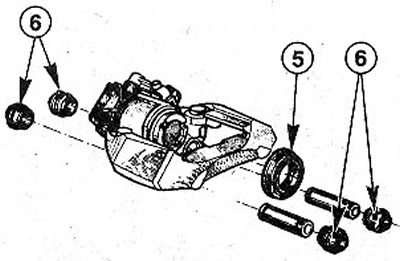
5.10 Check the condition of the dust caps 6 and cuff 5 of the piston of the brake cylinder
Attention! When the piston is screwed into the wheel cylinder, the brake fluid is squeezed out of the expansion tank. If there is a large volume of liquid in the tank, then it is recommended to take it away so that it does not splash out
Note: Use a siphon or a plastic bottle that is not destroyed by the brake fluid to drain. Do not use regular drinking water bottles! Brake fluid is poisonous and must never be sucked out by mouth through a hose. Use a siphon. And after replacing the brake pads, the level of brake fluid in the reservoir should also not exceed the maximum mark, because. when heated, it expands. Leaking brake fluid flows down the brake master cylinder, destroying the paintwork and causing corrosion.
11. Screw the piston into the brake cylinder by inserting a flat screwdriver with a square handle or a flat pin into the groove on the piston. Screw in the piston by turning it to the right. Screw in the piston as far as possible (see illustration). You can use the HAZET 4960-1 tool.
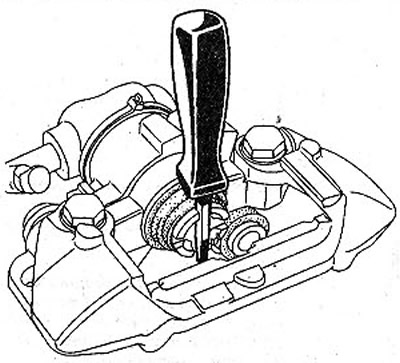
5.11 Screw the piston into the brake cylinder by inserting a flat-blade screwdriver or a flat-bladed pin into the groove on the piston
Attention! The piston must not be pressed in with a mandrel or pliers. In this case, the device for automatically adjusting the position of the brake pads is damaged.
12. Install the piston so that the mark R is aligned with the fit of the bleeder P (see illustration).
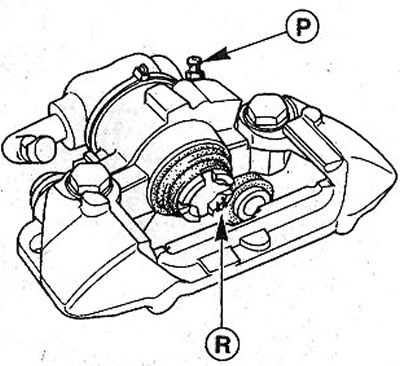
5.12 Install the piston so that the mark R is aligned with the fit of the bleeder P
13. Fix the clamping spring 3 on the new brake pads (see illustration).
5.13 Attach pressure spring 3 to the new brake pads
14. Install both brake pads in the guide, observing their previous mounting position.
15. Install the retaining wedge 2 into the caliper and insert the clamp 1 into it (see illustration). Only one clip 1 is placed on each caliper, which is attached to the inside of the caliper.
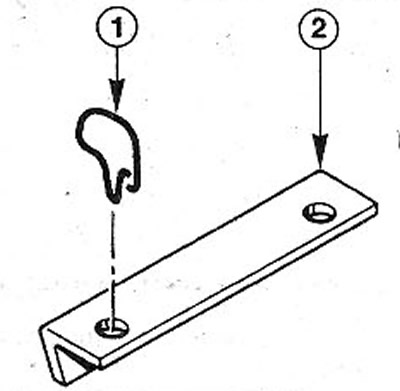
5.15 Install the retaining wedge 2 into the caliper and insert the clamp 1 into it
16 Install the rear wheels in accordance with the marks made during removal and secure them with bolts.
17. Lower the vehicle and tighten the wheel bolts in a cross pattern to 90 Nm.
Attention! Squeeze the brake pedal with force several times with the car standing on wheels until a strong resistance is felt.
18. Check the brake fluid level in the expansion tank. If necessary, add fluid to the maximum mark.
Attention! Make sure that
- A) brake hoses are securely connected,
- b) the brake hose is fixed in the holder,
- V) brake bleeders are screwed on,
- G) there is enough brake fluid in the expansion tank.
19. Carry out a leak test of the brake system with the engine running.
To do this, depress the brake pedal with a force of 200-300 N (20-30 kg) for approximately 10 seconds. The pressure in the system and, accordingly, on the brake pedal must not drop. Check all connections for tightness.
20. Carefully run in new brake pads. To do this, brake several times, bringing the speed from about 80 km / h to a speed of 40 km / h and lightly pressing the brake pedal. Let the brakes cool down in between.
Attention! New brake pads should be worn in. Therefore, before driving approximately 200 km, refrain from braking until the car comes to a complete stop.
Note: Brake linings must not be disposed of with normal waste, as the dust that forms on them is hazardous to health. They need to be disposed of only at special points.