



Contents: Tightening to the required torque 🠛 Tightening to a given angle 🠛 Compliance with tightening moments…🠛 Recommended tool for controlled…🠛 Using a torque wrench with a maximum…🠛 Using Electronic Torque Wrenches 🠛
As a rule, two methods of controlled tightening are used when repairing cars: tightening with the required torque and tightening at a given angle (also called torque and angular tightening).
Tightening to the required torque
The most commonly used method is to tighten until a given counter-torque is achieved, called the tightening torque.
A significant portion of the tightening torque falls on friction moments (under the head and in the thread) and, a small amount, is used to create useful tightening torque (for voltage).
With this tightening method, a significant spread of tension is obtained due to changes in the coefficients of friction for different connections and the inaccuracy of the methods and the impossibility of providing the specified torque with the tools used.
Tightening to a given angle
The principle of this method is to connect the assembly parts by means of a joining torque (approximately 25-30% of the final torque), then to turn to a given angle. This method is almost independent of the friction forces of the bolted connection and gives more accurate results than tightening with torque.
Compliance with tightening moments and angles
If torques and tightening angles for bolted connections are specified in the description of removal and installation operations, they must be strictly observed. Tightening is carried out using the appropriate tool (torque wrench, angle measuring disc). Failure to comply with the tightening torques and angles may result in reduced safety, malfunctions that make further operation of the vehicle impossible, and increased noise and friction. For other bolted connections, tightening is permitted without checking the tightening torque value (using standard keys). However, the corresponding tightening torque is specified in the standard tightening torque table.
Recommended tool for controlled tightening
For controlled tightening, torque wrenches are used, which provide tightening within the range of 4-400 Nm, as well as a protractor disk. Torque wrenches with a maximum tightening torque or electronic ones are used.
For example:
- torque wrench 4-40 Nm;
- torque wrench 20-100 Nm;
- torque wrench 80-400 Nm;
- goniometer disk.
Torque wrenches used shall comply with the requirements of ISO 6789. Wrenches shall be regularly calibrated to the supplier's specifications using suitable means.
Using a torque wrench with a maximum tightening torque
When the maximum force is reached, the release mechanism of such a tool causes the key to break or be disconnected.
The maximum force is determined by the adjustment of the wrench, but also depends on how it is used.
When the rules are followed, the tightening accuracy using a torque wrench with a maximum tightening torque is ±15%.
When working with such a tool, the following rules must be observed:
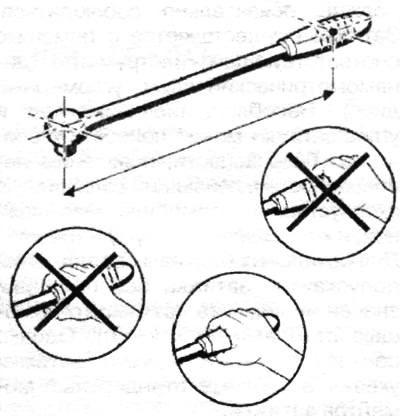
Lever arm
- you need to grab the handle in the middle (if the hand is positioned incorrectly on the handle, the response threshold changes);
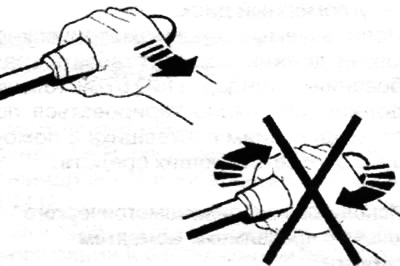
- pull the key gently and without jerking, without applying any twisting force. Increased tightening speed and jerking are the main causes of overtightening. The twisting force applied to the key changes its response threshold;
- hold the wrench on the bolt with minimal force. When force is applied to the head of the wrench, its response threshold changes;
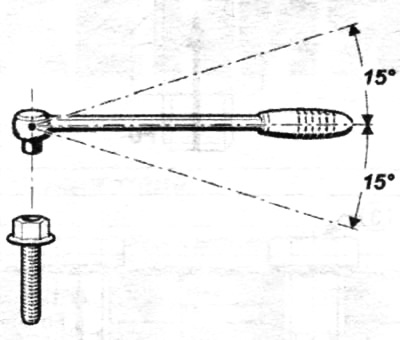
- apply the tightening force perpendicular to the fastening axis, observing a tolerance of ±15° in relation to the perpendicular to the fastening axis. Non-perpendicularity of the key in relation to the fastening axis causes insufficient tightening.
- stop tightening as soon as the key engages. Further tightening after the key engages results in overtightening.
 |
 |
When changing the key length (adding a handle extension, tip) it is necessary to adjust the key in the new version. When changing the length of the key, its response threshold changes.
Use the formula:
C ₁ = C0 to L ₂ / (L ₁ + L ₂).
WITH0 — the applied force.
C₁ is the adjustment force displayed on the key.
L ₁ — the length of the extension.
L ₂ — key length.
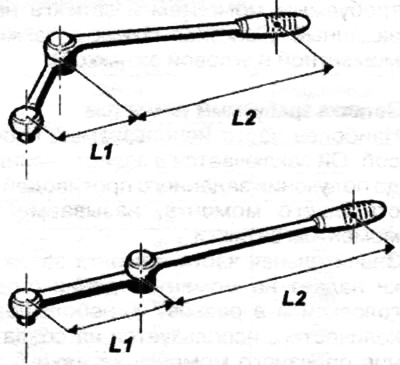
Attention. During controlled work, it is prohibited, except for specially specified cases in the repair procedure, to use the cardan joint (cardan type). When using a cardan joint, there is a difference between the wrench adjustment torque and the actual torque applied.
Before storing the key, the adjusting spring should be completely unloaded. Storing the key with the spring taut will result in loss of tightening accuracy.
Using Electronic Torque Wrenches
The torque reading and, depending on the model, the tightening angle, are carried out directly on such tools.
When the rules are followed, the tightening accuracy using an electronic torque wrench is ±5%.
The accuracy of electronic torque wrenches does not depend on the position of the operator's hand on the wrench handle.
In this case, you should use the key carefully and stop tightening when the required value appears on it.