
Removal
- Remove the trim from the front door
- Remove the protective film from the door.
- Remove the glass.
- Disconnect the electrical connector from the window motor.
- Remove the window lift motor mounting bolts.
- Remove the window lifter guide mounting bolts.
- Remove the window regulator from the front door.
Installation
- Installation is carried out in sequence. reverse to withdrawal.
- Before installing the door trim, connect all electrical connections and check the operation of the window regulator.
- Install the front door trim.
- If damaged, replace the dust and moisture protective film.

Pic. 13.14. Elements of the front door with the trim removed: 1 - electrical connector for window lift motor; 2 - bolt for fastening the electric window motor; 3 - glass guide fastening bolts; 4 - rod of the internal door lock handle; 5 - glass bracket mounting bolts; 6 - lock fastening screws
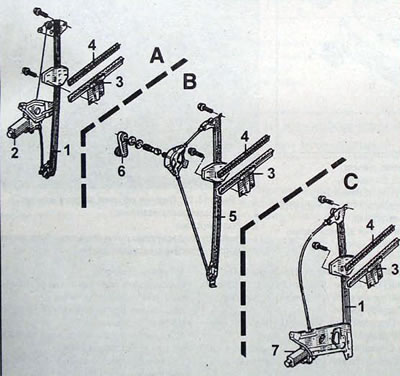
Pic. 13.15. Window lifter mechanism: A - front door window lift with electric drive; B - rear door window lift with manual drive; C - rear door window lift with electric drive; 1 - front door window lift mechanism with electric drive; 2 - electric motor for driving the front door window lifter; 3 - lower glass support; 4 - seal; 5 - manual window lift mechanism; 6 - handle; 7 - rear door window lift mechanism with electric drive
Pic. 13.16. Elements of the rear door with the trim removed: 1 - manual window lifter mounting bolts; 2 - bolt for fastening the electric window motor; 3 - bolts for securing the lower glass support; 4 - bolt for fastening the bushing of the window lifter guide rod; 5 - rod of the internal door lock handle; 6 - lock fastening screws