
English Русский
Български
Беларускі
Український
Српски
Hrvatski
Română
Polski
Slovenský
Magyar
Bookmark Contacts Articles Sitemap
Company vehicles Peugeot Company vehicles Opel Company vehicles Skoda Company vehicles Land Rover Company vehicles Mitsubishi Company vehicles Volkswagen Company vehicles Honda
RenaultBook.ru


Duster   Fluence   Kangoo   Laguna   Logan   Megane   Sandero   Scenic   Symbol   Clio   Other
Symbol 1 (1999-2008, petrol) Symbol 2 (2008-2013, petrol)

Removal and installation the front door trim (Renault Symbol 1)

  • Main
  • Symbol
  • Symbol 1 (1999-2008, petrol)
  • Body and interior
  • Doors, locks and windows
  • Removal and installation the front door trim
0
Removal procedure:
  • on vehicles equipped with central locking and electric windows, disconnect the negative battery cable;
  • remove the inner mirror trim and speaker grille;

Fig. 9.34. Removing the window lift handle from the front door

Fig. 9.34. Removing the window lift handle from the front door

  • on models with mechanical windows, with the glass fully lowered, remember the position of the window handle and remove the handle from the axis (Fig. 9.34);
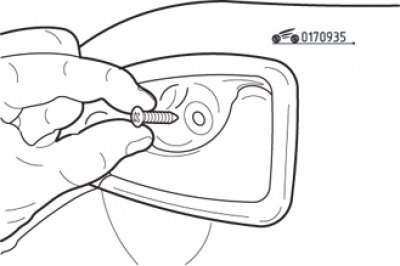
Fig. 9.35. Screw for fastening the inner door handle trim
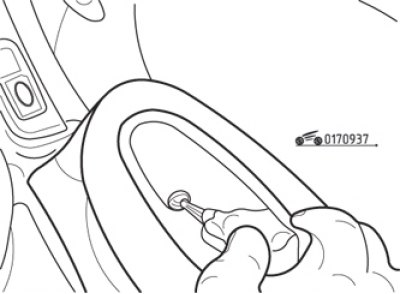
Fig. 9.35. Screw for fastening the inner door handle trim


Fig. 9.37. Removing the front door armrest mounting screw plug
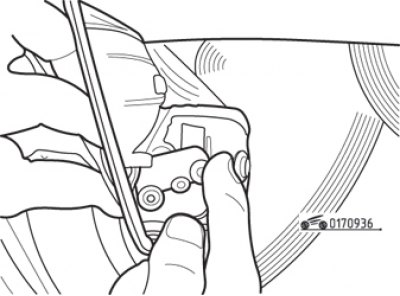
Fig. 9.37. Removing the front door armrest mounting screw plug


Fig. 9.36. Disconnecting the cable end from the inner door handle
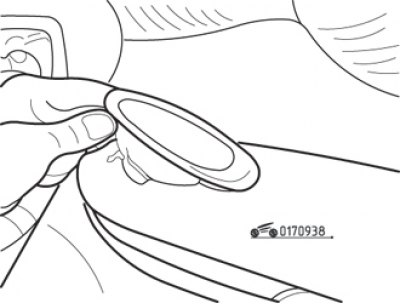
Fig. 9.36. Disconnecting the cable end from the inner door handle


Fig. 9.38. Removing the front door armrest trim

Fig. 9.38. Removing the front door armrest trim

  • remove the screws securing the inner door handle trim. Remove the handle and disconnect the control cable sheath from the handle, then disconnect the cable end (fig. 9.35 and 9.36). Unscrew the armrest mounting screw, having first removed its plug, then, carefully lifting it, slide the armrest trim back to remove it from the door (fig. 9.37 and 9.38);
  • on models with power windows, disconnect the wiring connectors from the switches. Disconnect (if applicable) the connector from the power mirror switch;

Fig. 9.39. Removing the speaker from the front door

Fig. 9.39. Removing the speaker from the front door


  • unscrew the four mounting screws and remove the speaker from the door, after disconnecting the wiring connector (Fig. 9.39);
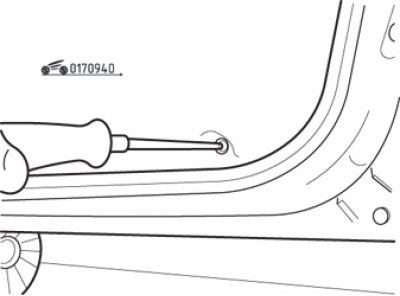
Fig. 9.40. Unscrewing the screw securing the lower edge of the front door trim

Fig. 9.40. Unscrewing the screw securing the lower edge of the front door trim

  • unscrew the screws securing the lower edge of the door trim (Fig. 9.40);
  • using a flat fork-shaped tool, carefully pry off the plastic trim clips around the perimeter of the door;
  • remove the trim from the door and lift it over the inner window seal to remove it (it is sealed around the perimeter with sealant).

(This note was copied from the resource: www.RENAULTBOOK.ru)

Installation is carried out in the reverse order of removal.
This article is available on: russian, bulgarian, belarusian, ukrainian, serbian, croatian, romanian, polish, slovak, hungarian
Article has been reviewed by editor: Podkrepilov Maxim
Share with friends:
Previous
Symbol 1: Doors, locks and windows
Next

Removal and installation side doors
Removal and installation the rear door trim
Removal and installation the front door lock
Removal and installation the rear door lock
Removal and installation the outer front door handle
Removal and installation the outer rear door handle
Other articles on other Renault models

➽ Front door trim Renault Duster 1 (2009-2017)
➽ External decorative trim for front door pillar Renault Fluence 1 (2009-2020, petrol)
➽ Removal and installation the outer decorative trim of the front… Renault Laguna 2 (2001-2007)
➽ Removal and installation the front door trim Renault Logan 1 (2004-2012, petrol)
➽ Removal and installation the decorative trim on the front door Renault Megan 2 (2002-2009, petrol)
Link to this article in different formats
Reviews and comments of visitors
No comments yet


Add two numbers 17 + 19


Symbol 2 (2008-2013, petrol) 
  • General information
  • User manual
  • Maintenance
  • Power unit
  • Engine repair
  • Cooling system
  • Fuel system
  • Exhaust system
  • Ignition system
  • Transmission
  • Clutch
  • Mechanical gearbox
  • Automatic gearbox
  • Drive shafts
  • Chassis, running gear
  • Front suspension
  • Rear suspension
  • Steering
  • Brake system
  • Body and interior
  • Exterior (external elements)
  • Interior (internal elements)
  • Doors, locks and windows
  • Heating and ventilation
  • Electrical equipment
  • Equipment and devices
  • Headlights and lighting
  • Power devices
  • Electrical circuits
Symbol 1 (1999-2008, petrol) 
  • General information
  • User manual
  • Car care
  • Maintenance
  • Power unit
  • Engine repair
  • Cooling and lubrication system
  • Supply system
  • Exhaust system
  • Ignition system
  • Transmission
  • Clutch
  • Mechanical gearbox
  • Automatic gearbox
  • Drive shafts
  • Chassis, running gear
  • Car suspension
  • Steering
  • Brake system
  • Body and interior
  • Exterior (external elements)
  • Interior (internal elements)
  • Doors, locks and windows
  • Restoration and repair
  • Electrical equipment
  • Equipment and devices
  • Headlights and lighting
  • Power devices
  • Heating and ventilation
  • Electrical circuits
RenaultBook.ru © 2018–2026 | Mobile version | News and articles | Sitemap: EN BG BY UA RS HR RO PL SK HU | Administration | Site search | Bookmark
Duster 1 (2009-2017) | Fluence 1 (2009-2020, petrol) | Kangoo 1 (1997-2007) | Laguna 2 (2001-2007) | Logan 1 (2004-2012, petrol) | Logan 2 (2012-2020) | Megane 1 (1995-2002) | Megan 2 (2002-2009, petrol) | Sandero 1 (2007-2012, petrol) | Scenic 1 (1996-2003) | Symbol 1 (1999-2008, petrol) | Symbol 2 (2008-2013, petrol) | Renault 19 (1988-1996) | Espace I and II (1984-1996) | Espace III (1996-2002) | Clio 1 (1990-1998) |
We want your visit to be comfortable 😌 and use cookies 🍪 to do so.