
English Русский
Български
Беларускі
Український
Српски
Hrvatski
Română
Polski
Slovenský
Magyar
Bookmark Contacts Articles Sitemap
Company vehicles Peugeot Company vehicles Opel Company vehicles Skoda Company vehicles Land Rover Company vehicles Mitsubishi Company vehicles Volkswagen Company vehicles Honda
RenaultBook.ru


Duster   Fluence   Kangoo   Laguna   Logan   Megane   Sandero   Scenic   Symbol   Clio   Other
Clio 1 (1990-1998)

Rear trailing arm bearings (closed rear axle) — replacement (Renault Clio 1)

  • Main
  • Clio
  • Clio 1 (1990-1998)
  • Chassis, running gear
  • Car suspension
  • Rear trailing arm bearings (closed rear axle) — replacement
0
Note: It is necessary to purchase or make a suitable tool - see text.


1. Remove both trailing arms (see Chapter 13).

2. Clamp the left trailing arm in a vice.

3. To remove the bearings, purchase a Renault tool (see illustration) or make a replacement as follows. First, mark the exact position of the bearing.
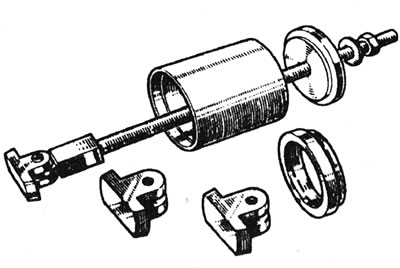
14.3 Renault Trailing Arm Bearing Removal Tool - Closed Rear Axle.

14.3 Renault Trailing Arm Bearing Removal Tool - Closed Rear Axle.


4. Select a threaded rod of sufficient length to reach the inner bearing, a tube of suitable diameter (see illustration), two thick washers of the same diameter as the bearings, a washer with a diameter larger than the tube, and two nuts.
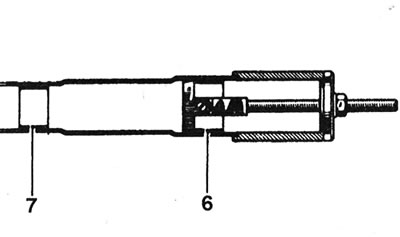
14.4 Remove the trailing arm bearings on the closed rear axle using the Renault tool: 6 - Outer…

14.4 Remove the trailing arm bearings on the closed rear axle using the Renault tool: 6 - Outer bearing; 7 - Inner bearing.


Cut off two sides of the smaller washer to create a flat strip with a hole in the center - this will be the turning end piece (see Renault tool). Pass the threaded rod through the hole in the strip and screw on the nut. Guide the strip and rod through the bearing so that the strip is behind the bearing. Place the tube on the rod until it touches the edge of the lever. Place a large washer on the end of the tube, then screw on the remaining nut. While holding the rod with pliers, tighten the nut to pull the bearing out, then repeat this action on the remaining bearing.

5. Clean the hole thoroughly. File down any burrs or rough spots that might interfere with assembly. Apply a small amount of general purpose grease to the outer edge of the new bearings, then gently press them into position using a spacer sleeve that rests only on the hard outer edge of the bearing.

6. Clamp the right trailing arm in a vice.

7. Mark the exact position of the bearing inner races on the trailing arm. Cut almost completely through both inner bearing races, being careful not to damage the axle. Use a chisel to split the rings and remove them. Also cut and remove the seal (see illustration).
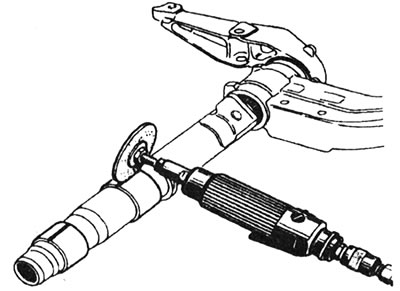
14.7. Remove the inner bearing rings of the rear axle using a grinding wheel.

14.7. Remove the inner bearing rings of the rear axle using a grinding wheel.


8. Clean the lever and install a new seal.

9. Press on new inner rings, beveled side first. When doing this, make sure the torsion bars are seated correctly in their mounting points.

(View the original source on this resource: «renaultbook.ru»)

10. There is no need to lubricate the needle bearings as they are already supplied with grease.

11. Assemble and install the trailing arms (see Chapter 13).
This article is available on: russian, bulgarian, belarusian, ukrainian, serbian, croatian, romanian, polish, slovak, hungarian
Article has been reviewed by editor: Fedoseev Denis
Share with friends:
Previous
Clio 1: Car suspension
Next

Rear Suspension Trailing Arm (Closed Rear Axle) — removal and…
Rear torsion bar — removal and installation
Rear anti-roll bar (closed rear axle) — removal and installation
Rear shock absorber — removal, inspection and installation
Rear wheel hub bearings — inspection, removal and installation
Rear Bearing Bracket Bushings (Closed Rear Axle) — replacement
Rear axle (with open torsion bars) — removal, overhaul and…
Underbody/Rear Suspension Overhang — checking and adjusting
Wheel alignment angles
Other articles on other Renault models

➽ Removal and installation the rear anti-roll bar (closed rear… Renault Megane 1 (1995-2002)
➽ Rear axle assembly (4x2 drive) Renault Duster 1 (2009-2017)
➽ Rear wheel hub axle Renault Fluence 1 (2009-2020, petrol)
➽ Tubular beam rear axle Renault Kangoo 1 (1997-2007)
➽ Removal and installation the rear wheel hub axle Renault Laguna 2 (2001-2007)
Link to this article in different formats
Reviews and comments of visitors
No comments yet


Add two numbers 13 + 43


Clio 1 (1990-1998) 
  • General information
  • Maintenance
  • Troubleshooting
  • Power unit
  • Petrol engines 1.1 l (C)
  • Petrol engines 1.2 l (D)
  • Petrol engines 1.2/1.4 l (E)
  • Petrol engines 1.8 l (F)
  • Diesel engines
  • Overhaul of engines
  • Cooling and heating
  • Fuel system (carburetor)
  • Central fuel injection
  • Distributed fuel injection
  • Fuel system (diesel)
  • Starting and charging system
  • Ignition system (transistor)
  • Ignition system (electronic)
  • Pre-heating of diesel engines
  • Transmission
  • Clutch
  • Manual gearbox
  • Automatic gearbox
  • Drive shafts
  • Chassis, running gear
  • Brake system
  • Car suspension
  • Steering system
  • Body and interior
  • Exterior (external elements)
  • Doors, locks and windows
  • Electrical equipment
  • Equipment and devices
  • Electrical circuits
RenaultBook.ru © 2018–2026 | Mobile version | News and articles | Sitemap: EN BG BY UA RS HR RO PL SK HU | Administration | Site search | Bookmark
Duster 1 (2009-2017) | Fluence 1 (2009-2020, petrol) | Kangoo 1 (1997-2007) | Laguna 2 (2001-2007) | Logan 1 (2004-2012, petrol) | Logan 2 (2012-2020) | Megane 1 (1995-2002) | Megan 2 (2002-2009, petrol) | Sandero 1 (2007-2012, petrol) | Scenic 1 (1996-2003) | Symbol 1 (1999-2008, petrol) | Symbol 2 (2008-2013, petrol) | Renault 19 (1988-1996) | Espace I and II (1984-1996) | Espace III (1996-2002) | Clio 1 (1990-1998) |
We want your visit to be comfortable 😌 and use cookies 🍪 to do so.