
English Русский
Български
Беларускі
Український
Српски
Hrvatski
Română
Polski
Slovenský
Magyar
Bookmark Contacts Articles Sitemap
Company vehicles Peugeot Company vehicles Opel Company vehicles Skoda Company vehicles Land Rover Company vehicles Mitsubishi Company vehicles Volkswagen Company vehicles Honda
RenaultBook.ru


Duster   Fluence   Kangoo   Laguna   Logan   Megane   Sandero   Scenic   Symbol   Clio   Other
Clio 1 (1990-1998)

Tie Rod End Ball Joint — removal and installation (Renault Clio 1)

  • Main
  • Clio
  • Clio 1 (1990-1998)
  • Chassis, running gear
  • Steering system
  • Tie Rod End Ball Joint — removal and installation
0
Contents: Removal 🠛 Installation 🠛

Removal


Note: A ball joint puller is required.


1. Apply the handbrake, then jack up the front of the car and support it on axle stands. Remove the front wheel.

2. If the ball joint cannot be replaced, use a ruler and marking tool to mark its position on the steering rod.

3. While holding the ball joint, loosen its lock nut a quarter of a turn. Do not move the lock nut from this position - it will serve as a guide during installation.

4. Remove the nut securing the steering rod ball joint to the steering knuckle. Release the ball joint pin using a special puller. If the ball joint is not replaceable, secure its threaded end by tightening the nut a few turns (see illustration).
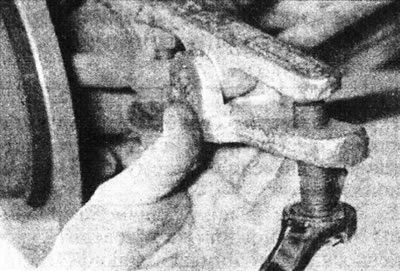
23.4. Remove the steering rod ball joint from the steering knuckle using a special puller.

23.4. Remove the steering rod ball joint from the steering knuckle using a special puller.


5. While counting the number of revolutions, unscrew the ball joint from the tie rod end.

6. Count the number of visible thread turns between the end of the ball joint and the locknut and record the result. If a new ball joint is being installed, remove the lock nut from the old joint.


7. Carefully clean the ball joint and threads. Replace the hinge if it moves too loosely or too tightly, or if it is excessively worn or damaged. Carefully inspect the hinge pin and threads. If the hinge boot is damaged, the hinge must be replaced.

Installation


8. If a new joint is being installed, thread the lock nut onto it and position it so that the same number of thread turns are visible as was noted before removal.

9. Screw the joint into the steering rod by the number of turns counted during removal.

10. Install the ball joint pin into the steering knuckle and tighten the fastening nut to the specified tightening torque Specifications. If this cannot be done due to the rotation of the pin, fix it by pressing the back side of the hinge with a jack.

11. Install the wheel, lower the vehicle to the ground and tighten the wheel bolts to the specified tightening torque Specifications.

View the original source on this resource: RENAULTBOOK

12. Check the front wheel alignment (Chapter 25), then tighten the ball joint lock nut to the specified tightening torque Specifications.
This article is available on: russian, bulgarian, belarusian, ukrainian, serbian, croatian, romanian, polish, slovak, hungarian
Article has been reviewed by editor: Fedoseev Denis
Share with friends:
Previous
Clio 1: Steering system
Next

Power steering hydraulic system — bleeding
Electric power steering pump — general description, removal and…
Mechanical power steering pump — removal and installation
Power steering assembly — removal, overhaul and installation
Assembly of the steering gear without power assistance — removal,…
Tie rod and inner ball joint — removal and installation
Other articles on other Renault models

➽ Checking the ball joint of the lower arm of the front suspension Renault Duster 1 (2009-2017)
➽ Checking the ball joint of the front axle arm Renault Fluence 1 (2009-2020, petrol)
➽ Ball joint Renault Kangoo 1 (1997-2007)
➽ Removal and installation the inner ball joint of the steering rod Renault Laguna 2 (2001-2007)
➽ Replacing the ball joint Renault Logan 1 (2004-2012, petrol)
Link to this article in different formats
Reviews and comments of visitors
No comments yet


Add two numbers 39 + 17


Clio 1 (1990-1998) 
  • General information
  • Maintenance
  • Troubleshooting
  • Power unit
  • Petrol engines 1.1 l (C)
  • Petrol engines 1.2 l (D)
  • Petrol engines 1.2/1.4 l (E)
  • Petrol engines 1.8 l (F)
  • Diesel engines
  • Overhaul of engines
  • Cooling and heating
  • Fuel system (carburetor)
  • Central fuel injection
  • Distributed fuel injection
  • Fuel system (diesel)
  • Starting and charging system
  • Ignition system (transistor)
  • Ignition system (electronic)
  • Pre-heating of diesel engines
  • Transmission
  • Clutch
  • Manual gearbox
  • Automatic gearbox
  • Drive shafts
  • Chassis, running gear
  • Brake system
  • Car suspension
  • Steering system
  • Body and interior
  • Exterior (external elements)
  • Doors, locks and windows
  • Electrical equipment
  • Equipment and devices
  • Electrical circuits
RenaultBook.ru © 2018–2026 | Mobile version | News and articles | Sitemap: EN BG BY UA RS HR RO PL SK HU | Administration | Site search | Bookmark
Duster 1 (2009-2017) | Fluence 1 (2009-2020, petrol) | Kangoo 1 (1997-2007) | Laguna 2 (2001-2007) | Logan 1 (2004-2012, petrol) | Logan 2 (2012-2020) | Megane 1 (1995-2002) | Megan 2 (2002-2009, petrol) | Sandero 1 (2007-2012, petrol) | Scenic 1 (1996-2003) | Symbol 1 (1999-2008, petrol) | Symbol 2 (2008-2013, petrol) | Renault 19 (1988-1996) | Espace I and II (1984-1996) | Espace III (1996-2002) | Clio 1 (1990-1998) |
We want your visit to be comfortable 😌 and use cookies 🍪 to do so.