



Removal
1. Remove the battery (Section 5A).
2. Use special clamps to clamp the supply and return hoses near the power steering fluid reservoir. This will reduce fluid loss during subsequent steps.
3. Block the rear wheels, apply the handbrake, jack up the front of the car and place it on axle stands. Remove the front wheels.
4. Remove the nuts securing the ball joints of the steering rods to the steering knuckles. Release the hinge rods using a special puller.
5. Using a hammer and punch, make alignment marks on the intermediate shaft universal joint and the steering gear pinion. Loosen and remove the nut and tie bolt securing the joint to the gear.
6. Remove the nut securing the feed pipe holder bracket to the steering gear housing. Mark the couplings to ensure proper installation, then loosen the return and supply tube coupling nuts. Be prepared for the liquid to come out; place a suitable container under the tubes. Spilled liquid cannot be reused. Disconnect both tubes. Cap the ends of the tubes and the openings in the steering gear to prevent excessive fluid loss and dirt from entering the unit.
7. Remove the four nuts and bolts securing the steering gear to the subframe. Remove the clamps and brackets from both ends of the steering gear.
8. Separate the steering gear pinion from the universal joint and remove the assembly. Please note that on some models it may be necessary to remove the exhaust outlet pipe (see Section 4) to obtain the required clearance.
Bulkhead
9. Inspect the steering gear for damage and signs of wear (see illustration).
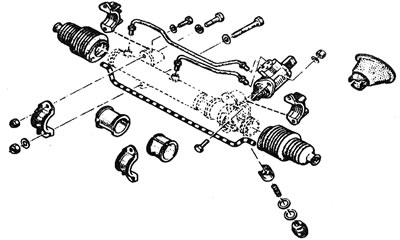
19.9. Power steering components.
Make sure the rack moves freely through its full stroke. The steering gear assembly should be replaced if internal wear or damage is present. The procedures for replacing the steering rod and its ball joint are given in Chapters 24 and 23. The gear housing assembly can also be replaced, but it is recommended to have this task done by a Renault dealer.
10. Inspect the steering gear couplings for signs of leaks and ensure the coupling nuts are tight.
11. Inspect the steering gear rubber mounts for damage; replace them as necessary.
Installation
12. Bring the steering gear assembly into working position. Align the marks made before removal, then connect the universal joint to the grooves of the steering gear pinion.
13. Install the mounting brackets and clamps onto the steering gear rubber mounts, then insert the four steering gear mounting bolts from the rear of the subframe. Tighten the nuts and tighten the bolts to the specified tightening torque Specifications.
14. Install the exhaust outlet pipe (if deleted).
15. Install the universal joint tie bolt and nut and tighten them to the specified tightening torque Specifications.
16. Wipe the supply and return pipe connectors clean, then install them on the steering gear. Tighten the union nuts. Screw on and tighten the nut that secures the feed tube to the steering gear.
17. Insert the steering rod ball joints into the steering knuckles. Tighten their fastening nuts to the specified tightening torque Specifications.
18. Install the wheels, lower the vehicle to the ground and tighten the wheel bolts to the specified torque Specifications. Install the battery.
19. Remove the clamps from the tank hoses. Bring the fluid level in the reservoir to the normal level and bleed the power steering hydraulic system (Chapter 22).
20. Finally, check the front wheel alignment (see Chapter 25).