



Note: A ball joint puller is required.
Removal
1. Block the rear wheels, apply the handbrake, jack up the front of the car and place it on axle stands. Remove both front wheels.
2. Remove the nuts securing the ball joints of the steering rods to the steering knuckles. Release the ball joint rods using a special puller.
3. Working underneath the vehicle, cut the retaining clip, then peel the protective cover away from the steering gear to access the intermediate shaft universal joint pinch bolt.
4. Apply alignment marks to the intermediate shaft universal joint and steering gear pinion using a hammer and punch. Remove the nut and tie bolt securing the joint to the gear.
5. Remove the two nuts and their bolts securing the steering gear assembly to the subframe. Separate the steering gear pinion from the universal joint and remove the assembly (see illustrations).
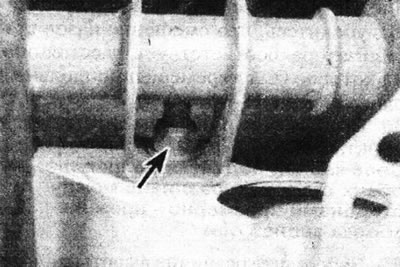
18.5a. Mounting nut for non-power steering gear (marked with an arrow)...
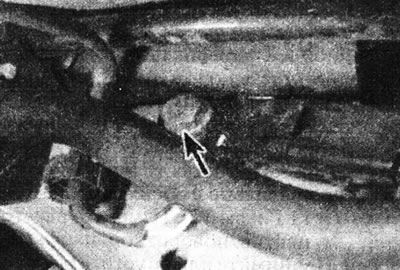
18.5b....and a bolt (marked with an arrow) - view from below.
Bulkhead
General description
6. The procedures for replacing the ball joints of the tie rod ends and the tie rods themselves are given in Chapters 23 and 24.
7. Inspect the steering gear assembly for damage and signs of wear. Make sure the rack moves freely through its full stroke. Internal wear or damage can only be corrected by replacing the steering gear assembly.
Adjusting the thrust plunger
8. If there is excessive play in the rack in the steering gear housing, accompanied by a knocking noise, it may be possible to correct this by adjusting the rack thrust plunger. Bend back the locking collar on the plunger adjusting nut. Using a 10mm Allen key, tighten the adjusting nut until the play disappears (but not more than three chamfers). Make sure the rack still moves freely through its full stroke, then tighten the adjusting nut (see illustration).
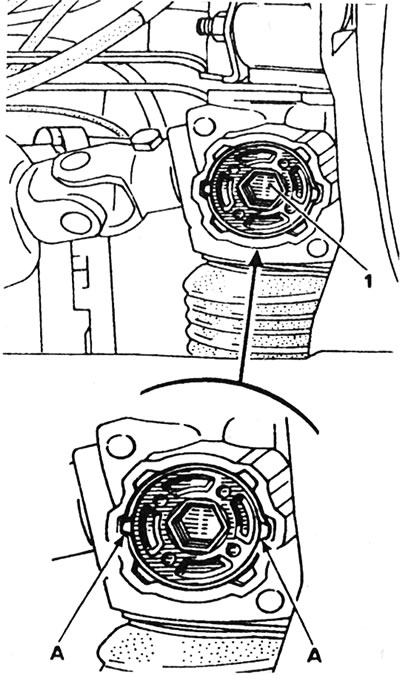
18.8 Adjusting the steering rack thrust plunger: 1 - Adjusting nut; A - Fixation points.
Noise-damping bushing
9. If the steering gear makes noise when turning the steering wheel, the noise-damping bushing is probably dry. Buy some lubricant "Molykote 33 medium" and the mounting clamp for the steering gear protective cover. Cut the boot clamp at the end of the steering gear opposite the pinion housing. Bend back and pull off the protective cover. Move the steering rack so that its now accessible end is fully extended, then apply grease to the surface of the steering rack. Install the protective cover onto the mechanism housing and secure it with a new clamp.
10. The noise-damping sleeve can be replaced if necessary. Remove the steering rod on the desired side and pry out the old bushing with a screwdriver. Install the new bushing so that its protrusions fit into the slots in the steering gear housing (see illustration).
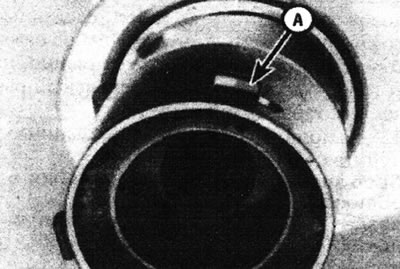
18.10. Noise-damping bushing of steering rack; the projections (A) must fit into the slots.
Lubricate the bushing as described above.
Installation
11. Bring the steering gear assembly into working position. Connect the universal joint to the grooves of the steering gear pinion, aligning the marks made before removal.
12. Insert the steering gear mounting bolts from the rear of the subframe. Install the nuts and tighten them to the torque specified in the Specifications.
13. Install the universal joint tie bolt and nut and tighten them to the specified tightening torque Specifications. Move the protective cover onto the steering gear and secure it with a new tie.
14. Insert the ball joints of the steering rods into the steering knuckles and tighten their fastening nuts with the tightening force specified Specifications.
15. Install the wheels, lower the vehicle to the ground and tighten the wheel bolts to the specified torque Specifications.
16. Check the front wheel alignment (Chapter 25).