
Attention! If one of the devices on the shield fails, the shield is removed and replaced as a set with a new one. Only the transparent plastic insert can be changed separately (glass) shield.
Removing
1. Disconnect the ground wire terminal (-) from the battery. Attention! At the same time, some data is deleted from the memory of storage devices, for example, an access code is erased from the radio receiver, which prevents unauthorized use of the receiver. Before disconnecting the battery, read the instructions in chapter «Removing and installing the battery».
2. Remove the covers from the left right speakers near the instrument panel, under them with a screwdriver, and unscrew the two bolts A on the left and right sides (see illustration).
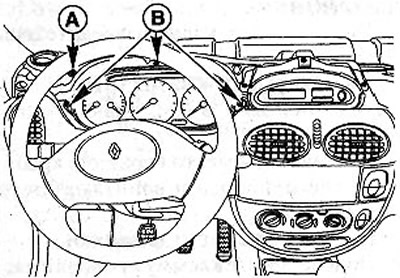
28.2 Unscrew the two screws A on the left and right sides
3. Remove the top cover of the panel of devices, having given it in the direction, as it is shown by arrows on an illustration.
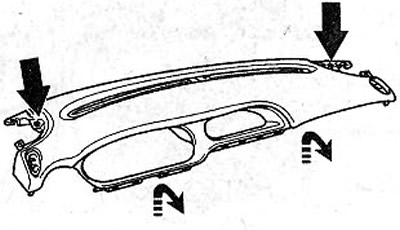
28.3 Remove the top cover of the instrument panel by pushing it in the direction as shown by the arrows
4. Unscrew the three bolts B that secure the instrument panel (see illustration 28.2).
5. Remove the instrument panel and disconnect the plugs by squeezing the leads.
Attention! Do not lose the rubber bushings 1 located on the right and left sides of the shield (see illustration).
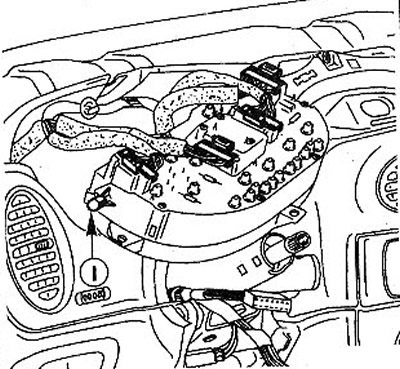
28.5 Do not lose the rubber bushings I located on the right and left sides of the shield
Installation
6. Connect all plugs to the shield and fix them.
7. Put the shield in place and secure with three bolts B (see illustration 28.2).
8. Replace the top cover of the instrument panel and screw in the mounting bolts.
9. Replace the speakers.
10. Connect wire terminal «masses» (-) to the negative pole of the battery.
11. Set the clock and program the radio.
12. Check up functioning of indexes and bulbs on a board of devices.