
English Русский
Български
Беларускі
Український
Српски
Hrvatski
Română
Polski
Slovenský
Magyar
Bookmark Contacts Articles Sitemap
Company vehicles Peugeot Company vehicles Opel Company vehicles Skoda Company vehicles Land Rover Company vehicles Mitsubishi Company vehicles Volkswagen Company vehicles Honda
RenaultBook.ru


Duster   Fluence   Kangoo   Laguna   Logan   Megane   Sandero   Scenic   Symbol   Clio   Other
Scenic 1 (1996-2003)

Clock and radio display — removal and installation (Renault Scenic 1)

  • Main
  • Scenic
  • Scenic 1 (1996-2003)
  • Electrical equipment
  • Equipment and devices
  • Clock and radio display — removal and installation
0
Contents: Removal 🠛 Installation 🠛

Removal


1. Disconnect the negative (-) battery cable terminal.

Warning! This will erase some data from the memory of the storage devices, for example, the access code that prevents unauthorized use of the radio receiver will be erased. Before disconnecting the battery, please read the instructions in the chapter "Removal and installation the battery".


2. Remove the top cover of the instrument panel (see illustration 28.3).

3. Unscrew the J screws securing the clock and disconnect the multi-pin plug (see illustration).
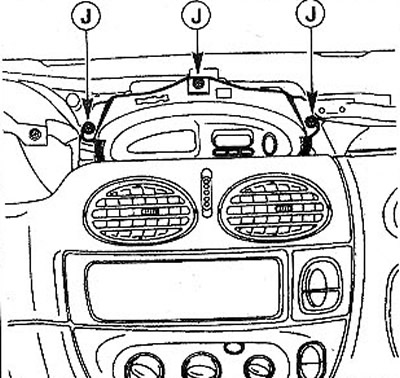
29.3 Remove the J screws securing the clock

29.3 Remove the J screws securing the clock


Installation


4. Connect the multi-pin plug to the watch and secure the watch with screws.

5. Replace the top cover of the instrument panel and secure it with screws.

6. Replace the speakers.

7. Connect the negative (-) battery terminal to the negative battery terminal.

8. Set the clock and program the radio.
This article is available on: russian, bulgarian, belarusian, ukrainian, serbian, croatian, romanian, polish, slovak, hungarian
Article has been reviewed by editor: Fedoseev Denis
Share with friends:
Previous
Scenic 1: Equipment and devices
Next

Control devices — removal and installation
Fuses — replacement
Security alarm and anti-theft device
Sound signal — removal and installation
Rear Window Defogger — Check
Steering column switches — removal and installation
Purpose of contacts of steering column switches
Ignition switch — removal and installation
Switches on the dashboard and on the door
Door contact switches — removal and installation
Other articles on other Renault models

➽ Headlight adjustment, horn, cigarette lighter, clock/display,… Renault Megane 1 (1995-2002)
➽ Keys, radio frequency remote control Renault Duster 1 (2009-2017)
➽ Video display and navigation system Renault Fluence 1 (2009-2020, petrol)
➽ Clock and temperature readings Renault Laguna 2 (2001-2007)
➽ Removal and installation a car radio Renault Symbol 1 (1999-2008, petrol)
Link to this article in different formats
Reviews and comments of visitors
No comments yet


Add two numbers 20 + 26


Scenic 1 (1996-2003) 
  • General information
  • User manual
  • Maintenance
  • Troubleshooting
  • Power unit
  • Engine repair
  • Cooling and ventilation
  • Injection system (petrol)
  • Fuel system (diesel)
  • Fuel system
  • Exhaust system
  • Ignition system
  • Transmission
  • Clutch
  • Car gearbox
  • Chassis, running gear
  • Brake system
  • Car suspension
  • Steering
  • Body and interior
  • Exterior (external elements)
  • Interior (internal elements)
  • Doors, locks and windows
  • Electrical equipment
  • Equipment and devices
  • Headlights and lighting
  • Power devices
  • Electrical circuits
RenaultBook.ru © 2018–2026 | Mobile version | News and articles | Sitemap: EN BG BY UA RS HR RO PL SK HU | Administration | Site search | Bookmark
Duster 1 (2009-2017) | Fluence 1 (2009-2020, petrol) | Kangoo 1 (1997-2007) | Laguna 2 (2001-2007) | Logan 1 (2004-2012, petrol) | Logan 2 (2012-2020) | Megane 1 (1995-2002) | Megan 2 (2002-2009, petrol) | Sandero 1 (2007-2012, petrol) | Scenic 1 (1996-2003) | Symbol 1 (1999-2008, petrol) | Symbol 2 (2008-2013, petrol) | Renault 19 (1988-1996) | Espace I and II (1984-1996) | Espace III (1996-2002) | Clio 1 (1990-1998) |
We want your visit to be comfortable 😌 and use cookies 🍪 to do so.