



Contents: Removal 🠛 Installation 🠛
The factory-installed radio is equipped with mounting clamps that allow the radio to be quickly installed and removed. However, this is only possible with special brackets, which are included in the delivery set or purchased separately in a specialized store. The fact that the radio is equipped with mounting clamps can usually be determined by four holes on the front panel. The number of holes also determines the type of device needed to remove the radio.
Removal
1. Disconnect the negative (-) battery cable terminal.
Warning! This will erase some data from the memory of the storage devices, for example, the access code preventing unauthorized use of the radio receiver will be erased. Before disconnecting the battery, please read the instructions in the chapter "Removing and installing the battery".
2. Install both removable brackets into the holes on the right and left sides of the radio front panel.
3. Slightly press the bracket 4 in the direction of arrow 6. As a result, the protrusions 5, which hold the radio receiver, are moved to the opposite side 7. In this position of the brackets, evenly pull out the radio receiver, preventing it from skewing in the mounting hole (see illustration).
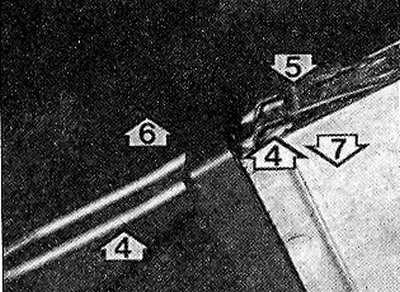
36.3 Slightly press the bracket 4 in the direction of arrow 6
[Text published on the website www.Renaultbook.ru]
4. Mark the speaker plugs with tape (right/left) and disconnect them. Disconnect the antenna plug and the radio power plugs.
5. Remove the removable brackets by pressing the locking tabs with a small screwdriver (see illustration).
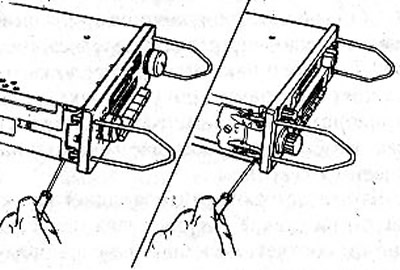
36.5 Remove the removable brackets by pressing the locking tabs with a small screwdriver
Installation
6. Connect the multi-pin plugs and the antenna wire plug to the sockets on the back of the radio.
7. Insert the radio into the mounting hole on the panel. The receiver should lock into place.
8. Connect the negative (-) cable terminal to the battery.
9. Turn on the radio and check its functionality. If the radio has a security code, enter it, because such radios do not start functioning after connecting the power supply, but only after entering the correct security code (see the radio receiver operating instructions).
Instructions for installing a radio receiver on vehicles that do not come with a radio receiver
If the car is designed for subsequent installation of a radio receiver, then all the wires are already present, respectively, two wires for connecting the speakers and an antenna cable.
Attention! If the connecting wires were not laid during the manufacture of the vehicle, ensure that they are laid and insulated in such a way as to prevent short circuits and fires.
To install the radio, remove the cover over the heater control unit. The connecting wires are located under this cover. The speakers can be installed after removing the decorative grilles.
The car is equipped with appropriate noise suppression as standard.
Check the reliability of radio reception. To do this, tune in to a weakly received radio station broadcasting on medium waves at a frequency of approximately 1400 kHz. If there are no radio stations on this frequency, then you can use the noise received by the receiver on this frequency. To do this, rotate the reception tuning screw (on the left side of the front panel of the radio) with a small screwdriver, achieving the best reception or the highest noise level.
Attention! The adjustment screw can be turned a maximum of 1/2 turn.