
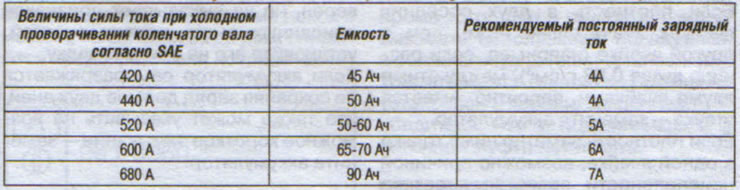
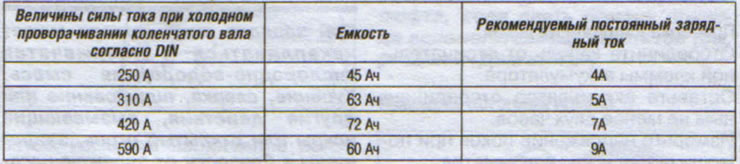
Operating characteristics
The performance of a car battery is usually expressed as follows:
- the magnitude of the current when cranking the crankshaft on a cold engine;
- reserve capacity;
- charging capacity.
Recommended charging current
The table below shows the SAE and DIN cold cranking amps along with the corresponding capacitance and recommended charging current.
Checking the electrolyte level
Note. Check the electrolyte level at every regular service. More frequent checks may be required for vehicles operating in severe conditions or in hot climates. Always check the electrolyte level before and after charging the battery.
Remove the battery plugs.
SAE cold cranking amps and corresponding capacitance and recommended constant charging current
Cold cranking current values according to DIN standard and corresponding capacitance and recommended constant charging current
Remove the battery plugs.
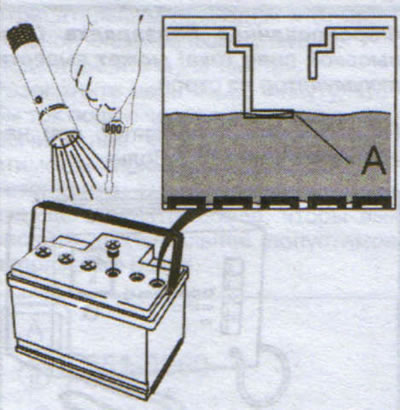
Check the level in all cells of the battery. Each cell has its own maximum mark (A) (use a flashlight). Fill the battery up to the maximum mark A with distilled or non-ionized water.
Attention. Do not use plain water, it may damage the battery.
Attention. Do not fill the battery above the maximum mark. This may cause electrolyte leakage.
Install plugs.
Attention. Do not replace gray plugs (with exhaust filter) on black (tightly closed plugs).
Fully tighten the plugs.
Attention. The battery contains an oxygen-hydrogen mixture, which is highly explosive. Open fire or smoking near the battery may cause an explosion.
The electrolyte is highly toxic. If it comes into contact with skin, clothing or car paint, immediately flush the area with plenty of water.
If electrolyte enters the engine compartment, it can corrode the engine and vehicle wiring.
Electrolyte Density Check
The density of the electrolyte is measured using an electrolyte meter or refractometer, at room temperature.
Measure the density in all cells. If the density is above 1.225 g/cm3 in each cell and the difference in density between cells is less than 0.03 g/cm3, The battery needs to be tested under load.
If the density is below 1.225 g/cm3 in each cell and the difference in density between cells is less than 0.03 g/cm3, the battery needs to be charged.
If the density in two neighboring cells is significantly lower than in the other cell (for example, if the difference is higher than 0.03 g/cm3), there is probably a leak between these two cells - replace the battery.
If the density is noticeably lower in only one cell, a short circuit may be the cause of the malfunction. Check if the electrolyte is discolored. If so, replace the battery.
Quiescent voltage test
Disconnect the cable from the negative battery terminal.
Leave the battery disconnected for at least two hours.
Measure the quiescent voltage with a digital multimeter. The battery needs to be charged if the quiescent voltage is below 12.45 V (the charging procedure is described later in this section).
Make sure the battery is charging.
If charging is normal, check the battery under load.
If the battery is not charging, it may be sulphated. Sulfitation means that the battery is damaged due to insufficient charging—replace the battery.
Load test
During this test, the load current should increase to a value greater than the battery capacity in amps (A) at least three times.
For example:a battery with a capacity of 60 Ah needs to be loaded with a current of 180 A (= 3 x 60).
Read the battery voltage after approximately 15 seconds—the voltage should be 9.6 volts. If this voltage is not reached, the battery may have an open circuit or short circuit.
Open circuit: can be identified, for example, by a rapid drop in voltage to 0 V when the battery is under load, or if the voltmeter does not read when connected to the battery - replace the battery.
Short circuit: In the event of this fault, the cell or cells that have a short circuit begin to boil - replace the battery.
Self-discharge
After the battery has been tested and does not show any of the symptoms described above, set it to self-discharge.
If the battery self-discharges without holding a charge for more than two days, this may also indicate a possible short circuit - replace the battery.
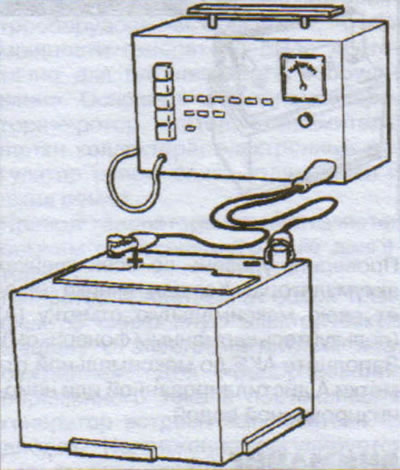
Charging batteries
Attention. When the battery is being charged, an explosive oxygen-hydrogen mixture may accumulate. Smoking, welding, grinding, or other activities that cause sparks or open flames are prohibited in the vicinity of a charging battery. Never charge batteries in a car. Charge in a well-ventilated area.
Attention. Boost recharge (at high current) may damage the battery.
Do not charge the battery at a voltage higher than 14.5 volts.
Before charging the battery, check the electrolyte level as described above. Do not charge the battery if the electrolyte level is low.
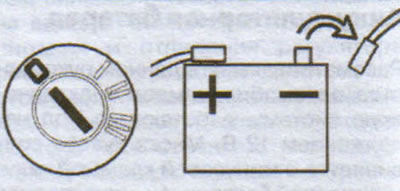
Remove the battery from the car. Always disconnect the negative terminal first to avoid sparking.
Connect the battery charger to the terminals.
Charge the battery for approximately 10 hours at the recommended constant current.
Replace the battery after charging.
Connect the positive terminal first, then the negative.
Disconnecting the battery
Attention. Since the additional security system (SRS) continues to operate for some time after turning off the power, wait three minutes before working inside the car.
If the converter malfunction lamp is lit in the instrument cluster, the engine management system malfunction codes must first be read and, if necessary, their causes corrected before the vehicle is turned off the power supply.
The ignition must be turned off for at least five minutes before the battery is disconnected, so that the control modules have time to save the information.
Before installing the battery
Attention. Turn on electrical consumers. No one should be in the vehicle when the battery is connected. This is a precautionary measure in case the airbag module is activated when the power supply is connected.
Fan Calibration
If the vehicle is equipped with an air conditioner, the fan speed must be calibrated after disconnecting the battery. Turn on the ignition.
Turn the fan knob to the maximum blowing position. Turn the fan knob to the minimum airflow position.