
English Русский
Български
Беларускі
Український
Српски
Hrvatski
Română
Polski
Slovenský
Magyar
Bookmark Contacts Articles Sitemap
Company vehicles Peugeot Company vehicles Opel Company vehicles Skoda Company vehicles Land Rover Company vehicles Mitsubishi Company vehicles Volkswagen Company vehicles Honda
RenaultBook.ru


Duster   Fluence   Kangoo   Laguna   Logan   Megane   Sandero   Scenic   Symbol   Clio   Other
Clio 1 (1990-1998)

After-heating microswitch — adjustment, testing, removal and installation (Renault Clio 1)

  • Main
  • Clio
  • Clio 1 (1990-1998)
  • Power unit
  • Pre-heating of diesel engines
  • After-heating microswitch — adjustment, testing, removal and installation
0
Contents: Adjustment 🠛 Examination 🠛 Removal 🠛 Installation 🠛

Adjustment


1. The engine must be turned off. Press the throttle lever fully and insert a 5 mm thick feeler gauge between the lever and the maximum engine speed stop screw on the fuel pump (see illustration).
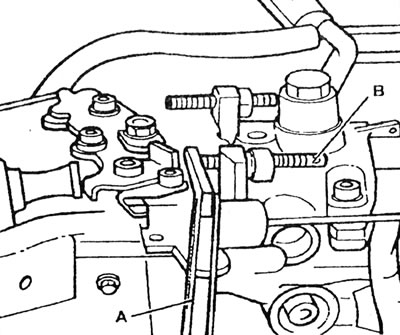
4.1. Adjusting the after-heating switch: A - 5 mm feeler gauge; B - Maximum speed locking screw.

4.1. Adjusting the after-heating switch: A - 5 mm feeler gauge; B - Maximum speed locking screw.


2. Adjust the position of the microswitch by loosening the two mounting screws and pushing it to the left. The microswitch should cut off power to the solenoid valve when the throttle lever is 5mm from the screw.

Examination


3. There is a simple method to check the operation of the microswitch. First, connect the wiring connector.

4. With the engine idling, disconnect and reconnect the EGR solenoid valve vacuum line three or four times. A noise should be heard indicating that the valve is correctly positioned.

5. The engine is still idling. Disconnect the vacuum tube again and place a small piece of paper on the connecting pipe (see illustration).
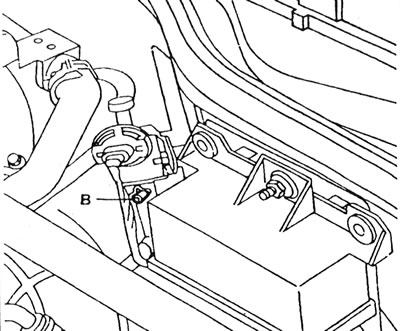
4.5. Connecting pipe (B) of the electromagnetic valve of exhaust gas recirculation.

4.5. Connecting pipe (B) of the electromagnetic valve of exhaust gas recirculation.


The paper must be held by a vacuum. Then press the gas lever. The paper should fall when the throttle lever is 5mm from the maximum engine speed screw, indicating that the vacuum supply is being cut off.

6. After completing these checks, repair the electrical and vacuum connections, then test drive the vehicle at high speed (in 3rd or 4th gear), to clear the pipes.

Removal


7. Disconnect the wiring connector, unscrew the two mounting screws and remove the microswitch from the bracket on the fuel pump.

Installation


8. Install in reverse order. Adjust the microswitch as described above and tighten the mounting screws.
This article is available on: russian, bulgarian, belarusian, ukrainian, serbian, croatian, romanian, polish, slovak, hungarian
Article has been reviewed by editor: Fedoseev Denis
Share with friends:
Previous
Clio 1: Pre-heating of diesel engines
Next

Heating system control unit — removal and installation
Glow Plugs — removal, inspection, and installation
Pre-start and post-start heating system — description and testing
Pre- and Post-Glow System Specifications — diesel engines
Air Conditioner Microswitch — adjustment, checking, removal and…
Coolant Temperature Sensor — checking, removing, and installing
Fuel Filter Heating System — general description and component…
Other articles on other Renault models

➽ Adjustment, testing, removal and installation of the glow… Renault Megane 1 (1995-2002)
➽ Heating, ventilation and air conditioning controls Renault Duster 1 (2009-2017)
➽ Steering column adjustment Renault Fluence 1 (2009-2020, petrol)
➽ Heating and ventilation system Renault Kangoo 1 (1997-2007)
➽ Ventilation and heating system Renault Laguna 2 (2001-2007)
Link to this article in different formats
Reviews and comments of visitors
No comments yet


Add two numbers 16 + 45


Clio 1 (1990-1998) 
  • General information
  • Maintenance
  • Troubleshooting
  • Power unit
  • Petrol engines 1.1 l (C)
  • Petrol engines 1.2 l (D)
  • Petrol engines 1.2/1.4 l (E)
  • Petrol engines 1.8 l (F)
  • Diesel engines
  • Overhaul of engines
  • Cooling and heating
  • Fuel system (carburetor)
  • Central fuel injection
  • Distributed fuel injection
  • Fuel system (diesel)
  • Starting and charging system
  • Ignition system (transistor)
  • Ignition system (electronic)
  • Pre-heating of diesel engines
  • Transmission
  • Clutch
  • Manual gearbox
  • Automatic gearbox
  • Drive shafts
  • Chassis, running gear
  • Brake system
  • Car suspension
  • Steering system
  • Body and interior
  • Exterior (external elements)
  • Doors, locks and windows
  • Electrical equipment
  • Equipment and devices
  • Electrical circuits
RenaultBook.ru © 2018–2026 | Mobile version | News and articles | Sitemap: EN BG BY UA RS HR RO PL SK HU | Administration | Site search | Bookmark
Duster 1 (2009-2017) | Fluence 1 (2009-2020, petrol) | Kangoo 1 (1997-2007) | Laguna 2 (2001-2007) | Logan 1 (2004-2012, petrol) | Logan 2 (2012-2020) | Megane 1 (1995-2002) | Megan 2 (2002-2009, petrol) | Sandero 1 (2007-2012, petrol) | Scenic 1 (1996-2003) | Symbol 1 (1999-2008, petrol) | Symbol 2 (2008-2013, petrol) | Renault 19 (1988-1996) | Espace I and II (1984-1996) | Espace III (1996-2002) | Clio 1 (1990-1998) |
We want your visit to be comfortable 😌 and use cookies 🍪 to do so.