
Removing
Vehicles with 1.4 liter engine (E7J)
The ignition coil is located on the front wall above the brake fluid reservoir.
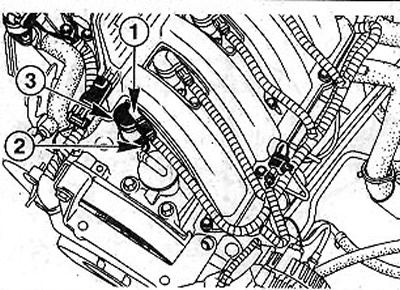
1. Disconnect the ignition distributor high voltage wire at terminal 1 of the ignition coil (see illustration).
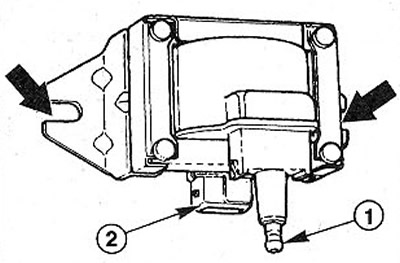
4.1 Disconnect the ignition distributor high voltage wire at terminal 1 of the ignition coil
2. Disconnect the multi-pin plug 2 by compressing the retaining spring (see illustration 4.1).
3. Remove the coil together with the holder by unscrewing the mounting bolts (see arrows in illustration 4.1).
Installation
4. Replace the holder and the ignition coil and secure them with bolts.
5. Connect high voltage wire and multi-pin plug.
Vehicles with 1.6 liter engine (K7M)
On vehicles with this engine, two twin ignition coils are flanged to the cylinder head. When performing work on the gas distribution mechanism, the coils must be dismantled together with the mount.
6. Turn off the ignition.
7. Remove the high voltage wire connectors 1 from the spark plugs (see illustration). In this case, you should pull on the tips, and not on the wires. To remove the tips, a certain amount of force is required. Immediately after disconnecting the tip, mark it so that it can be installed on the correct candle during assembly.
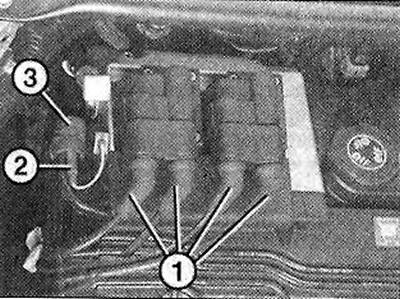
4.7 Remove the high voltage wire connectors 1 from the spark plugs
8. Disconnect the capacitor wire by unplugging the black plug 2 and releasing it from the guide 3 (see illustration 4.7).
9. Unscrew bolts of fastening of the tire of wires of a high tension on a head of the block of cylinders (see arrows in illustration).
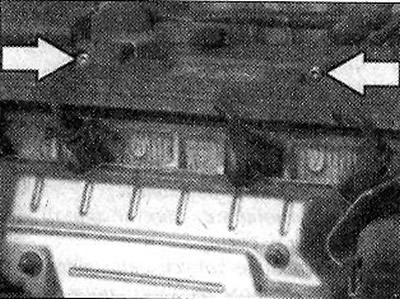
4.9 Remove the bolts securing the high voltage wire rail on the cylinder head (see arrows)
10. Remove the six bolts 1 that secure the ignition coil to the bracket (see illustration).
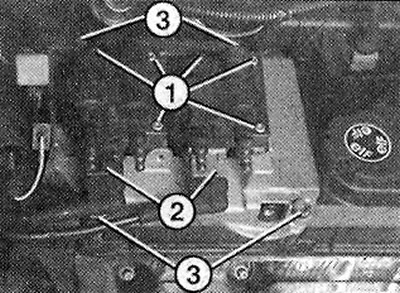
4.10 Unscrew the six bolts 1 that secure the ignition coil to the bracket
11. Disconnect multi-pin plug 2 (see illustration 4.10).
12. Unscrew four bolts 3 fastening the ignition coil bracket to the cylinder head (see illustration 4.10).
Installation
13. Bolt the ignition coil bracket to the cylinder head.
14. Connect the multi-pin plug of the ignition coils.
15. Attach the ignition coils to the bracket.
16. Connect the wire to the capacitor, lay it in the guide and fix it.
17. Connect the high voltage wires to the ignition coils, following the markings.
Vehicles with a 1.4-/1.6-liter petrol engine (K4J/K4M)
18. Disconnect tip 1 of the high voltage wire from the ignition coil. You should pull on the tip itself, and not on the wire (see illustration).
4.18 Disconnect the tip 1 of the high voltage wire from the ignition coil. You should pull on the tip itself, and not on the wire
19. Unscrew bolt 2 (see illustration 4.18).
20. Remove coil 3 from the spark plug (see illustration 4.18).
When assembling, tighten bolt 2 with a force of 15 Nm (see illustration 4.18).
Attention! Two ignition coils are connected in series to the engine control unit. Terminal 1 of the control unit corresponds to cylinders 2 and 3, terminal 32 to cylinders 1 and 4.
21. Cars with a 1.4-liter gasoline engine (E7J). Remove the distributor cap by unscrewing the mounting bolts (see arrows in illustration). From the inside, the distributor cap must be dry and without traces of breakdown. The carbon brush in the center of the distribution cover in the installation position must press the distributor slider, and must also not be damaged or be significantly worn. In the presence of these defects, the cover must be replaced.
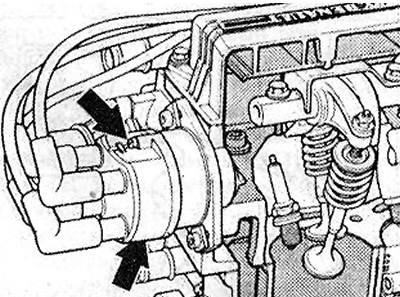
4.21 Remove the distributor cover by unscrewing the mounting bolts (see arrows)