
Attention! When removing and installing shock absorbers, the car must be on wheels.
Removing
1. Unscrew the bolt I fastening the lower support of the shock absorber (see illustration). In this case, the car must be on wheels.
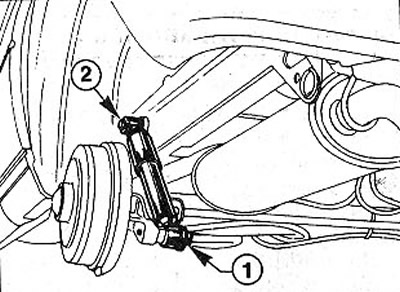
14.1 Unscrew the bolt 1 of the lower shock absorber support
Attention! Mark the position of the washer. It must be installed in its original position.
2. Mark the position of the rear wheel on the hub with paint. This will allow the assembly to set the balanced wheel in its original position.
3. Loosen the wheel nuts. The vehicle must be on wheels during this operation.
4. Put the car on jack stands and remove the rear wheel.
5. Unscrew the bolt 2 fastening the upper support of the shock absorber and remove the shock absorber (see illustration 14.1).
Installation
6. Check up operability of the shock-absorber, the corresponding chapter see.
Attention! Before installing a new shock absorber, push in its stem several times until it stops and release it, while holding the shock absorber in a vertical position. In this way, the shock absorber is brought into working condition after storage.
7. Lubricate the new shock mounting bolts with a thin layer of molybdenum grease, such as MOLYKOTE BR2.
8. Secure the shock absorber upper mount with the bolt by installing the washer and hand-tightening the bolt, but do not finish tightening the bolt.
9. Put the removed rear wheel, guided by the labels made before dismantling.
10. Lower the vehicle onto the wheels and tighten the wheel bolts in a criss-cross pattern to 90 Nm.
11. Fix the lower shock absorber support and tighten the bolt with a force of 130 Nm.
12. Perform the final tightening of the shock absorber upper support bolt with a force of 100 Nm.