
Removing
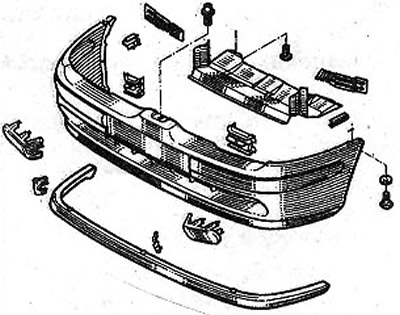
2.0 Front bumper components
1. Cars with fog lights. Disconnect wire terminal «masses» (-) from the battery.
Attention! In this case, some data is deleted from the memory of some blocks, for example, the security code of the radio receiver. Before disconnecting the battery, read the chapter «Battery - removal and installation».
2. Mark with paint the position of the front wheels on the hubs. This will allow the assembly to set the balanced wheel in its original position.
3. Loosen the wheel bolts. In this case, the car must be on wheels.
4. Install the front of the car on the goats and remove the wheels.
5. Unscrew the two bolts A on both sides of the car, as well as the bolt B on the wheel arch, using a T20 screwdriver (see illustration).
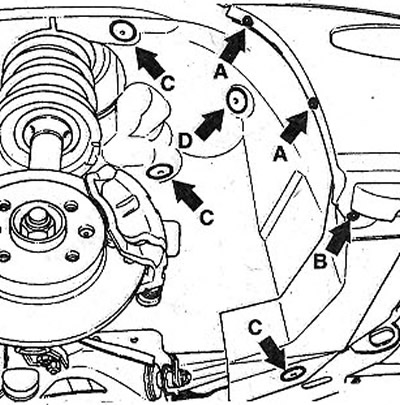
2.5 Unscrew the two bolts A on both sides of the car, as well as the bolt B on the wheel arch, using a T20 screwdriver
6. Use a screwdriver to remove clips C and D (see illustration 2.5).
7. Remove the front bumper from the fender liner.
8. Disconnect, if present, the plug E of the fog lights in the left wheel arch (see illustration).
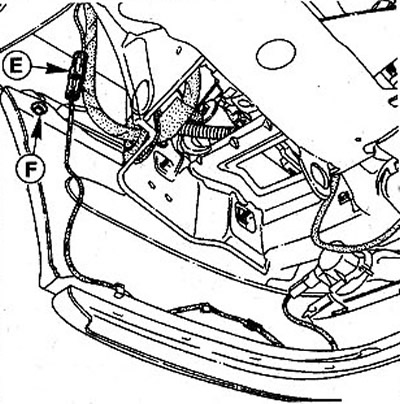
2.8 Disconnect, if present, plug E of the fog lights in the left wheel housing
9. Unscrew the two fixing screws F with a 10 mm socket (see illustration 2.8).
10. Remove the two bolts on the front of the engine mudguard (see illustration).
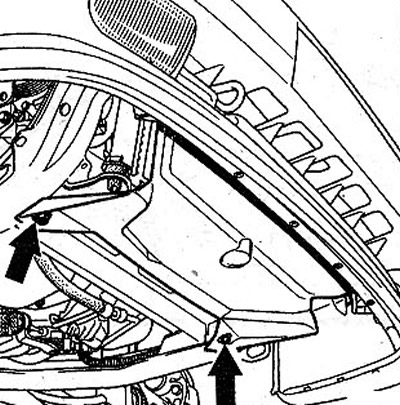
2.10 Remove the two bolts on the front of the engine mudguard
11. Unscrew the bolt that secures the bumper in the middle (see illustration).
2.11 Unscrew the bolt that secures the bumper in the middle
12. Cars with headlight washer. Disconnect the washer fluid hoses from the bumper.
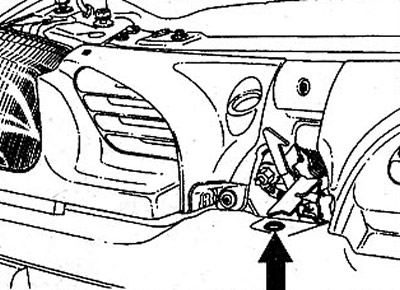
13. Disengage the bumper side stop (see arrow in illustration) and, acting together with an assistant, remove the bumper by pushing it forward.
2.13 Disengage the bumper side stop (see arrow)
Disassembly
14. Remove all clips A that connect the bumper and spoiler (see illustration). Bumper and its lower part (spoiler) can be replaced individually.

2.14 Remove all clips A that connect the bumper and spoiler
15. Install the new bumper spoiler and secure it with a grapple or clamp. The spoiler is centered on the bumper using pins C (see illustration).
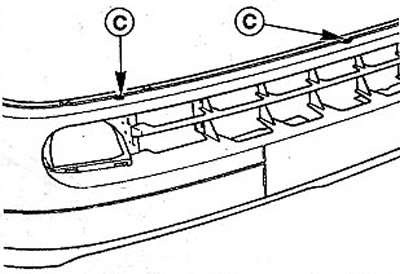
2.15 Centering the spoiler on the bumper is done with pins C
16.Drill holes at the mounting location of clamps A with a 4 mm drill (see illustration 2.14).
17. Fasten the spoiler with rivets 4 mm in diameter and 20 mm long using rivet pliers.
Installation
18. Cars with headlight washer. Drill three holes in the bumper to install the jets if a new bumper is being installed (see illustration) and install the old jets.
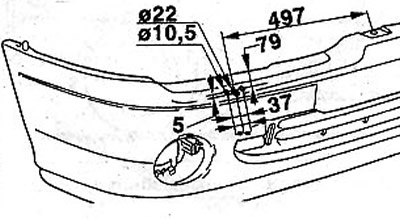
2.18 Drill three holes in the bumper to install the jets if a new bumper is being installed. Dimensions are in mm
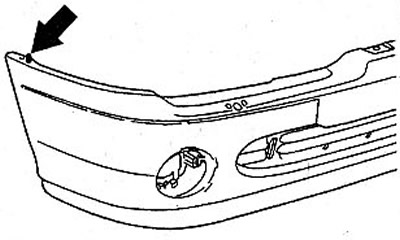
19. Install the bumper in place, working together with an assistant. The top of the bumper must lie in the guides 1 (see illustration).
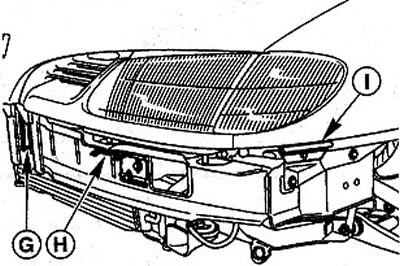
2.19 The top of the bumper must lie in the guides 1
20. Insert the centering pins into the holder G. The tabs H must lock into place (see illustration 2.19).
21. Insert the bumper side centering pin and fasten the bumper with bolts in the center, from the sides, and also screw in the bolts for securing the front of the engine mudguard.
22. Connect and fix the plug of antifog lamps.
23. Attach the front bumper to the fender liner.
24. Establish forward wheels according to the marks put at removal.
25. Screw in wheel bolts and lower the car. Do not grease wheel bolts.
26. Tighten the wheel bolts in a cross pattern to 90 Nm.
27. Connect the wire terminal to the battery pole «masses» (-).
28. Set the clock and enter the security code into the radio.