
Removing
1. Remove fairing.
2. Remove forward indexes of turn, and also lateral repeaters, the corresponding chapter see.
3. Remove the front bumper.
4. Remove the fender liner by unscrewing the mounting bolts with a T20 screwdriver and pulling out the retainers with a wide screwdriver (see illustration 7.5).
5. Unscrew a nut And fastenings of the hinge of a cowl (see illustration). On the left side of the vehicle, remove the plastic cover 1 before unscrewing the nut.
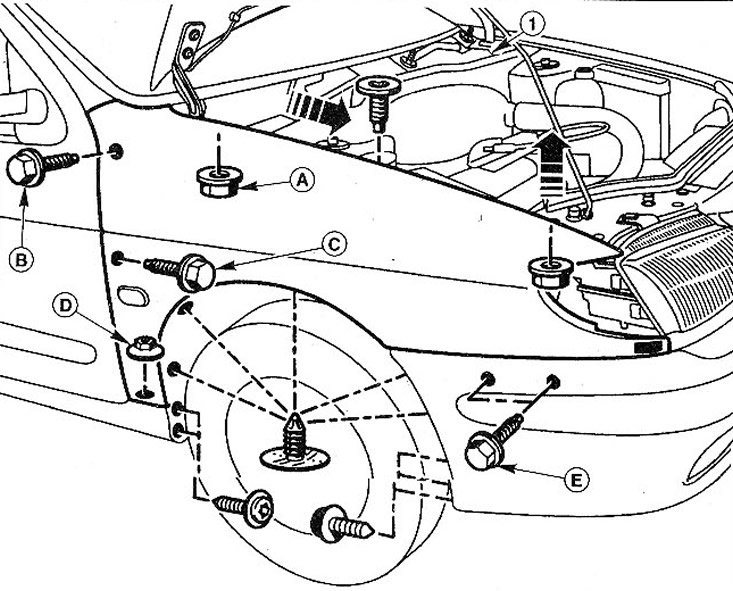
7.5 Unscrew the nut A fastening the hood hinge
6. Disconnect the grille from the fender.
7. Unscrew bolts of fastening of a wing. Nut D and bolt C are unscrewed from the inside. Open the door and unscrew bolt B and then bolts E (see illustration 7.5).
8. Remove the fender. Sealing mass (mastic) cut with a knife or heat with a hair dryer.
9. Remove the sealing mass from the body with a scraper. Be careful not to damage the paintwork.
Installation
10. Paint the new fender in areas that will not be accessible after installation.
11. Clean the wing fittings and align them if necessary.
12. Lay a sealing tape or a sealing mass that has hardened at normal temperature at the place where the wing fits to the front pillar.
13. Put the wing, fit it and fix it with bolts. Make sure that the gaps between fender, hood and front door are parallel.
14. Apply underbody protection to the inside of the wing and paint the outside.
15. Fasten the hinge of a cowl. Close the left hinge with a plastic cover.
16. Fit the hood.
17. Attach the grille to the fender.
18. Install the bumper and fender liner.
19. Replace the front direction indicators, as well as side repeaters.
20. Install fairing.
SCENIC cars
The fenders of SCENIC vehicles are generally dismantled in the same way as above. However, the wings of SCENIC are made of plastic (thermoplastic) and they are partially glued to the A-pillar. We recommend having the removal and installation of the wing removed and installed by a workshop. Some differences when removing the wing from SCENIC:
21. Remove a lateral rear-view mirror, the corresponding chapter see.
22. Unscrew nut A and bolt B (see illustration).
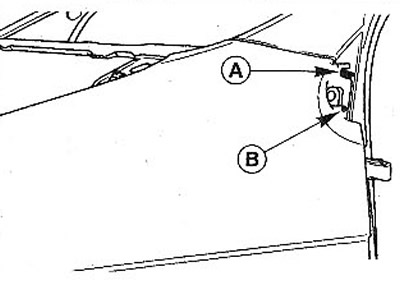
7.22 Unscrew nut A and bolt B
When detaching the wing, remember that its top is sealed with sealant to the A-pillar. The wing itself is made of thermoplastic and should therefore be handled with care.