
English Русский
Български
Беларускі
Український
Српски
Hrvatski
Română
Polski
Slovenský
Magyar
Bookmark Contacts Articles Sitemap
Company vehicles Peugeot Company vehicles Opel Company vehicles Skoda Company vehicles Land Rover Company vehicles Mitsubishi Company vehicles Volkswagen Company vehicles Honda
RenaultBook.ru


Duster   Fluence   Kangoo   Laguna   Logan   Megane   Sandero   Scenic   Symbol   Clio   Other
Laguna 2 (2001-2007)

Removal actuators (Renault Laguna 2)

  • Main
  • Laguna
  • Laguna 2 (2001-2007)
  • Electrical equipment
  • Headlights and lighting
  • Removal actuators
0
Contents: Removal 🠛 Installation 🠛

Removal


Remove the decorative cover and move the power steering reservoir aside (if necessary).

Disconnect the actuator connector.
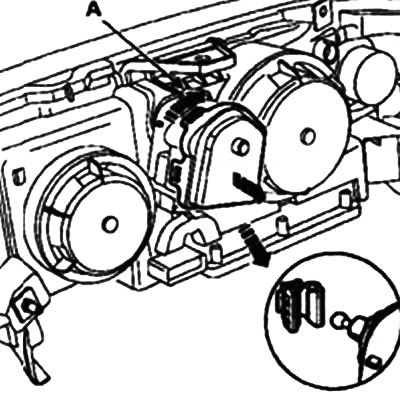
Disconnect the actuator connector.


Tighten the adjusting screw A (no more than six turns).

Rotate the actuator one eighth of a turn toward the outer edge to release it from the headlight assembly.

By gently rocking the drive, disconnect the ball joint from the parabolic reflector.

Note: It is not necessary to remove the headlight to remove the actuator.


Installation


When installing a new actuator, tighten its adjusting screw six turns.

To facilitate removal of the actuator, remove the sealed housing and hold the headlight reflector.

Loosen the adjusting screw (for six turns).
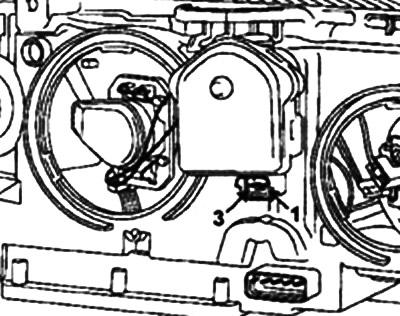
Loosen the adjusting screw (for six turns).


Attention! After removing the actuators, it is necessary to initialize the system and adjust the headlights.


Connection:
  • 1. Mass
  • 2. Adjusting the low beam headlights
  • 3. Nutrition

Note: Headlights equipped with xenon lamps are equipped with special actuators.


Note: If the low beam is on when the ignition is turned on; then the actuators are first set to the lower position and then returned to the intermediate position.


Original publication on the portal (RENAULTBOOK)
This article is available on: russian, bulgarian, belarusian, ukrainian, serbian, croatian, romanian, polish, slovak, hungarian
Article has been reviewed by editor: Podkrepilov Maxim
Share with friends:
Previous
Laguna 2: Headlights and lighting
Next

Removal and installation of xenon headlights
Removal and installation the front sensor and ECU
Removal the rear height sensor
Xenon headlights — design description
Fog lights — removal and installation
Removal the xenon lamp
Electronic control unit
Initializing the system and adjusting the headlights
Rear lights (hatchback)
Removal the lights on the trunk lid
Link to this article in different formats
Reviews and comments of visitors
No comments yet


Add two numbers 16 + 26


Laguna 2 (2001-2007) 
  • General information
  • User manual
  • Maintenance
  • Power unit
  • Engine repair
  • Cooling system
  • Fuel system
  • Fuel injection (petrol)
  • Power system (petrol)
  • Fuel injection (diesel)
  • Fuel system (diesel)
  • Exhaust system
  • Transmission
  • Clutch
  • Mechanical gearbox
  • Automatic gearbox
  • Drive shafts
  • Chassis, running gear
  • Wheels and tires
  • Car suspension
  • Steering
  • Brake system
  • Body and interior
  • Exterior (external elements)
  • Doors, locks and windows
  • Electrical equipment
  • Power devices
  • Equipment and devices
  • Headlights and lighting
  • Breakers and switches
  • Safety system
  • Electrical circuits
RenaultBook.ru © 2018–2026 | Mobile version | News and articles | Sitemap: EN BG BY UA RS HR RO PL SK HU | Administration | Site search | Bookmark
Duster 1 (2009-2017) | Fluence 1 (2009-2020, petrol) | Kangoo 1 (1997-2007) | Laguna 2 (2001-2007) | Logan 1 (2004-2012, petrol) | Logan 2 (2012-2020) | Megane 1 (1995-2002) | Megan 2 (2002-2009, petrol) | Sandero 1 (2007-2012, petrol) | Scenic 1 (1996-2003) | Symbol 1 (1999-2008, petrol) | Symbol 2 (2008-2013, petrol) | Renault 19 (1988-1996) | Espace I and II (1984-1996) | Espace III (1996-2002) | Clio 1 (1990-1998) |
We want your visit to be comfortable 😌 and use cookies 🍪 to do so.