



Contents: Removal 🠛 Installation 🠛
Despite the fact that the exhaust system is one piece (except for cars with a 1.4-/1.6-liter petrol engine (K4J/K4M), the mufflers and catalytic converter can be changed separately by cutting the connecting pipe at the designated place (see illustrations 1.0a, 1.0b, 1.0c).
To cut the pipe, you can use a regular pipe cutter, for example, HAZET 4682 (see illustration 6.0).
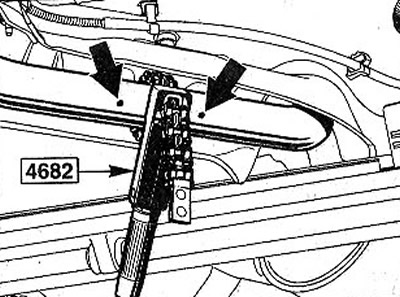
6.0 Cut the pipe with the HAZET 4682 pipe cutter
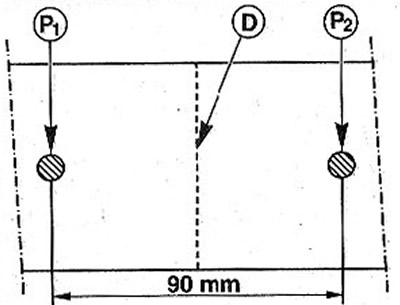
6.0a To do this, draw a line, maintaining the same distance D from notches P1 and P2
Removal
1. Place the vehicle on jack stands.
2. Cut the connecting pipe at the specially marked places. There are two places for dividing the pipe. They are located between the catalytic converter and the additional muffler and between the additional and main mufflers. These places are marked with notches. The pipe cutter chain should be placed exactly in the center between these notches (see illustration 6.0). To do this, draw a line, maintaining the same distance D from notches P1 and P2 (see illustration 6.0a). The distance between the notches is 90 mm.
3. Place the pipe cutter chain around the pipe and tighten it. Use a rotating motion to cut the pipe, tightening the chain. Do not squeeze the pipe too much, so as not to deform it.
4. Remove the muffler from the rubber suspension mounts.
Installation
5. Secure the muffler to the rubber suspension mounts.
To connect the muffler pipes, a clamp is used, which is purchased as a spare part.
Attention! Re-use of previously installed clamps is not allowed. It is mandatory to install a new clamp. Due to the fact that the diameter of the pipes in different models is different, this point should also be taken into account when purchasing a clamp.
6. Apply sealant to the inner side of the clamp before installing it to avoid leaks in the exhaust system. It is recommended to use sealant RENAULT-ET No.77 01 4421 161.
7. Place the clamp first on the end of the remaining old pipe, and then on the pipe of the new muffler. The ends of both pipes should fit against the pins on the inside of the clamp (see arrows in the illustration).
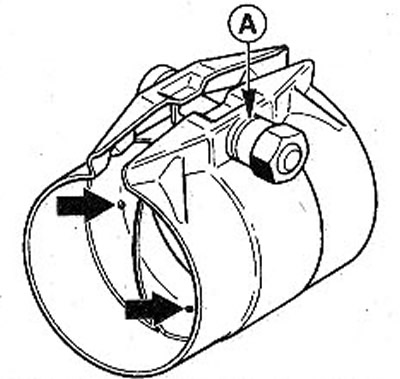
6.7 The ends of both pipes must fit against the pins on the inside of the clamp (see arrows)
Material taken from an online portal: www.RENAULTBOOK.ru
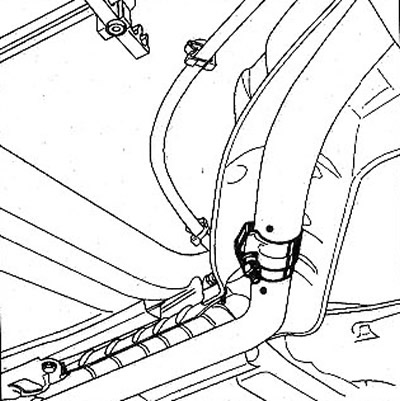
6.7a Turn the clamp so that the bolt and nut of the clamp are positioned vertically
Attention! Turn the clamp so that the bolt and nut of the clamp are positioned vertically (see illustration). Otherwise, it is possible that during movement the pipe and clamp will touch the bottom and cause a knocking sound.
8. Tighten the clamp nut until a distinct click is heard. This means that the required tightening torque of 25 Nm has been reached. The click is caused by the rupture of the gasket A (see illustration 6.7).
9. Make sure that the exhaust pipes are located at a sufficient distance from the bottom and other parts. The minimum distance should be 25 mm. The pipes should not touch the bottom. Straighten them if necessary.
10. Start the engine and check the exhaust system for leaks.