
English Русский
Български
Беларускі
Український
Српски
Hrvatski
Română
Polski
Slovenský
Magyar
Bookmark Contacts Articles Sitemap
Company vehicles Peugeot Company vehicles Opel Company vehicles Skoda Company vehicles Land Rover Company vehicles Mitsubishi Company vehicles Volkswagen Company vehicles Honda
RenaultBook.ru


Duster   Fluence   Kangoo   Laguna   Logan   Megane   Sandero   Scenic   Symbol   Clio   Other
Scenic 1 (1996-2003)

Lambda probe — removal and installation (Renault Scenic 1)

  • Main
  • Scenic
  • Scenic 1 (1996-2003)
  • Power unit
  • Exhaust system
  • Lambda probe — removal and installation
0
Contents: Removal 🠛 Installation 🠛
The lambda probe is designed to regulate harmful impurities in the CO of gasoline engines. It is installed in the exhaust pipe before the catalytic converter or on the exhaust manifold. The procedure for removing and installing the lambda probe is shown using the example of gasoline engines E7J, K7M, F3R and F7R.

Attention! The lambda probe connecting wire must not be connected if it is broken or soldered. If the wire is damaged, it must be replaced.


Removal


1. Place the vehicle on jack stands.

2. Disconnect plug 2 (see illustration).
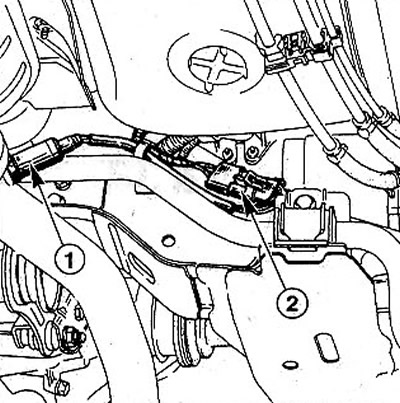
8.2 Disconnect plug 2

8.2 Disconnect plug 2


3. Unscrew the lambda probe 1 from the inlet pipe.

[Text provided by an online resource: renaultbook.ru]

Installation


Attention! When replacing the lambda probe, it is necessary to install the same model.


4. Clean the lambda probe threads.

5. Lubricate the threads of the lambda probe with BOSCH grease for oxygen sensors. New sensors are supplied with grease on the threads.

Attention! Apply the lubricant only to the thread and do not let it get into the groove on the sensor body or into its holes. If possible, do not touch the sensor body with your hands to avoid contaminating it.


Attention! If the lambda probe is installed without thread lubrication, over time the thread will jam and fuse at the seat. Subsequently, it will be impossible to unscrew the sensor.


6. Screw in the lambda probe and tighten it to 40 Nm.

7. Connect the plug with the lambda probe power wire.
This article is available on: russian, bulgarian, belarusian, ukrainian, serbian, croatian, romanian, polish, slovak, hungarian
Article has been reviewed by editor: Fedoseev Denis
Share with friends:
Previous
Scenic 1: Exhaust system
 

Catalyst — removal and installation
Mufflers — removal and replacement
Exhaust system — removal and installation
Exhaust system — leak test
Servicing cars with a catalytic converter
 
Link to this article in different formats
Reviews and comments of visitors
No comments yet


Add two numbers 24 + 17


Scenic 1 (1996-2003) 
  • General information
  • User manual
  • Maintenance
  • Troubleshooting
  • Power unit
  • Engine repair
  • Cooling and ventilation
  • Injection system (petrol)
  • Fuel system (diesel)
  • Fuel system
  • Exhaust system
  • Ignition system
  • Transmission
  • Clutch
  • Car gearbox
  • Chassis, running gear
  • Brake system
  • Car suspension
  • Steering
  • Body and interior
  • Exterior (external elements)
  • Interior (internal elements)
  • Doors, locks and windows
  • Electrical equipment
  • Equipment and devices
  • Headlights and lighting
  • Power devices
  • Electrical circuits
RenaultBook.ru © 2018–2026 | Mobile version | News and articles | Sitemap: EN BG BY UA RS HR RO PL SK HU | Administration | Site search | Bookmark
Duster 1 (2009-2017) | Fluence 1 (2009-2020, petrol) | Kangoo 1 (1997-2007) | Laguna 2 (2001-2007) | Logan 1 (2004-2012, petrol) | Logan 2 (2012-2020) | Megane 1 (1995-2002) | Megan 2 (2002-2009, petrol) | Sandero 1 (2007-2012, petrol) | Scenic 1 (1996-2003) | Symbol 1 (1999-2008, petrol) | Symbol 2 (2008-2013, petrol) | Renault 19 (1988-1996) | Espace I and II (1984-1996) | Espace III (1996-2002) | Clio 1 (1990-1998) |
We want your visit to be comfortable 😌 and use cookies 🍪 to do so.