
SCENIC vehicles with a 1.4-/1.6-litre petrol engine.
Removing
Attention! Removal requires a special tool RENAULT Tav. 1233-01 for lowering the base frame. 1 Disconnect the ground wire terminal (-) from the battery.
Attention! At the same time, some data is deleted from the memory of storage devices, for example, an access code is erased from the radio receiver, which prevents unauthorized use of the receiver. Before disconnecting the battery, read the instructions in chapter «Removing and installing the battery».
2. Place the vehicle on jack stands.
3. Lock the steering wheel. To do this, you can use a mechanical clamp, used as an anti-theft tool, or secure the steering wheel on both sides with straps.
4. Remove the air filter.
5. Unscrew bolts of fastening of a connecting flange of the catalyst on a final collector, operating from a motor compartment.
6. Bolt instead of the carrier frame mounting bolts 1 special tool Tav. 1233-01. Fasten at points A and B (see illustration). In this case, first unscrew one frame fastening bolt and screw in the tool fastening bolt, and then unscrew and screw in the second.
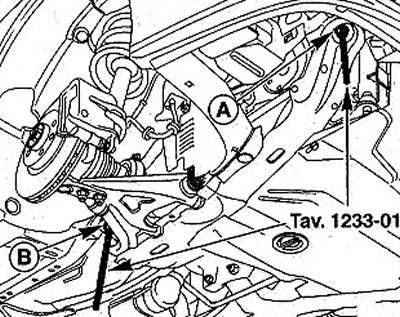
7.6 Bolt instead of the base frame fixing bolts 1 special tool Tav. 1233-01
7. Unscrew the clamping bolt 1 of the cross 2 on the steering column by unscrewing the nut (see illustration).
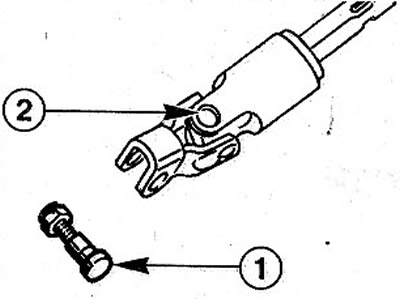
7.7 Unscrew the clamping bolt 1 of the crosspiece 2 on the steering column by unscrewing the nut
8. Remove a support rack of the stabilizer, dm. corresponding chapter.
9. Disconnect, if a second lambda probe is installed behind the catalyst, the probe power wire.
10. Lower carrier frame 1 by 20 mm first at point A by turning the nut (see illustration 7.6). After that, in the same way, lower the frame by 40 mm at point B.
11. Remove a fixing collar between the catalyst and the additional muffler.
12. Unscrew the bolts securing the catalyst to the flange on the exhaust manifold and remove the catalyst.
Installation
Before installing the catalyst, inspect all heat shields. If they are damaged, then remove the shields and replace them with new ones.
13. Put the catalyst in place on the exhaust manifold, replacing the old gasket with a new one. Tighten the catalyst mounting bolts by hand.
14. Put a new fixing collar between the catalyst and the additional muffler. Tighten the clamp nut by hand.
15. Straighten, if necessary, the exhaust pipes so that they stand without tension.
16. Tighten the clamp nut.
17. Tighten the nuts of the connecting flange bolts on the exhaust manifold with a force of 20 Nm.
18. Connect, if necessary, the power wire of the second lambda probe.
19. Replace the stabilizer support, see the relevant chapter.
20. Connect the steering column to the steering gear by reinstalling the cross clamp bolt. Bolt nut tightening torque 30 Nm.
21. Raise the base frame by turning the special tool nuts. After that, first unscrew the rear bolt of the special tool and screw in the bolt of the frame, and then the front.
Frame bolt tightening torques:
- Bolt M12 (rear) = 105 Nm
- Bolt M10 (front) = 62 Nm
22. Remove the device that fixed the steering wheel.
23. Lower the car on wheels.
24. Connect wire terminal «masses» (-) to the negative pole of the battery.
25. If necessary, enter the security code into the radio and set the clock.