
English Русский
Български
Беларускі
Український
Српски
Hrvatski
Română
Polski
Slovenský
Magyar
Bookmark Contacts Articles Sitemap
Company vehicles Peugeot Company vehicles Opel Company vehicles Skoda Company vehicles Land Rover Company vehicles Mitsubishi Company vehicles Volkswagen Company vehicles Honda
RenaultBook.ru


Duster   Fluence   Kangoo   Laguna   Logan   Megane   Sandero   Scenic   Symbol   Clio   Other
Scenic 1 (1996-2003)

Exhaust system — removal and installation (Renault Scenic 1)

  • Main
  • Scenic
  • Scenic 1 (1996-2003)
  • Power unit
  • Exhaust system
  • Exhaust system — removal and installation
0
Contents: Removal 🠛 Installation 🠛

Removal


Attention! All exhaust system parts can be replaced separately.


Attention! When installing the exhaust system parts in place, ensure that they are tightly joined. Otherwise, deviations from the norm will inevitably occur when checking the CO content.


Seals and nuts must be replaced with new ones. Check rubber cushions and rings of the exhaust pipe suspension for porosity and damage. Replace them if necessary.

Caution! The catalytic converter is fragile, so handle it with care, do not allow it to fall or hit it.


1. Place the vehicle on jack stands.

2. Treat all exhaust system mounting bolts and nuts with rust remover and let it work.

3. Remove the oxygen sensor

4. Cars with a 1.4-/1.6-liter gasoline engine (K4J/K4M). Remove the air filter.

5. Disconnect the inlet pipe at the joint near the catalytic converter (see illustration) or from the exhaust manifold.
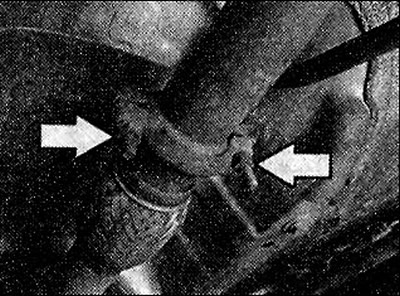
5.5 Disconnect the inlet pipe at the joint near the catalytic converter (see arrows). The…

5.5 Disconnect the inlet pipe at the joint near the catalytic converter (see arrows). The illustration shows the exhaust system of a car with a gasoline engine


6. Cars with a 1.4-/1.6-liter gasoline engine (K7J/K7M). Disconnect the catalytic converter from the exhaust manifold.


7. Cars with a 1.4-/1.6-liter gasoline engine (K4J/K4M). Unscrew the three nuts securing the inlet pipe and catalytic converter from the exhaust manifold, acting from the engine compartment.

8. Release the exhaust pipes from the rubber holders of the suspension. To make it easier to remove the main muffler, unscrew the holder A (see illustration).
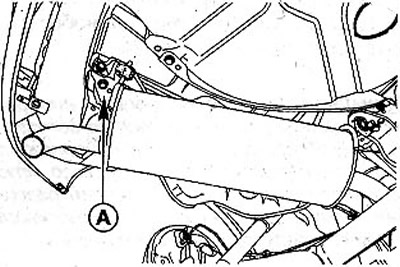
5.8 Unscrew the holder A to make it easier to remove the main muffler

5.8 Unscrew the holder A to make it easier to remove the main muffler


Installation


Before installing the exhaust system, make sure that the flange at the junction of the inlet pipe and the exhaust manifold is not dirty or deformed. If necessary, straighten the connecting flange and clean it with a wire brush.

Attention! To ensure that the exhaust pipe mounting nuts and bolts can be unscrewed without any problems later, it is recommended to lubricate them with a protective paste that is resistant to high temperatures, such as Liqui Moly LM-5O8-ASC.


9. Secure the exhaust pipe to the suspension mounts.

10. Screw on the muffler holder.

11. Secure the inlet pipe to the joint in front of the catalytic converter or to the exhaust manifold, installing a new sealing ring.


12. Correctly straighten the exhaust system. Ensure that there is no tension. At the same time, it is necessary to ensure sufficient distance of the exhaust system elements from the body (not less than 25 mm). The load on the rubber supports must be distributed evenly.

13. Install the lambda probe.

14. Cars with 1.4-/1.6-liter petrol engine (K4J/K4M): Install the air filter.

15. Start the engine and check the exhaust system for leaks.

The original can be found on the website: RENAULTBOOK
This article is available on: russian, bulgarian, belarusian, ukrainian, serbian, croatian, romanian, polish, slovak, hungarian
Article has been reviewed by editor: Fedoseev Denis
Share with friends:
Previous
Scenic 1: Exhaust system
Next

Exhaust system — leak test
Servicing cars with a catalytic converter
Operating principle of the catalyst
General description of the exhaust system
Mufflers — removal and replacement
Catalyst — removal and installation
Lambda probe — removal and installation
Other articles on other Renault models

➽ Location of components of the exhaust gas recirculation system… Renault Duster 1 (2009-2017)
➽ Exhaust gas system Renault Fluence 1 (2009-2020, petrol)
➽ Exhaust gas system Renault Kangoo 1 (1997-2007)
➽ Intake and exhaust system — general information Renault Laguna 2 (2001-2007)
➽ Checking the exhaust system Renault Logan 1 (2004-2012, petrol)
Link to this article in different formats
Reviews and comments of visitors
No comments yet


Add two numbers 42 + 22


Scenic 1 (1996-2003) 
  • General information
  • User manual
  • Maintenance
  • Troubleshooting
  • Power unit
  • Engine repair
  • Cooling and ventilation
  • Injection system (petrol)
  • Fuel system (diesel)
  • Fuel system
  • Exhaust system
  • Ignition system
  • Transmission
  • Clutch
  • Car gearbox
  • Chassis, running gear
  • Brake system
  • Car suspension
  • Steering
  • Body and interior
  • Exterior (external elements)
  • Interior (internal elements)
  • Doors, locks and windows
  • Electrical equipment
  • Equipment and devices
  • Headlights and lighting
  • Power devices
  • Electrical circuits
RenaultBook.ru © 2018–2026 | Mobile version | News and articles | Sitemap: EN BG BY UA RS HR RO PL SK HU | Administration | Site search | Bookmark
Duster 1 (2009-2017) | Fluence 1 (2009-2020, petrol) | Kangoo 1 (1997-2007) | Laguna 2 (2001-2007) | Logan 1 (2004-2012, petrol) | Logan 2 (2012-2020) | Megane 1 (1995-2002) | Megan 2 (2002-2009, petrol) | Sandero 1 (2007-2012, petrol) | Scenic 1 (1996-2003) | Symbol 1 (1999-2008, petrol) | Symbol 2 (2008-2013, petrol) | Renault 19 (1988-1996) | Espace I and II (1984-1996) | Espace III (1996-2002) | Clio 1 (1990-1998) |
We want your visit to be comfortable 😌 and use cookies 🍪 to do so.