
Vehicles with a 64/90n.c. diesel engine. (F8Q)
Faulty injectors can cause severe knocking in the engine, which is usually a sign of defective bearings. With such malfunctions, start the engine at idle and loosen the union nuts of the high pressure fuel lines in order. If after loosening the next nut, the knock disappears, then this is evidence of a malfunction of the nozzle.
A faulty injector is also found by loosening the union nuts of the high pressure fuel lines in order, leaving the engine to run at high idle. If, after loosening the next nut, the speed remains unchanged, then this indicates a defective nozzle. The injector can be checked with a pressure gauge (In workshop). The nozzle injection pressure rating is 125-138 bar.
The first signs of injector problems are:
- A) misfiring;
- b) knocking in one or more cylinders;
- V) engine overheating;
- G) drop in engine power;
- d) too much black smoke from the exhaust pipe;
- e) high fuel consumption.
Removing
1. Clean the high pressure fuel lines from the outside with a cold cleaner or diesel fuel.
2. Remove the high pressure fuel lines. To do this, using a wrench, for example, IIAZET 4550, loosen the union nuts for fastening the pipelines on the injection pump and on the valve injectors. Attention! Do not change the shape of the bends in the fuel lines.
3. Unscrew the nozzles using a 27 mm long socket, e.g. HAZET 4555-1 (see illustration).
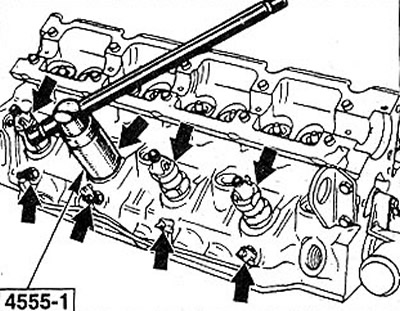
7.3 Unscrew the nozzles using a 27 mm socket extension, e.g. HAZET 4555-1
4. Turbocharged cars. On the injector of cylinder 4 there is an injector needle stroke sensor to which a wire is connected. Therefore, before unscrewing this nozzle, disconnect the sensor wire or use a socket with a slot for the wire.
Each nozzle has a heat shield.
5. Remove the heat shield from the hole in the cylinder head.
Attention! When installing valve injectors, the heat-shielding gaskets must be replaced with new ones.
6. Clamp the nozzle in a soft metal vise and disassemble it (see illustration).
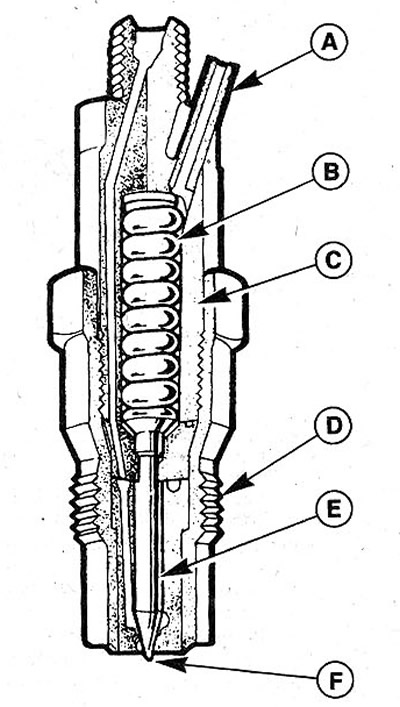
7.6 Nozzle components: A - fuel return channel; B - spring; C - nozzle body; D - base; E - nozzle spray; F - spray tip
7. Check the atomizer and condition of the atomizer seat. Use a wooden spatula to clean the spray gun from carbon deposits. The atomizer must, under its own weight, enter the nozzle hole and move freely in it.
Attention! Do not clean the nozzle or sprayer with wire, file or sandpaper. Do not confuse injector parts with each other. In the workshop, you can adjust the injection pressure of the nozzle by selecting and installing washers of different thicknesses.
8. Reassemble the nozzle. The tightening torque for the upper and lower parts of the injector is 70 Nm.
Installation
In the cylinder head, in the hole for the injector, there is a flameproof sleeve 1 with a sealing ring 3, as well as a heat-shielding gasket 2. Heat-shielding gaskets and sealing rings between the block head and the fuel injector should be replaced with new ones before installing the injectors (see illustration 7.9).
9. Lay a new heat shield 2 in the hole for the nozzle with the groove facing up (see illustration).
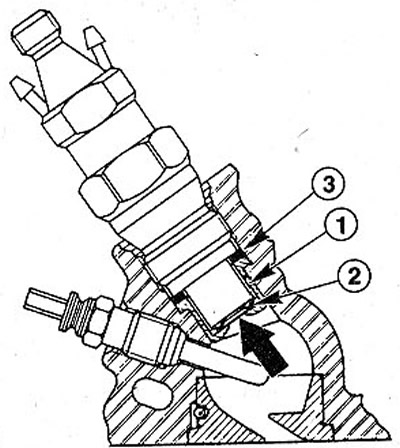
7.9 Lay a new heat shield 2 in the hole for the injector with the recess upwards
10. Tighten the nozzles with a force of 70 Nm.
11. Connect the high pressure fuel lines to the injectors and tighten the union nuts to 25 Nm.
Vehicles with 98 hp. F9Q engine
12. Disconnect the high pressure fuel lines and the injector mounting flange from the injectors. Torque for injector holder 27 Nm.
After removing the injectors, replace them with new gaskets between the injector and the cylinder head.
The fuel injector for this type of engine is double-spring. This means that two levels of pressure are created during fuel injection (see illustration).
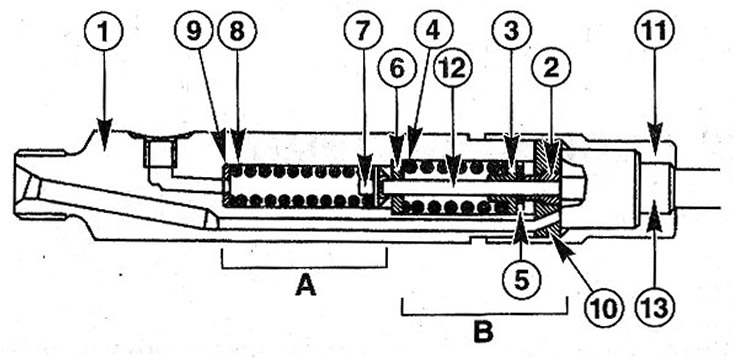
7.12 Fuel injector for F9Q engine: 1- nozzle holder; 2 - thrust bushing; 3 - spring support cup; 4 - spring of the second level of pressure; 5 - adjusting washer of the second level of pressure; 6 - guide gasket; 7 - thrust washer; 8 - spring of the first pressure level; 9 - adjusting washer of the first pressure level; 10 - intermediate gasket; 11 - lower case (Part) nozzles; 12 - pusher; 13 - atomizer; A - 1st level of pressure; B - 2nd pressure level
Nozzle adjustment is not possible. You can only check the pressure of the 1st level, which should be 200±2 bar. If this pressure is not reached, the nozzle must be replaced.
After replacing one of the injectors on the cylinder head, the return hose bar must also be changed.