
Checking the electrolyte level
1. Use a screwdriver to remove the bar covering the openings of the cells and check the electrolyte level in them. With some batteries, the electrolyte level can be checked through the transparent case without opening the cells.
The electrolyte in the cells should cover the lead plates with a layer of about 1.5 cm. If the top of the plates is not closed, then it is necessary to add distilled water.
Voltage test
The battery voltage is measured using a voltmeter connected to the battery poles..
2. Disconnect the battery. The battery must be disconnected from the on-board network at least two hours before the test.
3. Connect a voltmeter to the battery terminals and check the voltage (see illustration).
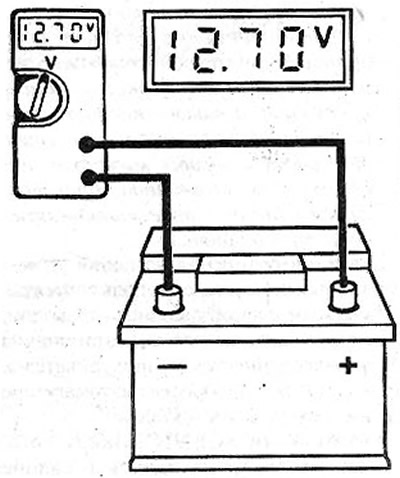
14.2 Connect a voltmeter to the battery terminals and check the voltage
Evaluation of the received testimony:
- 12.7V or higher - battery condition is good.
- 12.5 V - battery is normal.
- 12.3 V or below - battery condition is poor. Charge or replace the battery.
4. Connect the battery.
Battery test under load
5. Attach a voltmeter to the battery poles.
6. Start the engine and read the voltmeter. When starting the engine, the battery voltage should not fall below 10 volts (at an electrolyte temperature of about +20° (WITH).
If the battery voltage immediately drops, and the cells have different electrolyte densities, then a battery malfunction can be assumed.
Electrolyte Density Check
The degree of electrolyte density in combination with battery voltage data allows us to draw a conclusion about its condition.
The density of the battery in combination with its voltage allows you to make an accurate conclusion about the degree of charge.
To check, you need a densimeter, which can be purchased in specialized stores (see illustration 14.0). The greater the specific gravity (electrolyte density), the higher the densimeter float floats. On the densimeter scale, the density of the electrolyte can be determined in specific gravity in g / ml or in degrees Baume (+°Be). When measuring, the following values should be obtained:
| Battery charge level | +°Be | g/ml |
| Discharged | 16 | 1,15 |
| half empty | 24 | 1,22 |
| well charged | 30 | 1,26 |
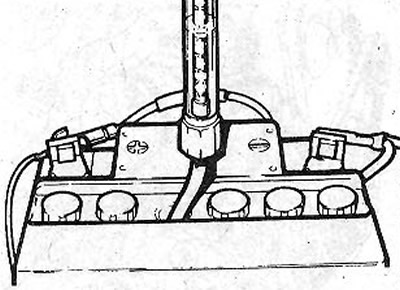
14.0 Checking the density of the electrolyte with a densimeter
7. Check all battery cells one by one. The electrolyte in them should have approximately the same density (maximum difference±0.04 g/ml). If the density of the electrolyte in the cells varies greatly, then a battery malfunction can be assumed.
Battery self-discharge
Depending on the vehicle configuration, the natural self-discharge of the battery is supplemented by current consumption by various control devices that continue to work even when the engine is turned off. Therefore, the battery of a car that has been used for a long time t ie must be recharged at least every 6 weeks. If there is a suspicion that there are leakage currents, then check the on-board electrical system as follows, using a charged battery:
8. Turn off all consumers of the on-board network, close the doors and the hood.
9. Set the ammeter with a range of 0-5 mA to 5 A to the upper range.
10. Disconnect the wire terminal from the battery «masses» (-).
Attention! At the same time, data is deleted from the memory of electronic units, and the security code is deleted from the radio receiver, as well as all automatic settings on the radio station. Therefore, before disconnecting the battery, read the chapter «Battery - removal and installation».
11. Connect the positive (+) ammeter lead to terminal «masses», taken from the negative pole of the battery, and the negative (-) ammeter output - to the negative pole of the battery (see illustration).
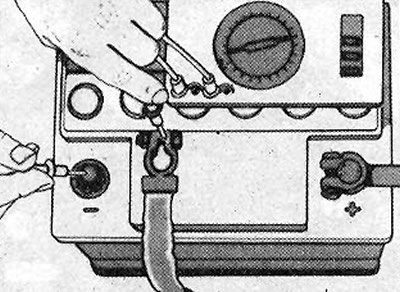
14.10 Connect the positive (+) ammeter lead to terminal «masses» (-), and the negative (-) ammeter output - to the negative pole of the battery
Attention! You can also check with a test light. But if the light bulb connected to the wire terminal «masses» (-) and the negative pole of the battery does not light up, then in any case you need to use an ammeter.
12. Switch the ammeter to smaller measuring ranges until the ammeter reading can be read (1-3mA are allowed).
13. Interrupt various electrical circuits by removing one fuse after another. If, when a circuit is disconnected, the ammeter readings drop to zero, the fault should be sought in this circuit. Its sources can be corroded or dirty contacts, frayed wires, internal short circuit in the circuit.
If no fault is found in fused circuits, disconnect wires from non-fused devices such as the ignition system, alternator and starter.
If, when disconnected from the terminals of any of the units that are not protected by fuses, the readings of the device drop to zero, then sort or replace the corresponding device. In case of current losses in the starter or in the ignition system, it is imperative to check the ignition switch according to the diagram.
14. Attach ground wire terminal (-) to the battery.
15. Set up the digital clock.
16. Enter the security code into the radio and tune it into radio stations.