
English Русский
Български
Беларускі
Український
Српски
Hrvatski
Română
Polski
Slovenský
Magyar
Bookmark Contacts Articles Sitemap
Company vehicles Peugeot Company vehicles Opel Company vehicles Skoda Company vehicles Land Rover Company vehicles Mitsubishi Company vehicles Volkswagen Company vehicles Honda
RenaultBook.ru


Duster   Fluence   Kangoo   Laguna   Logan   Megane   Sandero   Scenic   Symbol   Clio   Other
Scenic 1 (1996-2003)

Trunk lining — removal and installation (Renault Scenic 1)

  • Main
  • Scenic
  • Scenic 1 (1996-2003)
  • Body and interior
  • Interior (internal elements)
  • Trunk lining — removal and installation
0
Contents: Cars with a body "sedan", "coupe" 🠛 Cars SCENIC, Grandtour 🠛

Cars with a body "sedan", "coupe"


Removal


37. Lift the spare wheel tray cover.

38. Unscrew the three screws 1 securing the cover and release the cover from the clips by pushing it upwards (see arrows in the illustration).
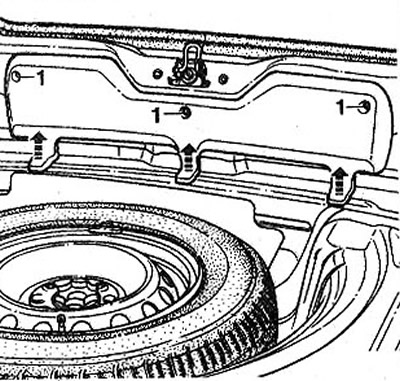
28.38 Unscrew the three screws 1 securing the cover and release the cover from the clips by pushing…

28.38 Unscrew the three screws 1 securing the cover and release the cover from the clips by pushing it upwards


Installation


39. Secure the cover to the clips and screw in the screws.

Cars SCENIC, Grandtour


Removal


40. Remove the screw caps at points A using a flat-head screwdriver (see illustration).
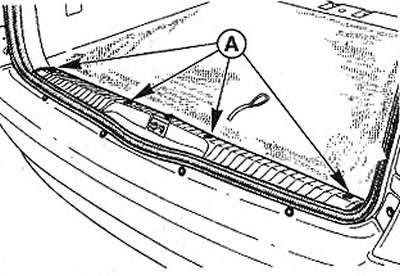
28.40 Remove the screw caps at points A using a flat-head screwdriver

28.40 Remove the screw caps at points A using a flat-head screwdriver


41. Unscrew the four screws with a T20 screwdriver and remove the cover (see illustration 28.40).


Installation


42. Put the cover back in place, screw in the screws and install the plugs.
This article is available on: russian, bulgarian, belarusian, ukrainian, serbian, croatian, romanian, polish, slovak, hungarian
Article has been reviewed by editor: Fedoseev Denis
Share with friends:
Previous
Scenic 1: Interior (internal elements)
Next

Rear trim of the coupe body
Rear trim of the sedan body
Door sill trim — removal and installation
Front Pillar Trim/Cover — Removal and Installation
Glove box lid — removal and installation
Center console — removal and installation
Seat belt tensioner
Front seat — removal and installation
Rear seat — removal and installation
Other articles on other Renault models

➽ Injector housing lining Renault Duster 1 (2009-2017)
➽ Tailgate and trunk lid Renault Fluence 1 (2009-2020, petrol)
➽ Replacing the trunk light bulb Renault Laguna 2 (2001-2007)
➽ Door and trunk locks Renault Logan 1 (2004-2012, petrol)
➽ Removal and installation the trunk lid Renault Megane 1 (1995-2002)
Link to this article in different formats
Reviews and comments of visitors
No comments yet


Add two numbers 33 + 20


Scenic 1 (1996-2003) 
  • General information
  • User manual
  • Maintenance
  • Troubleshooting
  • Power unit
  • Engine repair
  • Cooling and ventilation
  • Injection system (petrol)
  • Fuel system (diesel)
  • Fuel system
  • Exhaust system
  • Ignition system
  • Transmission
  • Clutch
  • Car gearbox
  • Chassis, running gear
  • Brake system
  • Car suspension
  • Steering
  • Body and interior
  • Exterior (external elements)
  • Interior (internal elements)
  • Doors, locks and windows
  • Electrical equipment
  • Equipment and devices
  • Headlights and lighting
  • Power devices
  • Electrical circuits
RenaultBook.ru © 2018–2026 | Mobile version | News and articles | Sitemap: EN BG BY UA RS HR RO PL SK HU | Administration | Site search | Bookmark
Duster 1 (2009-2017) | Fluence 1 (2009-2020, petrol) | Kangoo 1 (1997-2007) | Laguna 2 (2001-2007) | Logan 1 (2004-2012, petrol) | Logan 2 (2012-2020) | Megane 1 (1995-2002) | Megan 2 (2002-2009, petrol) | Sandero 1 (2007-2012, petrol) | Scenic 1 (1996-2003) | Symbol 1 (1999-2008, petrol) | Symbol 2 (2008-2013, petrol) | Renault 19 (1988-1996) | Espace I and II (1984-1996) | Espace III (1996-2002) | Clio 1 (1990-1998) |
We want your visit to be comfortable 😌 and use cookies 🍪 to do so.